使用Socialite包进行Laravel Google OAuth身份验证
在本节中,我们将学习关于Google OAuth身份验证的内容。我们将使用Laravel和socialite包来完成这个任务。社交网络正在遍布全球,很多人与之相连。因此,我们的网站需要实现社交身份验证,因为Twitter,Facebook,Github,Google等社交网络与许多开发者和用户相关联。在我们的应用程序中,我们将看到如何登录和注册一个Google帐户。使用Laravel,我们可以非常容易地注册我们的Google ID并登录到Google帐户。socialite包由Laravel 5提供,被用于社交身份验证。为了登录和退出,步骤如下:
步骤1:
在这一步中,我们将进行 socialite包的安装 。这个包用于提供与Google帐户建立连接的fb api。为了实现这一点,我们将使用命令提示符运行以下命令:
composer require laravel/socialite
当上述软件包安装成功后,我们将使用一个名为config file的文件,并将别名和提供者添加到其中。现在,我们将使用一个名为config/app.php的文件,并将别名和服务提供者添加到其中,如下所示:
'providers' => [
    ....
    Laravel\Socialite\SocialiteServiceProvider::class,
],
'aliases' => [
    ....
    'Socialite' => Laravel\Socialite\Facades\Socialite::class,
],
步骤2:
在这一步,我们将 创建Google应用程序 。为此,我们需要Google客户端和秘钥的ID。使用这些详细信息,我们可以获取其他用户的信息。如果我们没有,我们可以使用以下链接创建Google应用程序帐户:
https://console.cloud.google.com/projectselector2/apis/dashboard?supportedpurview=project
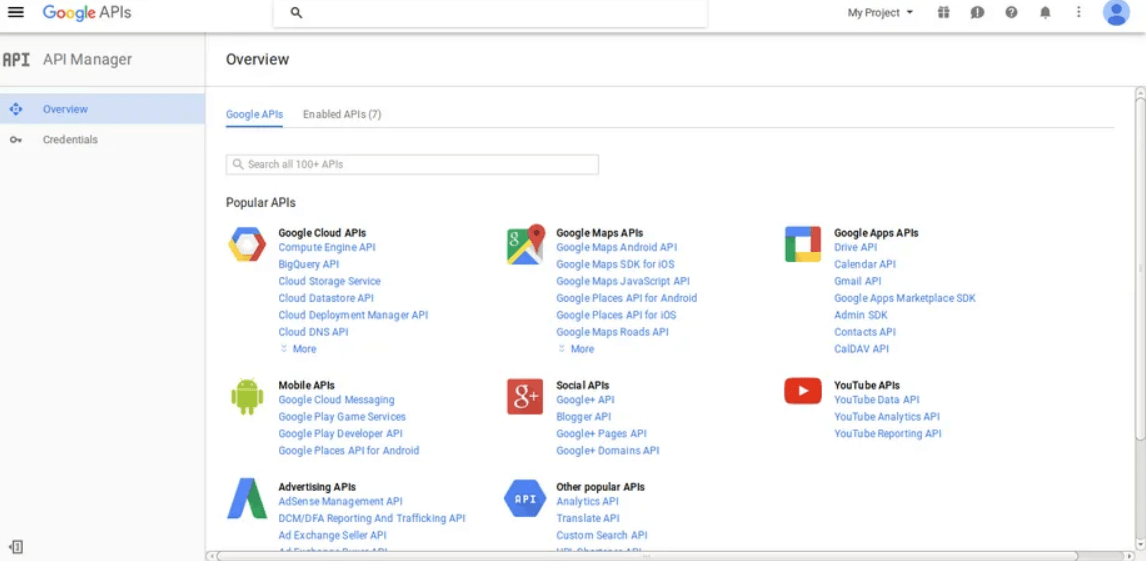
当我们点击这个链接时,我们将得到以下页面:

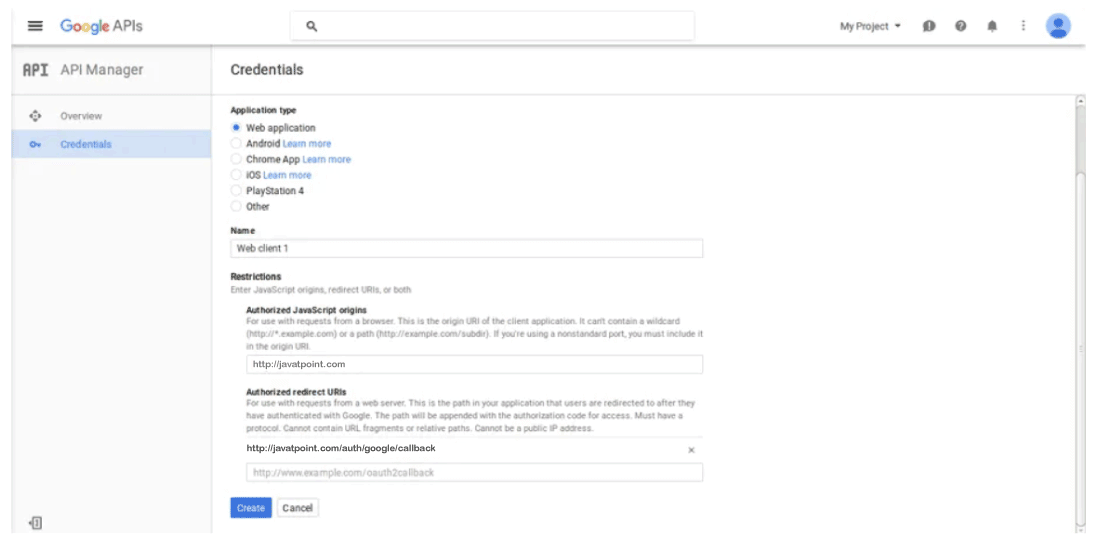
现在我们将点击Credentials。然后选择第一个选项OAuth。然后点击名为Create new Client ID的按钮。然后我们将看到以下页面:

当我们完成创建帐户的过程后,我们可以复制用户的id和secret。现在我们将使用配置文件设置应用程序的id,secret和回调URL。为此,我们将打开一个名为config/services.php的文件,然后设置id和secret的值如下:
config/services.php
return [
    ....
    'google' => [
        'client_id' => 'app id',
        'client_secret' => 'add secret',
        'redirect' => 'http://learnl52.hd/auth/google/callback',
    ],
]
步骤3:
在这一步中,我们要 创建Google登录账号 。现在我们需要通过在用户表中创建迁移来添加google_id。创建迁移的代码如下所示:
迁移
Schema::table('users', function (table) {table->string('google_id');
});
当我们成功添加google_id列时,我们首先需要通过添加新的路由来登录Google。 为此,我们将使用routes.php文件,并像这样将以下路由代码添加到其中:
app/Http/routes.php
Route::get('google', function () {
    return view('googleAuth');
});
Route::get('auth/google', 'Auth\AuthController@redirectToGoogle');
Route::get('auth/google/callback', 'Auth\AuthController@handleGoogleCallback');
当我们成功添加路由时,我们需要添加Google身份验证方法。使用这个方法,我们可以处理Google回调的URL等。我们将使用一个名为AuthController.php的文件,并将以下代码添加到其中,如下所示:
app/Http/Controllers/Auth/AuthController.php
namespace App\Http\Controllers\Auth;

use App\User;
use Validator;
use App\Http\Controllers\Controller;
use Illuminate\Foundation\Auth\ThrottlesLogins;
use Illuminate\Foundation\Auth\AuthenticatesAndRegistersUsers;
use Socialite;
use Auth;
use Exception;

class AuthController extends Controller
{

    use AuthenticatesAndRegistersUsers, ThrottlesLogins;

    protected redirectTo = '/';

    public function __construct()
    {this->middleware('guest', ['except' => 'logout']);
    }

    protected function validator(array data)
    {
        return Validator::make(data, [
            'name' => 'required|max:255',
            'email' => 'required|email|max:255|unique:users',
            'password' => 'required|confirmed|min:6',
        ]);
    }

    protected function create(array data)
    {
        return User::create([
            'name' =>data['name'],
            'email' => data['email'],
            'password' => bcrypt(data['password']),
        ]);
    }

    public function redirectToGoogle()
    {
        return Socialite::driver('google')->redirect();
    }

    public function handleGoogleCallback()
    {
        try {
            user = Socialite::driver('google')->user();userModel = new User;
            createdUser =userModel->addNew(user);
            Auth::loginUsingId(createdUser->id);
            return redirect()->route('home');
        } catch (Exception $e) {
            return redirect('auth/facebook');
        }
    }
}
在此之后,我们需要添加 blade 视图。为此,我们将创建一个名为 googleAuth.blade.php 的新文件,然后将以下代码添加到其中,如下所示:
resources/views/googleAuth.blade.php
@extends('layouts.app')
@section('content')
<style type="text/css">
.account-box
{
    border: 2px solid rgba(153, 153, 153, 0.75);
    border-radius: 2px;
    -moz-border-radius: 2px;
    -webkit-border-radius: 2px;
    -khtml-border-radius: 2px;
    -o-border-radius: 2px;
    z-index: 3;
    font-size: 13px !important;
    font-family: "Helvetica Neue" ,Helvetica,Arial,sans-serif;
    background-color: #ffffff;
    padding: 20px;
}
.logo
{
    background-position: 0 -4px;
    margin: -5px 0 17px 80px;
    position: relative;
    text-align: center;
    width: 138px;
}
.forgotLnk
{
    margin-top: 10px;
    display: block;
}
.or-box
{
    position: relative;
    border-top: 1px solid #dfdfdf;
    padding-top: 20px;
    margin-top:20px;
}
</style>
<div class="container">
    <div class="row">
        <div class="col-md-4 col-md-offset-4">
            <div class="account-box">
                <div class="logo ">
                    <img src="http://design.ubuntu.com/wp-content/uploads/ubuntu-logo32.png" width="80px" alt=""/>
                </div>
                <form class="form-signin" action="#">
                <div class="form-group">
                    <input type="text" class="form-control" placeholder="Email" required autofocus />
                </div>
                <div class="form-group">
                    <input type="password" class="form-control" placeholder="Password" required />
                </div>
                <button class="btn btn-lg btn-block btn-primary" type="submit">
                    Sign in</button>
                </form>
                <a class="forgotLnk" href="http://www.jquery2dotnet.com">I can't access my account</a>
                <div class="or-box">
                    <div class="row">
                        <div class="col-md-12 row-block">
                            <a href="{{ url('auth/google') }}" class="btn btn-lg btn-danger btn-block">
                                <strong>Login With Google</strong>
                            </a>
                        </div>
                    </div>
                </div>
                <div class="or-box row-block">
                    <div class="row">
                        <div class="col-md-12 row-block">
                            <a href="http://www.jquery2dotnet.com" class="btn btn-primary btn-block">Create New Account</a>
                        </div>
                    </div>
                </div>
            </div>
        </div>
    </div>
</div>
@endsection
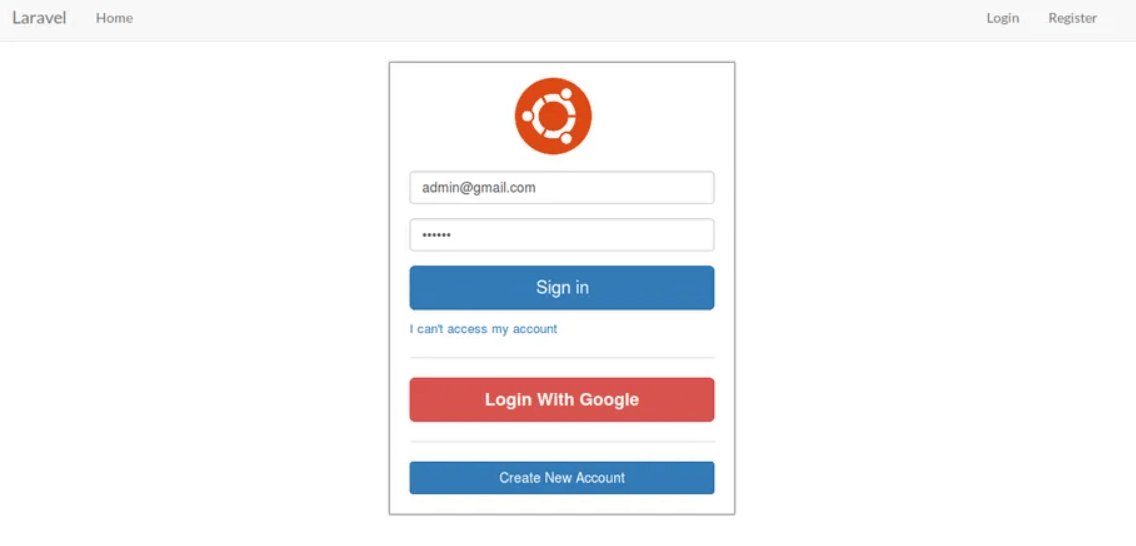
现在我们的上述代码已经准备好运行。当我们打开我们的URL时,将会生成以下输出:

 极客笔记
极客笔记