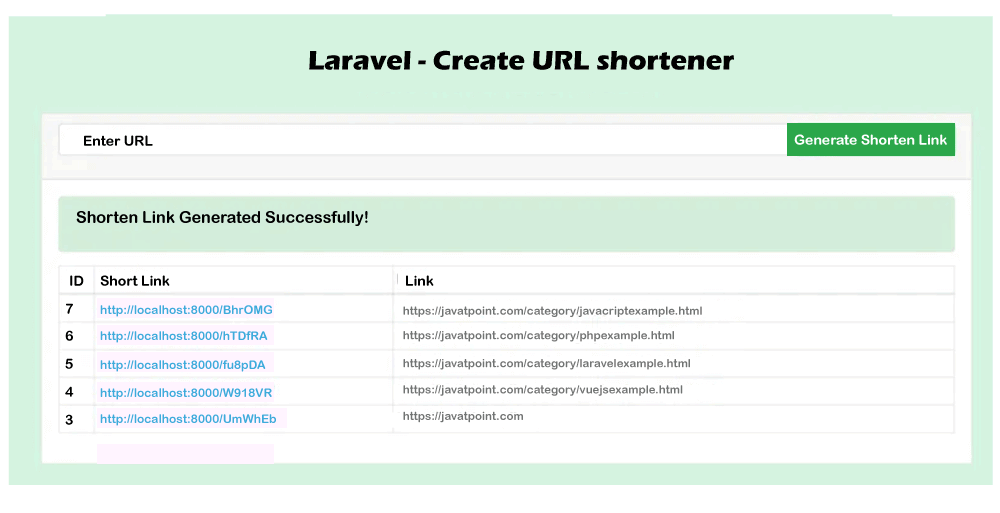
Laravel 创建 URL 缩短器
在这个部分,我们将要创建一个 URL 缩短器。我们将使用 Laravel 来完成这个任务。在我们的应用中,我们会生成缩短的 URL 字符串,而不是长的 URL。我们可以使用不同版本的 Laravel,比如 Laravel 6、Laravel 7 和 Laravel 8 来编写我们的脚本函数。
在使用短信或其他方式分享时,我们需要生成缩短的 URL,因为有字符限制。在我们的项目中,我们需要在分享任何链接或 URL 时生成短链接。在我们的应用中,生成短链接的需求会多次出现,所以我们需要在项目中实现一个模块,这个模块将帮助我们生成带有我们网站域名的缩短 URL 或短链接。下面是创建缩短 URL 或短链接的逐步过程,不使用任何包:
步骤1:
在这一步中,我们将安装 Laravel 5。如果我们的系统还没有安装全新的 Laravel 版本,我们可以使用以下命令来安装最新版本的 Laravel 5 应用,命令如下:
composer create-project --prefer-dist laravel/laravel blog
步骤2:
在这一步中,我们将 创建表格 。在这里,我们将使用刮痕应用程序创建短链接。为了创建名为”short_links”的表格,我们将使用迁移。为此,我们将使用以下命令:
php artisan make:migration create_short_links_table
当上述命令成功执行时,我们将打开名为”database/migrations”的文件路径,并在此路径中看到一个新文件。在我们的迁移文件中,我们将添加以下代码,以便能够创建一个short_links表。
?php

use Illuminate\Support\Facades\Schema;
use Illuminate\Database\Schema\Blueprint;
use Illuminate\Database\Migrations\Migration;

class CreateShortLinksTable extends Migration
{
    /**
     * It is used to run the migrations.
     *
     * @return void
     */
    public function up()
    {
        Schema::create('short_links', function (Blueprint table) {table->bigIncrements('id');
            table->string('code');table->string('link');
            $table->timestamps();
        });
    }

    /**
     * It is used to reverse the migrations.
     *
     * @return void
     */
    public function down()
    {
        Schema::dropIfExists('short_links');
    }
}
以下命令将用于执行上述迁移:
php artisan migrate
步骤3:
在这一步中,我们将 创建模型 。在这里,我们将创建一个名为ShortLink的新模型。为了创建一个新模型,下面的命令非常有用:
php artisan make:model ShortLink
app/ShortLink.php
<?php

namespace App;

use Illuminate\Database\Eloquent\Model;

class ShortLink extends Model
{
    /**
     * It is used to display the mass assignable attributes.
     *
     * It is used to show @var array
     */
    protected $fillable = [
        'code', 'link'
    ];
}
步骤4:
在这一步中,我们将进行 创建路由 的操作。在这里,我们将创建两条路由。一条路由用于布局文件,另一条路由用于存储数据。我们可以通过使用名为routes/web.php的文件来添加路由,如下所示:
routes/web.php
Route::get('generate-shorten-link', 'ShortLinkController@index');
Route::post('generate-shorten-link', 'ShortLinkController@store')->name('generate.shorten.link.post');

Route::get('{code}', 'ShortLinkController@shortenLink')->name('shorten.link');
步骤5:
在这一步中,我们将要 创建控制器 。在这里,我们将使用ShortLinkController作为一个新的控制器。使用这个控制器,我们可以管理布局,也可以在数据库中存储数据。现在我们将使用我们的控制器文件,并将以下代码添加到其中,就像这样:
app/Http/Controllers/ShortLinkController.php
<?php

namespace App\Http\Controllers;

use Illuminate\Http\Request;
use App\ShortLink;

class ShortLinkController extends Controller
{
    /**
     * It is used to show the resource list.
     *
     * @return \Illuminate\Http\Response
     */
    public function index()
    {
        shortLinks = ShortLink::latest()->get();

        return view('shortenLink', compact('shortLinks'));
    }

    /**
     * It is used to show the resource list.
     *
     * @return \Illuminate\Http\Response
     */
    public function store(Requestrequest)
    {
        request->validate([
           'link' => 'required|url'
        ]);input['link'] = request->link;input['code'] = str_random(6);

        ShortLink::create(input);

        return redirect('generate-shorten-link')
             ->with('success', 'Shorten Link Generated Successfully!');
    }

    /**
     * It is used to show the resource list.
     *
     * @return \Illuminate\Http\Response
     */
    public function shortenLink(code)
    {
        find = ShortLink::where('code',code)->first();

        return redirect($find->link);
    }
}
步骤6:
在这一步中,我们将 创建视图 。在这里,我们将为布局创建一个名为 shortenLink.blade.php 的文件。我们将把下面的代码添加到该文件中,就像这样:
resources/views/shortenLink.blade.php
<!DOCTYPE html>
<html>
<head>
    <title> Laravel - Create URL shortener </title>
    <link rel="stylesheet" href="https://cdnjs.cloudflare.com/ajax/libs/twitter-bootstrap/4.3.1/css/bootstrap.min.css" />
</head>
<body>

<div class="container">
    <h1> Laravel - Create URL shortener </h1>

    <div class="card">
      <div class="card-header">
        <form method="POST" action="{{ route('generate.shorten.link.post') }}">
            @csrf
            <div class="input-group mb-3">
              <input type="text" name="link" class="form-control" placeholder="Enter URL" aria-label="Recipient's username" aria-describedby="basic-addon2">
              <div class="input-group-append">
                <button class="btn btn-success" type="submit">Generate Shorten Link</button>
              </div>
            </div>
        </form>
      </div>
      <div class="card-body">

            @if (Session::has('success'))
                <div class="alert alert-success">
                    <p>{{ Session::get('success') }}</p>
                </div>
            @endif

            <table class="table table-bordered table-sm">
                <thead>
                    <tr>
                        <th>ID</th>
                        <th>Short Link</th>
                        <th>Link</th>
                    </tr>
                </thead>
                <tbody>
                    @foreach(shortLinks asrow)
                        <tr>
                            <td>{{ row->id }}</td>
                            <td><a href="{{ route('shorten.link',row->code) }}" target="_blank">{{ route('shorten.link', row->code) }}</a></td>
                            <td>{{row->link }}</td>
                        </tr>
                    @endforeach
                </tbody>
            </table>
      </div>
    </div>

</div>

</body>
</html>
现在我们的上述代码已经准备就绪。为了快速运行上述代码,我们将使用以下命令:
php artisan serve
现在我们可以使用浏览器打开下面的网址:
http://localhost:8000/generate-shorten-link
打开之后,我们可以看到以下输出:

 极客笔记
极客笔记