Laravel Eloquent
在这个主题中,我们将学习与数据库进行交互的Eloquent模型。每个数据库表都有其对应的模型,用于与数据库进行交互。模型允许您查询表中的数据。
模型是在 app 目录中创建的。您也可以将模型放在任何位置,根据 composer.json 文件自动加载模型。
我们可以使用以下命令创建模型:
php artisan make:model Post
我们也可以使用数据库迁移生成模型:
php artisan make:model Post -m
或者
php artisan make:model Post -migration
创建模型的步骤
- 当我们在Git bash窗口中输入以上命令时:

上述窗口显示名为 Post 的模型已成功创建。
- 模型(Post)创建在 app 目录中。
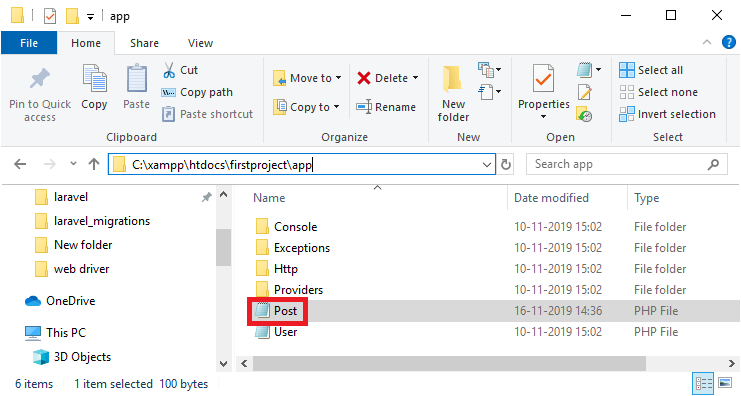
模型的结构
上面创建的模型类的结构如下所示:
<?php

namespace App;

use Illuminate\Database\Eloquent\Model;

class Post extends Model
{
    //
}
上面的代码显示了类Post扩展了 Illuminate\Database\Eloquent\Model 。
表名
在laravel eloquent中,我们不需要指定Post模型要使用的表名。除非我们明确指定表名,否则类的复数名称将被认为是表名。例如,在上面的代码中,类的名称是Post,它操作的表是posts。您还可以使用模型类中的$table属性来指定自定义表,如下所示的代码:
<?php
namespace App;
use Illuminate\Database\Eloquent\Model;

class Post extends Model
{
    /**
     * The table associated with the model.
     *
     * @var string
     */
    protected $table = ?posts';
}
在上面的代码中,$table属性指定了Post类使用的是posts表。
主键
eloquent模型认为每个表都有一个名为’id’的主键。我们可以通过为$primarykey属性指定不同的名称来覆盖这个约定。
<?php

namespace App;

use Illuminate\Database\Eloquent\Model;

class Flight extends Model
{
    /**
     * The primary key associated with the table.
     *
     * @var string
     */
    protected $primaryKey = 'post_id';
}
默认情况下,在Eloquent中,主键是一个自动递增的整数值。如果我们想要提供非递增的值作为主键,那么我们必须将$incrementing属性设为false。
public $incrementing = false;
如果我们想要将非整数值提供给主键,那么我们必须为 $keyType 属性提供一个不同的值。
protected $keyType = ‘string’;
在上面的示例中,我们给主键分配了字符串类型。
读取数据
现在,让我们看看如何从数据库中检索数据。让我们通过一个例子来理解。
- 首先,我们需要在模型类中添加两个属性。
Post.php
namespace App;
use Illuminate\Database\Eloquent\Model;
class Post extends Model
{
    //
protected table='posts';
protectedprimaryKey='id';
}
- 我们添加了一个用于从数据库中检索数据的路由。
web.php
<?php
use App\Post;
Route::get('/read',function(){
posts=Post::all();
foreach(posts as post)
{
  echopost->body;
  echo ?<br>?;
}
});
在上面的代码中,我们使用 all() 方法从数据库中检索所有记录,然后我们应用 foreach 循环来检索数据库中所有行的主体名称,如下所示。
在下面的截图中,我们可以看到在 posts 表中有两条记录。
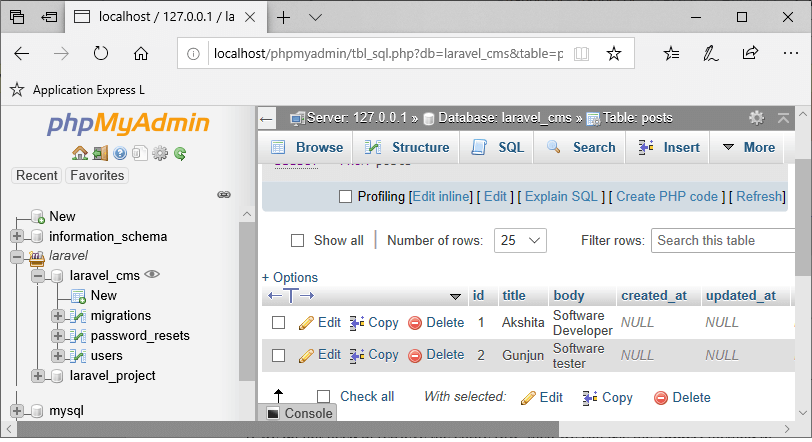
输出
当我们运行以下URL时, localhost/firstproject/public/read ,输出将是:
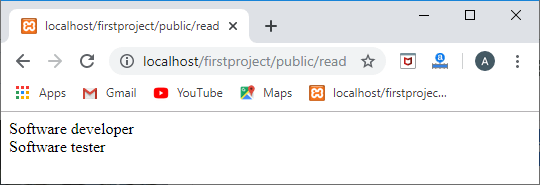
Route::get('/find',function(){
posts=Post::find(2);
returnposts->title;
});
输出
运行URL, localhost/firstproject/public/find 来查看上述代码的输出。

阅读带有约束的数据
- 要检索一行数据,我们使用 first() 方法,如下所示:
Route::get('/find',function(){
posts=Post::where('id',2)->first();
returnposts;
});
输出

- 如果我们不需要检索整行数据,那么我们可以使用 value() 方法直接检索列的值。
Route::get('/find',function(){
posts=Post::where('id',1)->value('title');
returnposts;
});
输出

插入数据
现在,我们将看到如何向数据库中插入数据。让我们看下面的例子:
Route::get('/insert',function(){
post=new Post;post->title='Nishka';
post->body='QA Analyst';post->save();
});
输出
在Web浏览器中运行以下网址: localhost/firstproject/public/insert 。执行完该网址后,打开phpmyadmin。
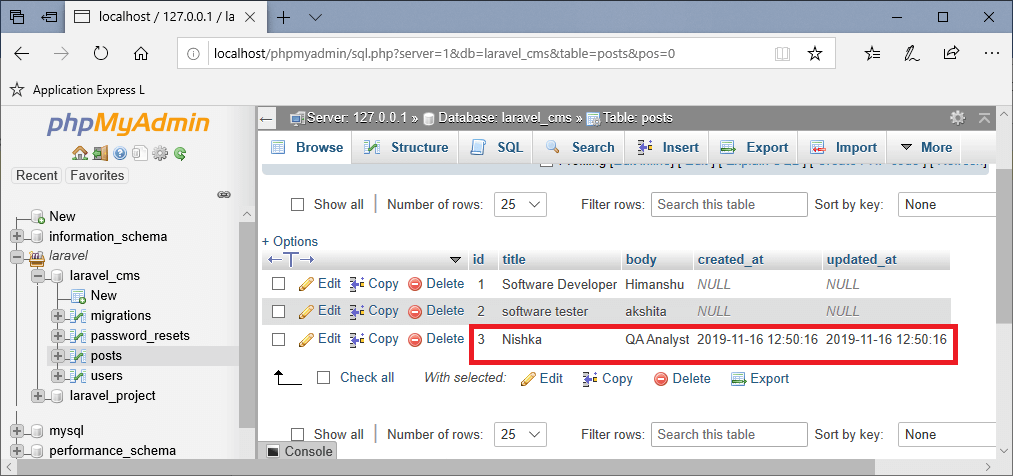
上面的输出显示数据已成功插入。
使用save()方法更新数据
我们还可以使用save()方法来更新记录。让我们通过一个例子来理解。
Route::get('/basicupdate',function(){
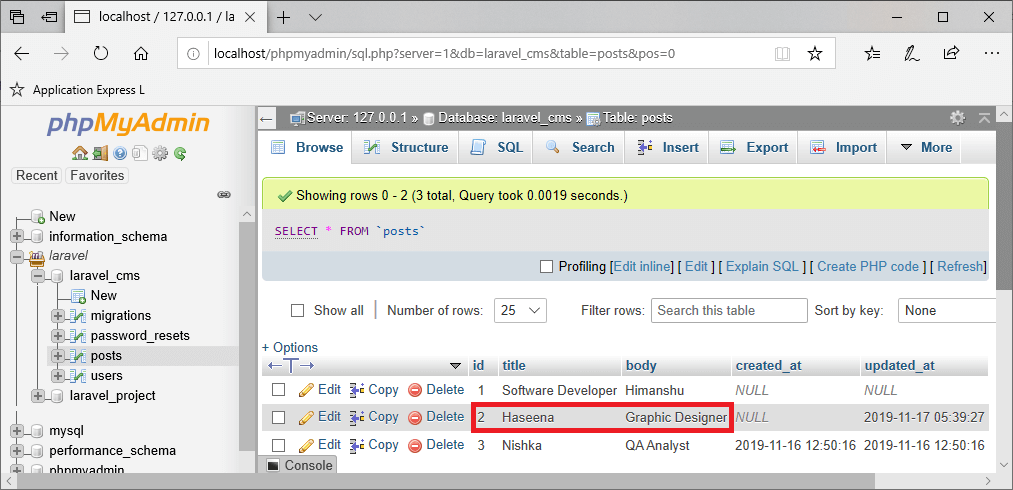
post=Post::find(2);post->title='Haseena';
post->body='Graphic Designer';post->save();
});
输出
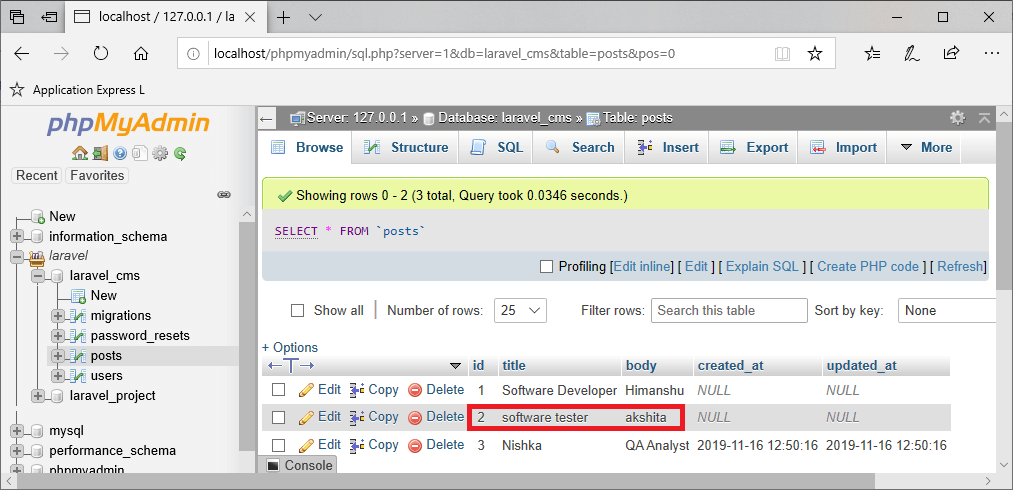
上面的屏幕显示了数据库表,在上述代码执行之前。
当我们执行上述代码时,数据会在下面的屏幕中更新显示。
批量赋值
为了提供批量赋值,我们需要在模型类中使用 create() 方法,并提供 $fillable 属性。
让我们通过一个例子来理解。
- 首先,创建路由,并在闭包函数中添加create()方法。create()方法基本上是添加一个新记录,并通过其参数提供值。首先,创建路由,并在闭包函数中添加create()方法。create()方法基本上是添加一个新记录,并通过其参数提供值。
Route::get('/create',function(){
Post::create(['title'=>'Harshita','body'=>'Technical Content Writer']);
});
- 为了提供质量分配,我们需要在模型类中添加 $fillable 属性,如下代码所示。
<?php
namespace App;
use Illuminate\Database\Eloquent\Model;
class Post extends Model
{
    //
protected table='posts';
protectedprimaryKey='id';
protected $fillable=
[
'title',
'body'
];
}
输出
运行以下URL: localhost/firstproject/public/create 来运行上述代码。

现在,看一下数据库。
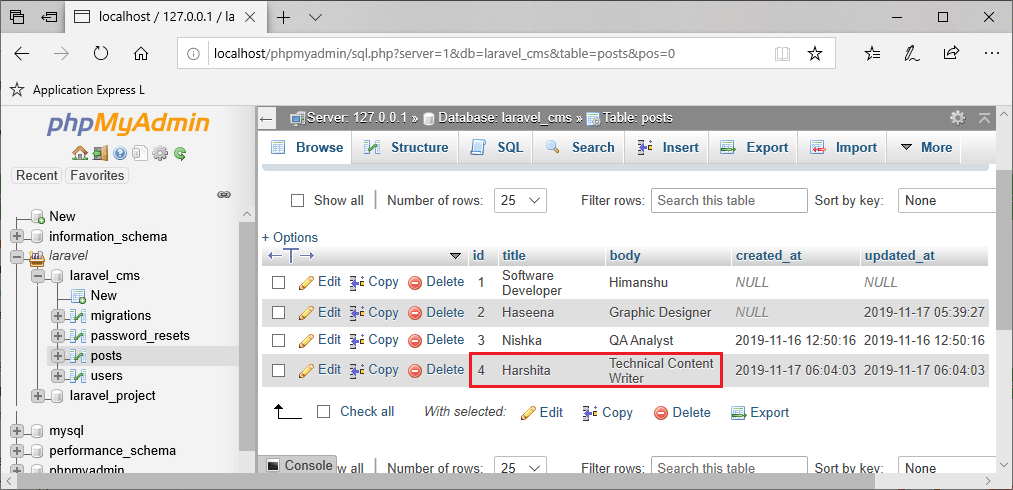
上面突出显示的区域显示新记录已成功创建。
使用Eloquent更新数据
现在,我们将看到如何使用Eloquent来更新数据。让我们通过一个例子来理解。
- 首先,创建路由。
Route::get('/update',function(){
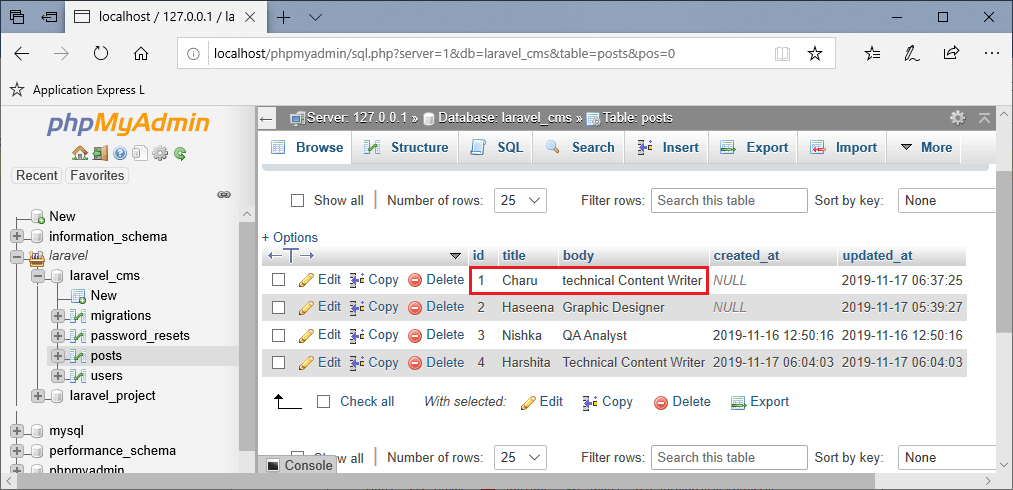
Post::where('id',1)->update(['title'=>'Charu','body'=>'technical Content Writer']);
});
在上面的代码中,我们使用了模型类的update()方法。我们正在更新id等于1的记录。
输出
删除数据
现在,我们将看到如何使用Eloquent来删除数据。我们直接使用Eloquent模型类中提供的 delete() 方法来实现。
有不同的删除数据的方式。
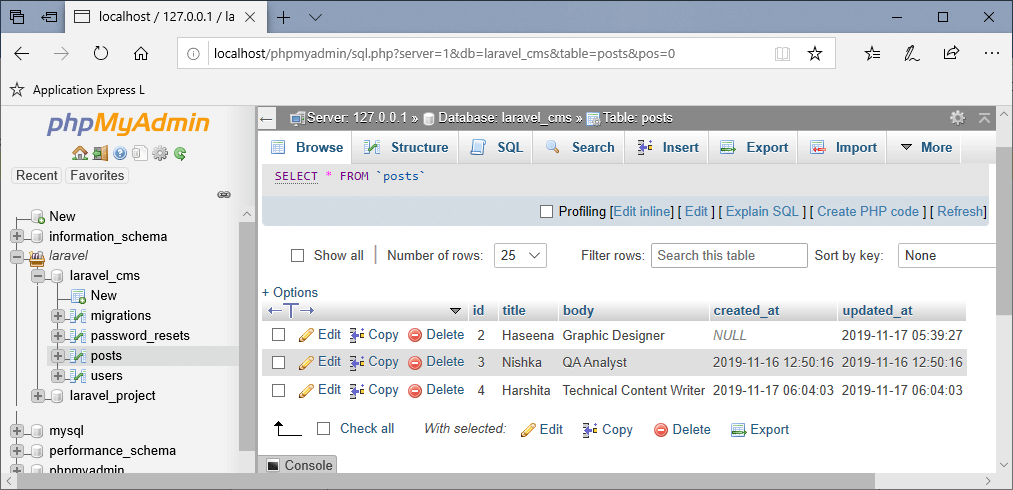
- 第一种方式是使用find()和delete()方法。
Route::get('/delete',function(){
post=Post::find(1);post->delete();
});
输出
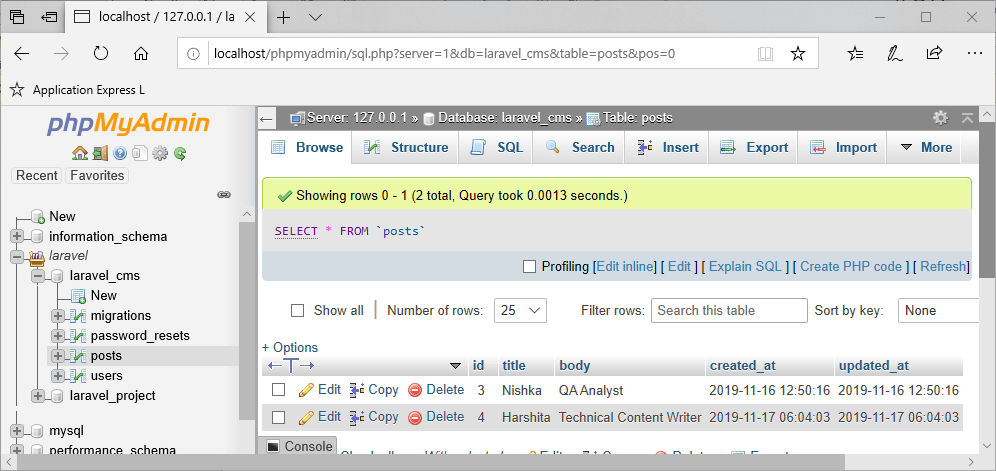
- 第二种方法是使用 destroy() 方法。
Route::get('/destroy',function(){
Post::destroy(2);
});
输出
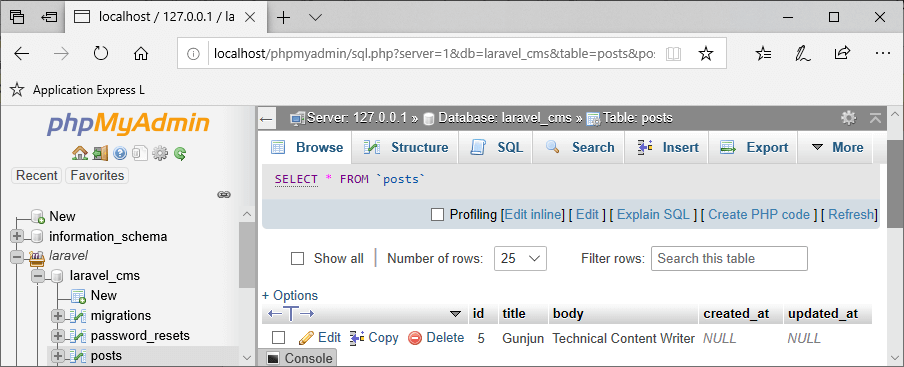
如果我们想要删除多行,
Route::get('/destroy',function(){
Post::destroy([3,4]);
});
上述代码会销毁具有id为3和4的记录。
输出
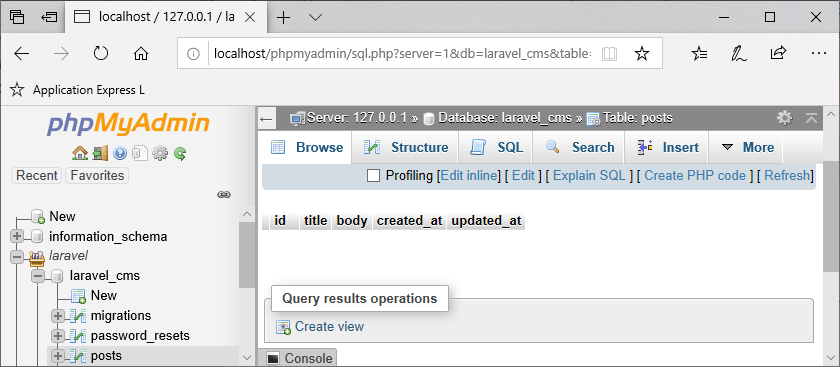
- 第三种方法是使用查询。
Route::get('/delete1',function(){
Post::where('id',5)->delete();
});
输出结果
软删除/垃圾桶
还有一种删除记录的方式是软删除。当模型被软删除时,意味着记录并没有实际从数据库中移除。在软删除中,记录并不是永久删除,它们被存储在垃圾桶空间中。
让我们通过一个示例来了解软删除是如何进行的。
- 首先,我们需要将 deleted_at 属性设置给模型类。
<?php
namespace App;
use Illuminate\Database\Eloquent\Model;
use Illuminate\Database\Eloquent\SoftDeletes;
class Post extends Model
{
 use SoftDeletes;
protected table='posts';
protectedprimaryKey='id';
protected $dates=['deleted_at'];
}
- 现在,创建迁移以在posts表中添加 deleted_at 列。

- 我们已经使用名称 add_column_deleted_at 创建了迁移,其结构如下:
<?php

use Illuminate\Support\Facades\Schema;
use Illuminate\Database\Schema\Blueprint;
use Illuminate\Database\Migrations\Migration;

class AddColumnDeletedAt extends Migration
{
    /**
     * Run the migrations.
     *
     * @return void
     */
    public function up()
    {
        Schema::table('posts', function (Blueprint table) {table->softDeletes();
        });
    }

    /**
     * Reverse the migrations.
     *
     * @return void
     */
    public function down()
    {
        Schema::table('posts', function (Blueprint table) {table->dropColumn('deleted_at');
        });
    }
}
laravel包含了一个称为softDeletes()的帮助方法,我们在上面的代码中使用了它。softDeletes()方法用于创建列。
- 现在,运行以下命令: php artisan migrate 。

- 最后,在web.php文件中添加路由,以运行软删除。
Route::get('/softdelete',function(){
Post::find(1)->delete();
});
在上述代码中,我们软删除了ID为’1’的记录。 输出:
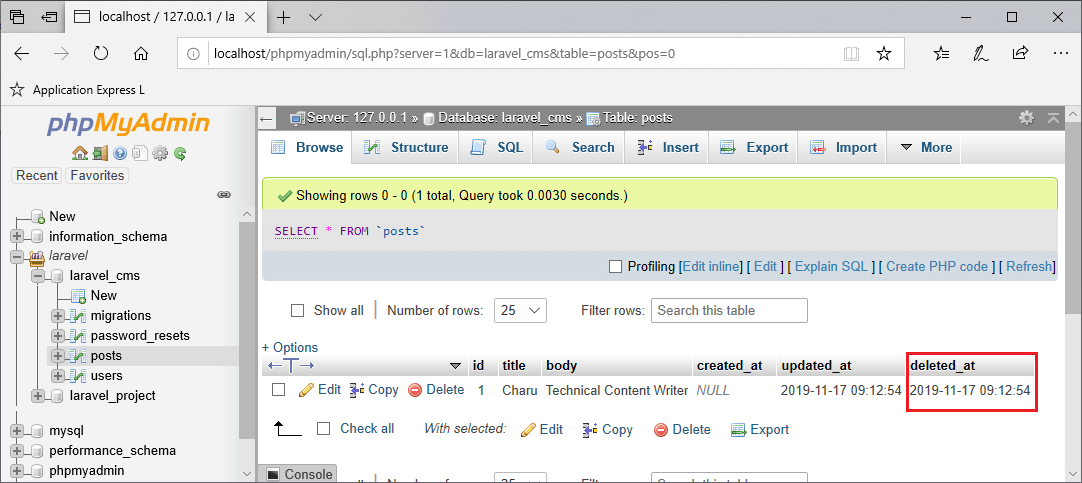
在上面的屏幕中, deleted_at 列显示了记录被软删除的时间。如果该列包含空值,则意味着该记录未被软删除。
检索已删除/回收站中的数据
要检索已删除的数据,我们使用 withTrashed() 方法。让我们通过一个示例来理解。
Route::get('/readsofdelete',function(){
post=Post::withTrashed()->where('id',1)->get();
returnpost;
});
在上述情况中,我们正在检索被删除或软删除的记录。
输出结果

恢复删除/已垃圾数据
在之前的主题中,我们看到了如何从软删除模型中检索数据。现在,我们将看到如何将数据从垃圾空间恢复到原始位置。让我们通过一个例子来理解这一点。
Route::get('/restore',function(){
Post::withTrashed()->where('id',1)->restore();
});
在上述代码中,我们使用 restore() 函数来恢复被删除的数据。
输出结果
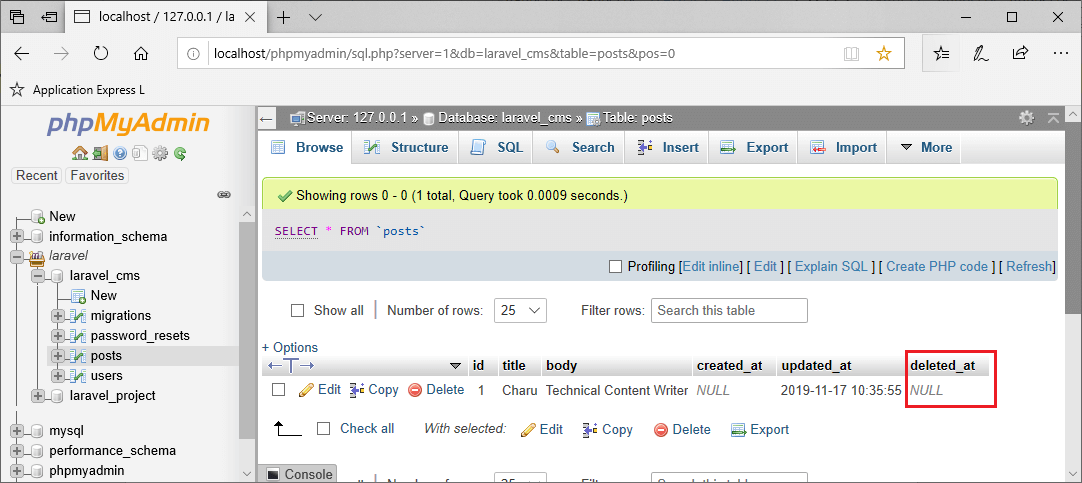
上面的屏幕显示删除的列的值为NULL,这意味着记录在数据库中恢复了。
永久删除记录
有时我们需要永久删除数据。要永久删除软删除的模型,我们使用 forceDelete() 方法。让我们通过一个例子来理解这个。
Route::get('/forcedelete',function(){
Post::onlyTrashed()->forceDelete();
});
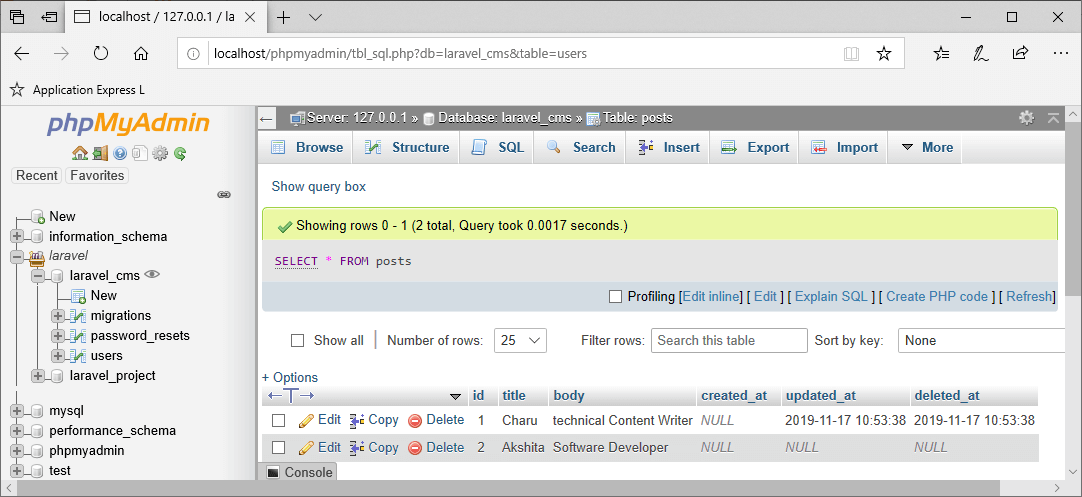
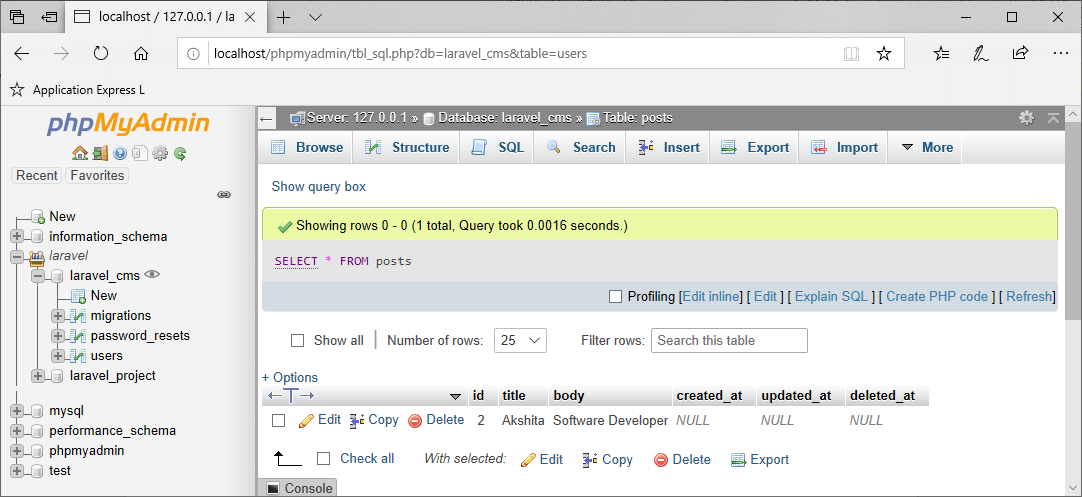
在上述代码中,我们正在删除被丢弃的数据。
在执行上述代码之前,被丢弃的记录具有一个与下面截图中显示的ID相等的ID。
 极客笔记
极客笔记