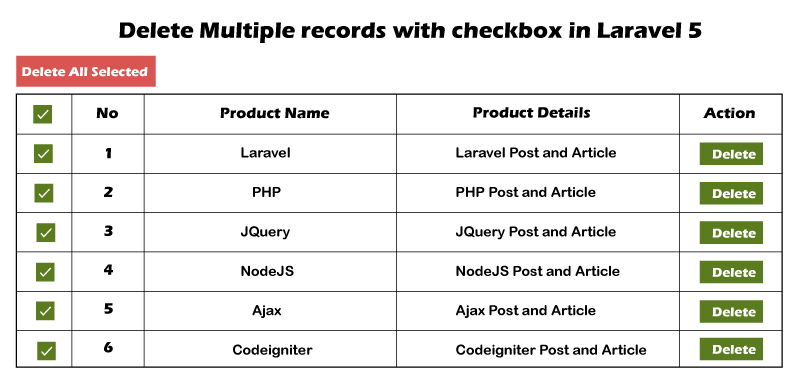
Laravel 使用复选框删除多个记录
在本节中,我们将使用Laravel使用复选框删除多个记录。如果我们想要开发一个大型的Web应用程序或电子商务应用程序,我们应该提供删除多个记录的功能。
现在我们将描述如何在各个版本的Laravel应用程序(如5、6、7和8)中使用复选框删除多个记录。在这里,我们可以删除单个记录或多个记录。在我们的例子中,我们将创建一个名为”products”的表,它将包含created_at、details、updated_at列、name和id。我们还将使用mysql查询添加虚拟记录。为了通过选择所有复选框删除所有记录,我们将使用jquery。为此,我们应该按照以下步骤进行:
步骤1:
在第一步中,我们将创建一个带有虚拟记录的产品表。为此,我们将创建一个”product”表。然后,我们将通过运行mysql查询创建一些虚拟记录。我们可以使用迁移来创建产品表,然后使用seeder创建一些虚拟记录。在以下示例中,我们将简单地使用sql查询。
虚拟记录查询:
INSERT INTO `products` (`id`, `name`, `details`, `created_at`, `updated_at`) VALUES
(1, 'Laravel', 'Laravel posts', NULL, NULL),
(2, 'PHP', 'PHP posts', NULL, NULL),
(3, 'JQuery', 'JQuery posts', NULL, NULL),
(4, NodeJS, 'NodeJS posts', NULL, NULL),
(5, 'Ajax', 'Ajax posts', NULL, NULL);
(6, 'Codeigniter', 'Codeigniter posts', NULL, NULL);
步骤2:
在这一步中,我们将 创建新的路由器 。为此,我们将添加三个路由器。第一个路由器用于显示数据。第二个路由器用于删除请求。第三个路由器用于删除所有选定的数据。因此,我们将使用我们的laravel应用程序并添加这三个新的路由器。
routes/web.php
Route::get('myproducts', 'ProductController@index');
Route::delete('myproducts/{id}', 'ProductController@destroy');
Route::delete('myproductsDeleteAll', 'ProductController@deleteAll');
步骤3:
在这一步中,我们将 添加一个产品控制器 。为此,我们将创建一个新的 ProductController 文件,用于处理上述三个路由创建的请求。我们将使用该控制器创建三个方法,即deleteAll(),destroy(),index()。这些方法用于处理路由的请求。现在我们将创建一个新的控制器,然后将以下代码放入其中:
app/Http/Controllers/ProductController.php
<?php

namespace App\Http\Controllers;

use Illuminate\Http\Request;
use DB;

class ProductController extends Controller
{
    /**
     * It will display application dashboard.
     *
     * It will return \Illuminate\Http\Response
     */
    public function index()
    {
        products = DB::table("products")->get();
        return view('products?,compact('products'));
    }

    /**
     * It will display application dashboard.
     *
     * It will return \Illuminate\Http\Response
     */
    public function destroy(id)
    {
        DB::table("products")->delete(id);
        return response()->json(['success'=>"Product Deleted successfully.", 'tr'=>'tr_'.id]);
    }

    /**
     * It will display application dashboard.
     *
     * It will return \Illuminate\Http\Response
     */
    public function deleteAll(Request request)
    {ids = request->ids;
        DB::table("products")->whereIn('id',explode(",",ids))->delete();
        return response()->json(['success'=>"Products Deleted successfully."]);
    }
}
步骤4:
在这一步中,我们将 添加 blade 文件 。为此,我们将创建 product.blade.php 文件。对于删除全部和删除函数,我们将编写以下 jQuery 代码。现在我们将创建 product.blade.php 文件并放入以下代码。
resources/views/products.blade.php
<!DOCTYPE html>
<html>
<head>
    <title> Delete Multiple records with checkbox in Laravel 5 </title>

    <link rel="stylesheet" href="https://maxcdn.bootstrapcdn.com/bootstrap/3.3.7/css/bootstrap.min.css">
    <script src="https://cdnjs.cloudflare.com/ajax/libs/jquery/3.2.1/jquery.min.js"></script>
    <script src="https://cdnjs.cloudflare.com/ajax/libs/twitter-bootstrap/3.3.7/js/bootstrap.min.js"></script>
    <script src="https://cdnjs.cloudflare.com/ajax/libs/bootstrap-confirmation/1.0.5/bootstrap-confirmation.min.js"></script>
    <meta name="csrf-token" content="{{ csrf_token() }}">

</head>
<body>

<div class="container">
    <h3> Delete Multiple records with checkbox in Laravel 5 </h3>
    <button style="margin-bottom: 10px" class="btn btn-primary delete_all" data-url="{{ url('myproductsDeleteAll') }}">Delete All Selected</button>
    <table class="table table-bordered">
        <tr>
            <th width="50px"><input type="checkbox" id="master"></th>
            <th width="80px">No</th>
            <th>Product Name</th>
            <th>Product Details</th>
            <th width="100px">Action</th>
        </tr>
        @if(products->count())
            @foreach(products as key =>product)
                <tr id="tr_{{product->id}}">
                    <td><input type="checkbox" class="sub_chk" data-id="{{product->id}}"></td>
                    <td>{{ ++key }}</td>
                    <td>{{product->name }}</td>
                    <td>{{ product->details }}</td>
                    <td>
                         <a href="{{ url('myproducts',product->id) }}" class="btn btn-danger btn-sm"
                           data-tr="tr_{{product->id}}"
                           data-toggle="confirmation"
                           data-btn-ok-label="Delete" data-btn-ok-icon="fa fa-remove"
                           data-btn-ok-class="btn btn-sm btn-danger"
                           data-btn-cancel-label="Cancel"
                           data-btn-cancel-icon="fa fa-chevron-circle-left"
                           data-btn-cancel-class="btn btn-sm btn-default"
                           data-title="Are you sure you want to delete ?"
                           data-placement="left" data-singleton="true">
                            Delete
                        </a>
                    </td>
                </tr>
            @endforeach
        @endif
    </table>
</div> <!-- container / end -->

</body>

<script type="text/javascript">(document).ready(function () {

        ('#master').on('click', function(e) {
         if((this).is(':checked',true))
         {
            (".sub_chk").prop('checked', true);          } else {(".sub_chk").prop('checked',false);
         }
        });

        ('.delete_all').on('click', function(e) {

            var allVals = [];(".sub_chk:checked").each(function() {
                allVals.push((this).attr('data-id'));
            });

            if(allVals.length <=0)             {                 alert("Please select row.");             }  else {

                var check = confirm("Are you sure you want to delete this row?");                 if(check == true){

                    var join_selected_values = allVals.join(",");.ajax({
                        url: (this).data('url'),
                        type: 'DELETE',
                        headers: {'X-CSRF-TOKEN':('meta[name="csrf-token"]').attr('content')},
                        data: 'ids='+join_selected_values,
                        success: function (data) {
                            if (data['success']) {
                                (".sub_chk:checked").each(function() {(this).parents("tr").remove();
                                });
                                alert(data['success']);
                            } else if (data['error']) {
                                alert(data['error']);
                            } else {
                                alert('Whoops Something went wrong!!');
                            }
                        },
                        error: function (data) {
                            alert(data.responseText);
                        }
                    });

                  .each(allVals, function( index, value ) {('table tr').filter("[data-row-id='" + value + "']").remove();
                  });
                }
            }
        });

        ('[data-toggle=confirmation]').confirmation({
            rootSelector: '[data-toggle=confirmation]',
            onConfirm: function (event, element) {
                element.trigger('confirm');
            }
        });(document).on('confirm', function (e) {
            var ele = e.target;
            e.preventDefault();

            .ajax({
                url: ele.href,
                type: 'DELETE',
                headers: {'X-CSRF-TOKEN':('meta[name="csrf-token"]').attr('content')},
                success: function (data) {
                    if (data['success']) {
                        $("#" + data['tr']).slideUp("slow");
                        alert(data['success']);
                    } else if (data['error']) {
                        alert(data['error']);
                    } else {
                        alert('Whoops Something went wrong!!');
                    }
                },
                error: function (data) {
                    alert(data.responseText);
                }
            });

            return false;
        });
    });
</script>

</html>
现在我们的上面的代码已经准备好运行了。为了快速运行上述代码,我们将使用以下命令:
php artisan serve
现在我们可以使用浏览器打开以下网址:
http://localhost:8000/myproducts
打开后,我们可以看到以下输出:

 极客笔记
极客笔记