OpenCV Python 如何翻转图像
在 OpenCV 中,可以使用函数cv2.flip()翻转图像。使用此函数,我们可以沿着X轴、Y轴和两个轴翻转图像。它接受一个标志 flipCode 作为参数来沿着轴翻转图像。
如果将 flipCode 设置为0,则图像沿着x轴翻转;如果将 flipCode 设置为正整数(如1),则图像沿着Y轴翻转;如果将 flipCode 设置为负整数(如-1),则图像沿着两个轴翻转。
步骤
要翻转图像,可以按照以下步骤进行:
- 导入所需库。在以下所有示例中,所需的Python库是 OpenCV 。确保已经安装了它。
-
使用 cv2.imread() 方法读取输入图像。指定图像的完整路径和图像类型(例如png或jpg)
-
对输入图像 img 应用 cv2.flip() 函数。传递 flipCode 参数以实现所需的翻转。我们将 flipCode=0 设置为沿x轴翻转。
img_v = cv2.flip(img, 0)
- 显示翻转后的输出图像。
我们将在以下示例中使用此图像作为 输入文件 。

示例
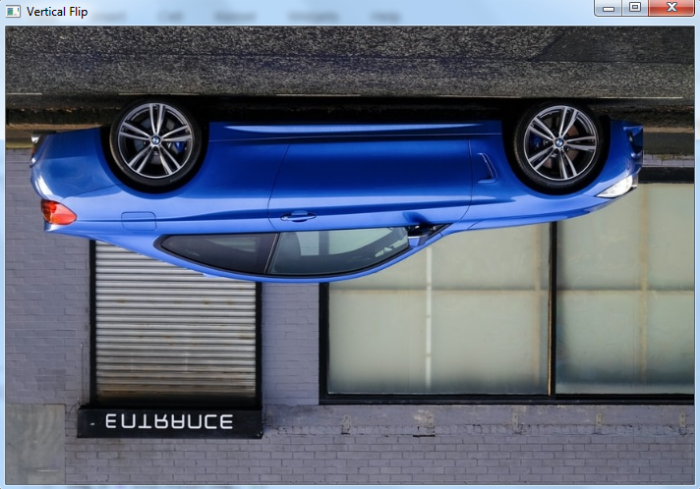
在这个Python程序中,我们沿x轴(垂直方向)翻转输入图像。
# import required library
import cv2

# read input image
img = cv2.imread('blue-car.jpg')

# flip the image by vertically
img_v = cv2.flip(img, 0)

# display the rotated image
cv2.imshow("Vertical Flip", img_v)
cv2.waitKey(0)
cv2.destroyAllWindows()
输出
当你运行上面的程序时,它会产生以下输出窗口 – 输出 -:

注意输出图像在X轴上翻转。
示例
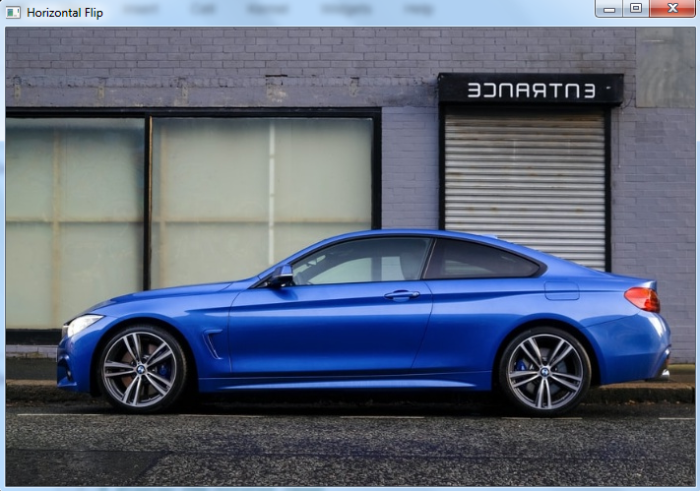
在这个Python程序中,我们将输入图像沿着y轴(水平)翻转。
# import required library
import cv2

# read input image
img = cv2.imread('blue-car.jpg')

# flip the image by horizontally
img_h = cv2.flip(img, 1)

# display the rotated image
cv2.imshow("Horizontal Flip", img_h)
cv2.waitKey(0)
cv2.destroyAllWindows()
输出
当您运行上述程序时,它将产生以下输出窗口:

注意,输出图像在Y轴上翻转。
示例
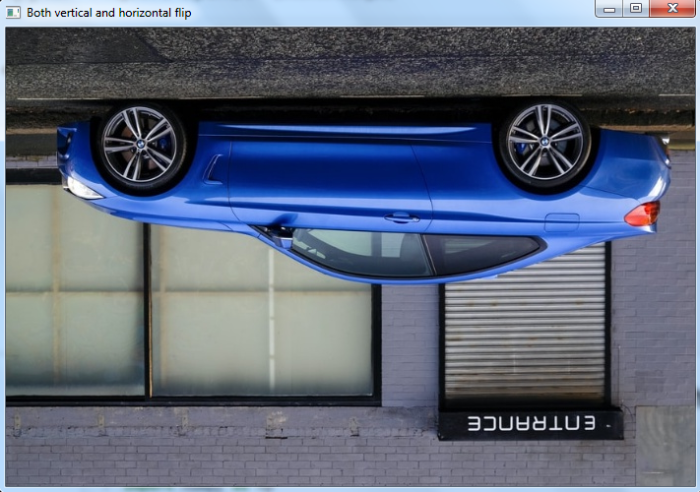
在这个Python程序中,我们将输入图像在两个轴上翻转(垂直和水平翻转)。
# import required library
import cv2

# read input image
img = cv2.imread('blue-car.jpg')

# rotate the image both vertically and horizontally
img_vh = cv2.flip(img, -1)

# display the rotated image
cv2.imshow("Both vertical and horizontal flip", img_vh)
cv2.waitKey(0)
cv2.destroyAllWindows()
输出
当你运行上面的程序时,它会生成以下的输出窗口 –

注意输出图像是沿着X轴和Y轴翻转的。
 极客笔记
极客笔记