PHP Laravel 5.6 – 使用Passport创建Rest API
在这一部分,我们将学习如何使用Passport进行Rest API身份验证。我们将使用Laravel和PHP来实现。我们将在Laravel应用程序中创建Rest API,并安装和实现Passport用于身份验证。在我们的应用程序中,我们可以非常容易地使用它,并且很容易理解。
流行的PHP框架被称为Laravel。Laravel被认为是最好的框架,所以大多数开发者使用Laravel创建后端框架的API。Laravel提供了很多功能,如Passport、路由、安全性、中间件、模型、Rest API、事件等。这些功能可以很容易地使用,我们可以编写清晰的Laravel代码。在这个Laravel应用中,我们将学习如何集成Passport进行Rest API。如果我们对Laravel没有太多了解,这个应用对于设置API和身份验证非常有用。为了设置Rest API,下面是一步一步的过程:
步骤1:
在这一步中,我们将 安装Laravel应用程序 。我们将使用以下命令获取最新版本的Laravel 5.6应用程序。为此,我们将打开CMD,并运行以下命令:
composer create-project --prefer-dist laravel/laravel blog
步骤2:
在这一步骤中,我们将进行 安装包 。在这里,我们将使用Composer包管理器来安装护照。为此,我们将使用命令提示符并在其中运行以下代码,就像这样:
composer require laravel/passport
当上述包成功安装后,我们需要获得默认迁移。我们将使用我们的数据库并通过使用这个迁移来创建一个新的护照表。为此,我们将运行以下命令:
php artisan migrate
在此之后,我们将使用以下命令来安装护照。这个命令用于为安全性创建令牌密钥。为此,我们将运行以下命令:
php artisan passport:install
步骤3:
在这个步骤中,我们将进行 护照配置 。在这里,我们将在认证配置文件、服务提供者和Place模型上添加配置。为此,我们要对三个文件进行一些更改,它们分别是User.php、AuthServiceProvider.php和auth.php。这些文件的更改如下所述。在User.php文件中,我们需要添加一个名为HasApiTokens的护照类,如下所示:
app/User.php
<?php

namespace App;

use Illuminate\Notifications\Notifiable;
use Laravel\Passport\HasApiTokens;
use Illuminate\Foundation\Auth\User as Authenticatable;

class User extends Authenticatable
{
    use HasApiTokens, Notifiable;

    /**
     * The attributes which are mass assigned will be used.
     *
     * @var array
     */
    protected fillable = [
        'name', 'email', 'password',
    ];

    /**
     * It is used to define the attributes that are hidden for arrays.
     *
     * @var array
     */
    protectedhidden = [
        'password', 'remember_token',
    ];
}
现在我们将使用AuthServiceProvider.php文件,并像这样添加”Passport::routes()”:
app/Providers/AuthServiceProvider.php
<?php

namespace App\Providers;

use Laravel\Passport\Passport;
use Illuminate\Support\Facades\Gate;
use Illuminate\Foundation\Support\Providers\AuthServiceProvider as ServiceProvider;

class AuthServiceProvider extends ServiceProvider
{
    /**
     * It is used to define application?s policy mappings.
     *
     * @var array
     */
    protected policies = [
        'App\Model' => 'App\Policies\ModelPolicy',
    ];

    /**
     * It is used to register authorization services or any authentication.
     *
     * @return void
     */
    public function boot()
    {this->registerPolicies();

        Passport::routes();
    }
}
现在我们将使用auth.php文件,并像这样将api auth配置添加到其中:
<?php

return [
    .....
    'guards' => [
        'web' => [
            'driver' => 'session',
            'provider' => 'users',
        ],
        'api' => [
            'driver' => 'passport',
            'provider' => 'users',
        ],
    ],
    .....
]
步骤4:
在这一步中,我们将要 创建一个产品表和模型 。在这里,我们将使用以下命令来为帖子表创建迁移。为此,我们将首先运行以下代码:
php artisan make:migration create_products_table
当我们成功运行上述命令时,我们将在database/migrations路径中看到一个新的文件。现在,我们将使用迁移文件创建一个产品表,并将以下代码放入该文件中。
<?php

use Illuminate\Support\Facades\Schema;
use Illuminate\Database\Schema\Blueprint;
use Illuminate\Database\Migrations\Migration;

class CreateProductsTable extends Migration
{
    /**
     * It is used for the running of migration.
     *
     * @return void
     */
    public function up()
    {
        Schema::create('products', function (Blueprint table) {table->increments('id');
            table->string('name');table->text('detail');
            $table->timestamps();
        });
    }

    /**
     * It is used to perform reverse migrations.
     *
     * @return void
     */
    public function down()
    {
        Schema::dropIfExists('products');
    }
}
当我们成功运行上述命令时,我们必须使用以下命令运行上述创建的迁移,如下所示:
php artisan migrate
当我们成功创建了一个“products”表格后,我们需要为产品创建一个产品模型。因此,我们将使用app/Product.php路径,并创建一个名为item.php的新文件。然后,我们将在这个创建的文件中添加如下代码:
app/Product.php
<?php

namespace App;

use Illuminate\Database\Eloquent\Model;

class Product extends Model
{
    /**
     * The attributes which are mass assigned will be used.
     *
     * @var array
     */
    protected $fillable = [
        'name', 'detail'
    ];
}
步骤5:
在这一步中,我们将 创建API路由 。我们可以使用Laravel提供的api.php文件轻松编写web服务路由。现在我们将使用该文件并像这样添加一个新路由:
routes/api.php
<?php

/*
|--------------------------------------------------------------------------
| API Routes
|--------------------------------------------------------------------------
|
| Here, we can use our application and register API routes. Within
| the groups, RouteServiceProvider is used to load these routes
| that is assigned the "api" middleware group. Now we can
| enjoy building our API!
|
*/

Route::post('register', 'API\RegisterController@register');

Route::middleware('auth:api')->group( function () {
    Route::resource('products', 'API\ProductController');
});
步骤6:
在这一步中,我们要 创建控制器 。在这里,我们将创建RegisterController、BaseController和ProductController作为三个新的控制器。现在我们需要创建一个独立的API控制器。所以我们将使用Controllers文件夹,并创建一个名为”API”的新文件夹。现在我们将创建这些控制器。首先,我们将创建BaseController,代码如下:
app/Http/Controllers/API/BaseController.php
<?php

namespace App\Http\Controllers\API;

use Illuminate\Http\Request;
use App\Http\Controllers\Controller as Controller;

class BaseController extends Controller
{
    /**
     * It is used to perform the success response method.
     *
     * @return \Illuminate\Http\Response
     */
    public function sendResponse(result,message)
    {
        response = [
            'success' => true,
            'data'    =>result,
            'message' => message,
        ];

        return response()->json(response, 200);
    }

    /**
     * It is used to return error response.
     *
     * @return \Illuminate\Http\Response
     */
    public function sendError(error,errorMessages = [], code = 404)
    {response = [
            'success' => false,
            'message' => error,
        ];

        if(!empty(errorMessages)){
            response['data'] =errorMessages;
        }

        return response()->json(response,code);
    }
}
现在我们将创建一个名为ProductController.php的文件,内容如下:
app/Http/Controllers/API/ProductController.php
<?php

namespace App\Http\Controllers\API;

use Illuminate\Http\Request;
use App\Http\Controllers\API\BaseController as BaseController;
use App\Product;
use Validator;

class ProductController extends BaseController
{
    /**
     * It is used to show the resource list.
     *
     * @return \Illuminate\Http\Response
     */
    public function index()
    {
        products = Product::all();

        returnthis->sendResponse(products->toArray(), 'Products retrieved successfully.');
    }

    /**
     * It uses storage to store the above-created resource.
     *
     * @param  \Illuminate\Http\Requestrequest
     * @return \Illuminate\Http\Response
     */
    public function store(Request request)
    {input = request->all();validator = Validator::make(input, [
            'name' => 'required',
            'detail' => 'required'
        ]);

        if(validator->fails()){
            return this->sendError('Validation Error.',validator->errors());
        }

        product = Product::create(input);

        return this->sendResponse(product->toArray(), 'Product created successfully.');
    }

    /**
     * It is used to show specified resources.
     *
     * @param  int  id
     * @return \Illuminate\Http\Response
     */
    public function show(id)
    {
        product = Product::find(id);

        if (is_null(product)) {
            returnthis->sendError('Product not found.');
        }

        return this->sendResponse(product->toArray(), 'Product retrieved successfully.');
    }

    /**
     * It uses storage to update the specified resource.
     *
     * @param  \Illuminate\Http\Request  request
     * @param  intid
     * @return \Illuminate\Http\Response
     */
    public function update(Request request, Productproduct)
    {
        input =request->all();

        validator = Validator::make(input, [
            'name' => 'required',
            'detail' => 'required'
        ]);

        if(validator->fails()){
            returnthis->sendError('Validation Error.', validator->errors());              }product->name = input['name'];product->detail = input['detail'];product->save();

        return this->sendResponse(product->toArray(), 'Product updated successfully.');
    }

    /**
     * It uses storage and removes the specified resource from it.
      *
     * @param  int  id
     * @return \Illuminate\Http\Response
     */
    public function destroy(Productproduct)
    {
        product->delete();

        returnthis->sendResponse($product->toArray(), 'Product deleted successfully.');
    }
}
之后,我们将创建如下的RegisterController:
app/Http/Controllers/API/RegisterController.php
<?php

namespace App\Http\Controllers\API;

use Illuminate\Http\Request;
use App\Http\Controllers\API\BaseController as BaseController;
use App\User;
use Illuminate\Support\Facades\Auth;
use Validator;

class RegisterController extends BaseController
{
    /**
     * It is used for the registration of api
     *
     * @return \Illuminate\Http\Response
     */
    public function register(Request request)
    {validator = Validator::make(request->all(), [
            'name' => 'required',
            'email' => 'required|email',
            'password' => 'required',
            'c_password' => 'required|same:password',
        ]);

        if(validator->fails()){
            return this->sendError('Validation Error.',validator->errors());
        }

        input =request->all();
        input['password'] = bcrypt(input['password']);
        user = User::create(input);
        success['token'] =user->createToken('MyApp')->accessToken;
        success['name'] =user->name;

        return this->sendResponse(success, 'User register successfully.');
    }
}
现在护照API和完整的RESTful API已经准备好在Laravel中运行。 我们将使用以下命令快速运行此代码:
php artisan serve
我们需要记住下面的标题将在详细的api中使用。
'headers' => [
    'Accept' => 'application/json',
    'Authorization' => 'Bearer '.$accessToken,
]
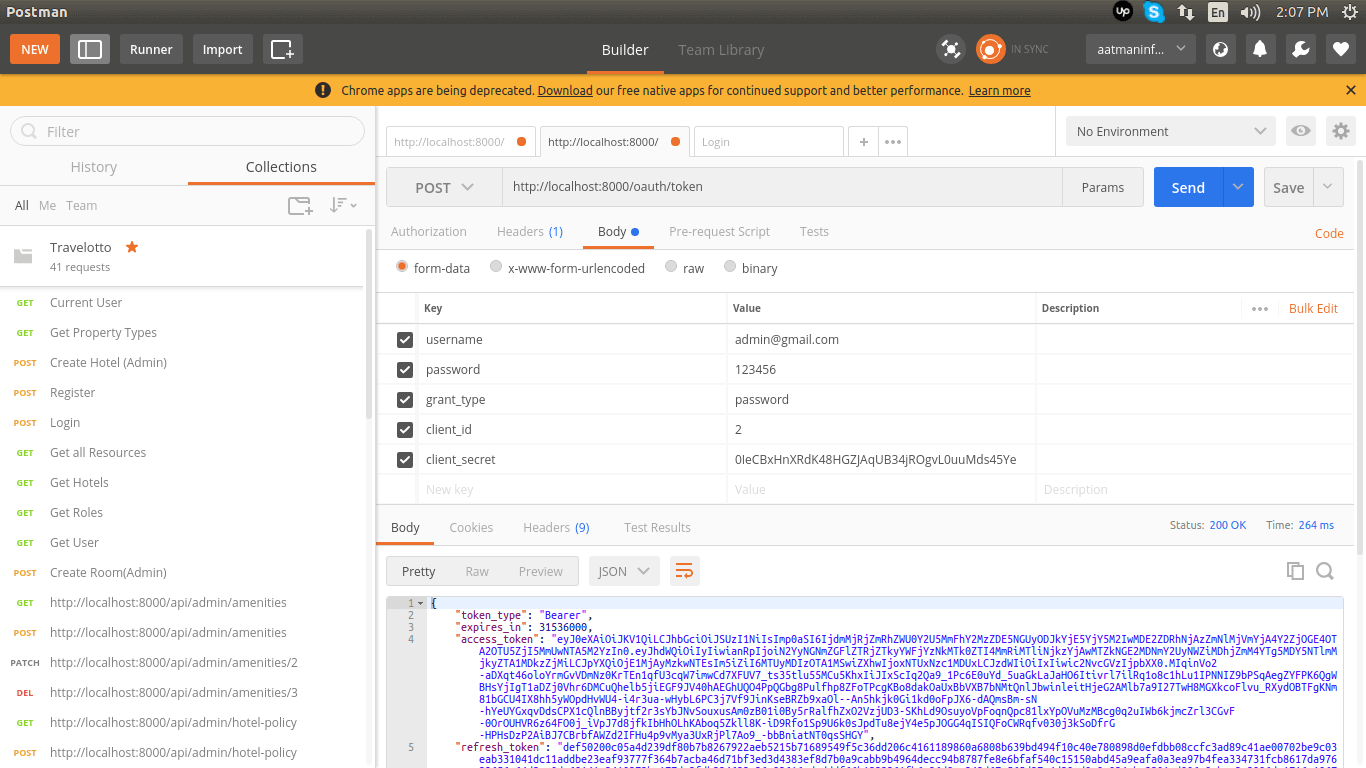
现在我们将使用动词描述各种路由URL。首先,我们将使用类似于下面的动词描述登录路由URL:
Login: 动词: GET, URL: http://localhost:8000/oauth/token
当我们运行上述URL时,我们将得到如下的登录API:
我们将使用这样一个动词来描述注册路由的URL:
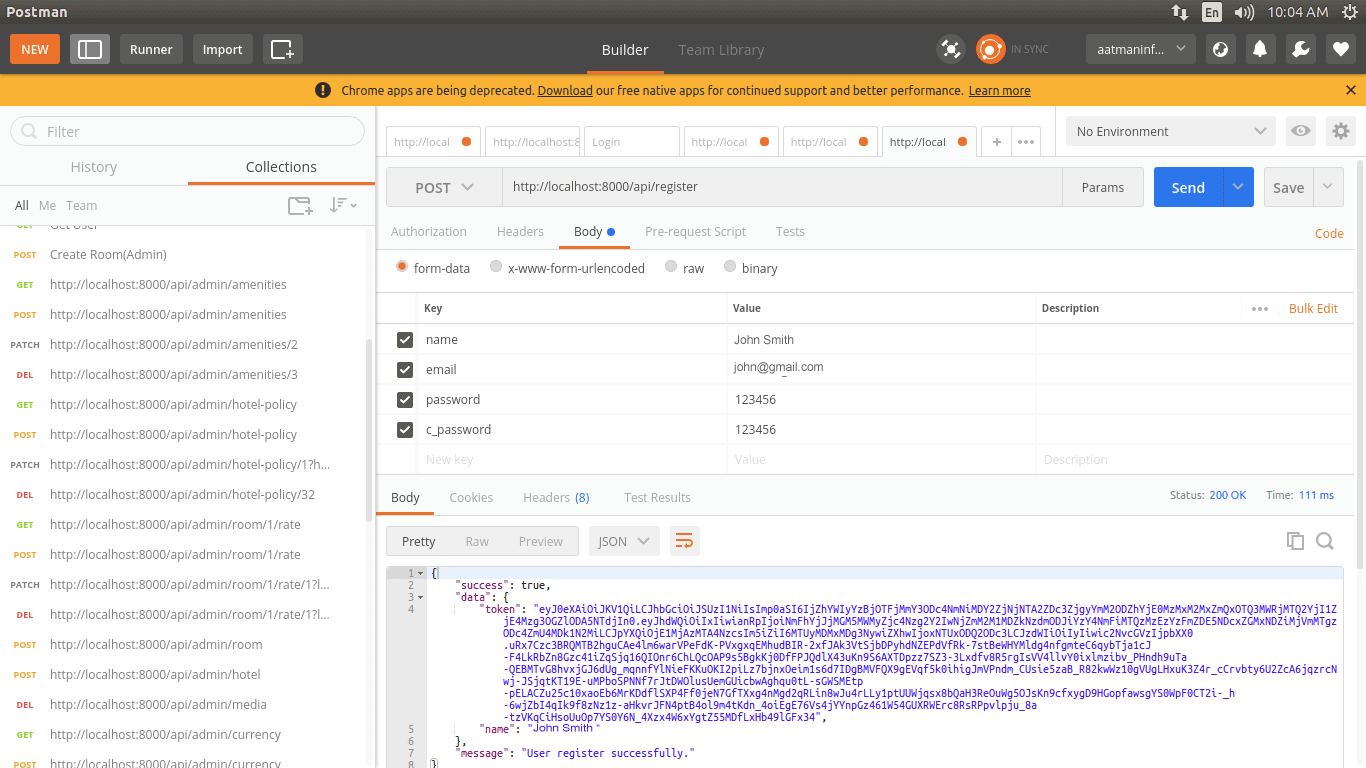
注册: 请求方法:GET, URL:http://localhost:8000/api/register
当我们运行上述URL时,我们将获得如下的注册API:
我们将使用一个动词来描述 List 路由的 URL,如下所示:
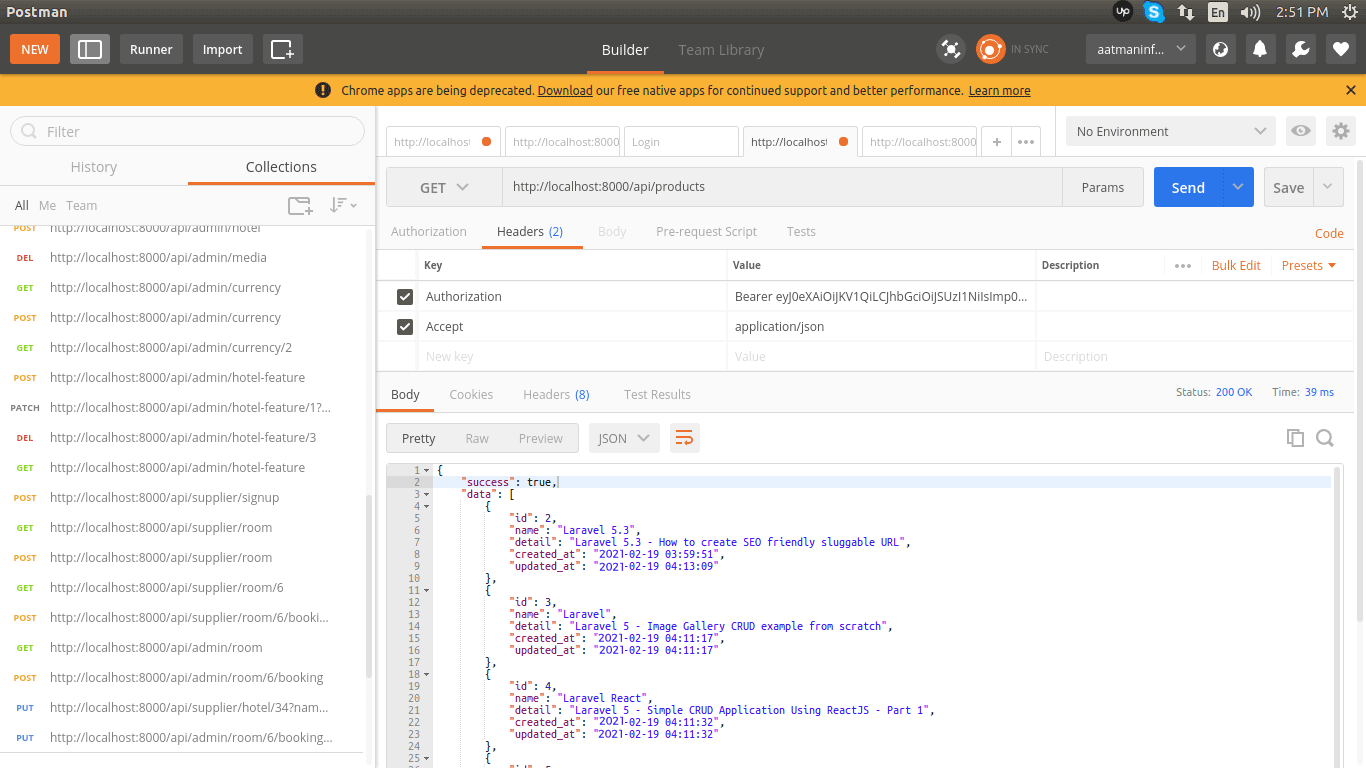
List: 动词: GET,URL: http://localhost:8000/api/products
当我们运行上述 URL 时,我们将得到类似以下的 List API:
我们将使用一个动词来描述创建路由的URL,如下所示:
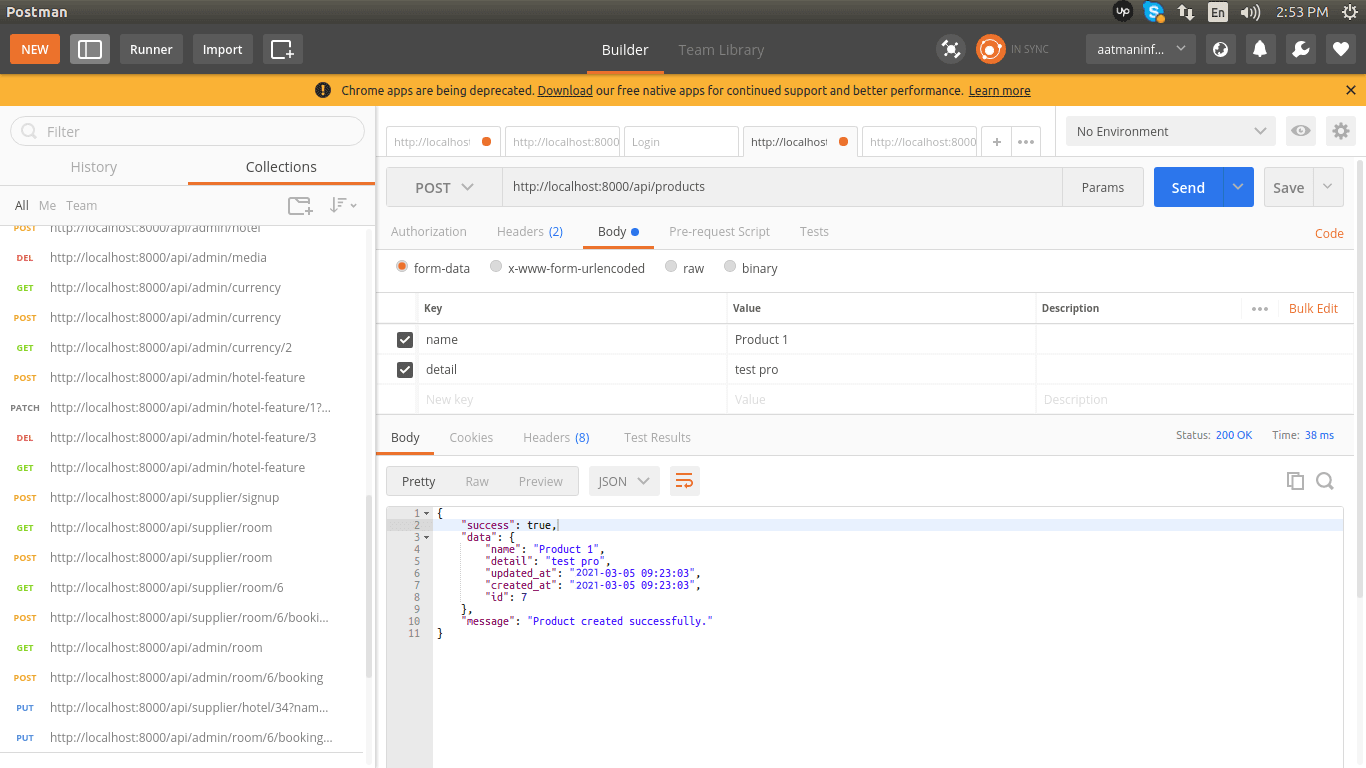
创建: 动词:POST,URL:http://localhost:8000/api/products
当我们运行上述URL时,我们将得到如下所示的创建API:
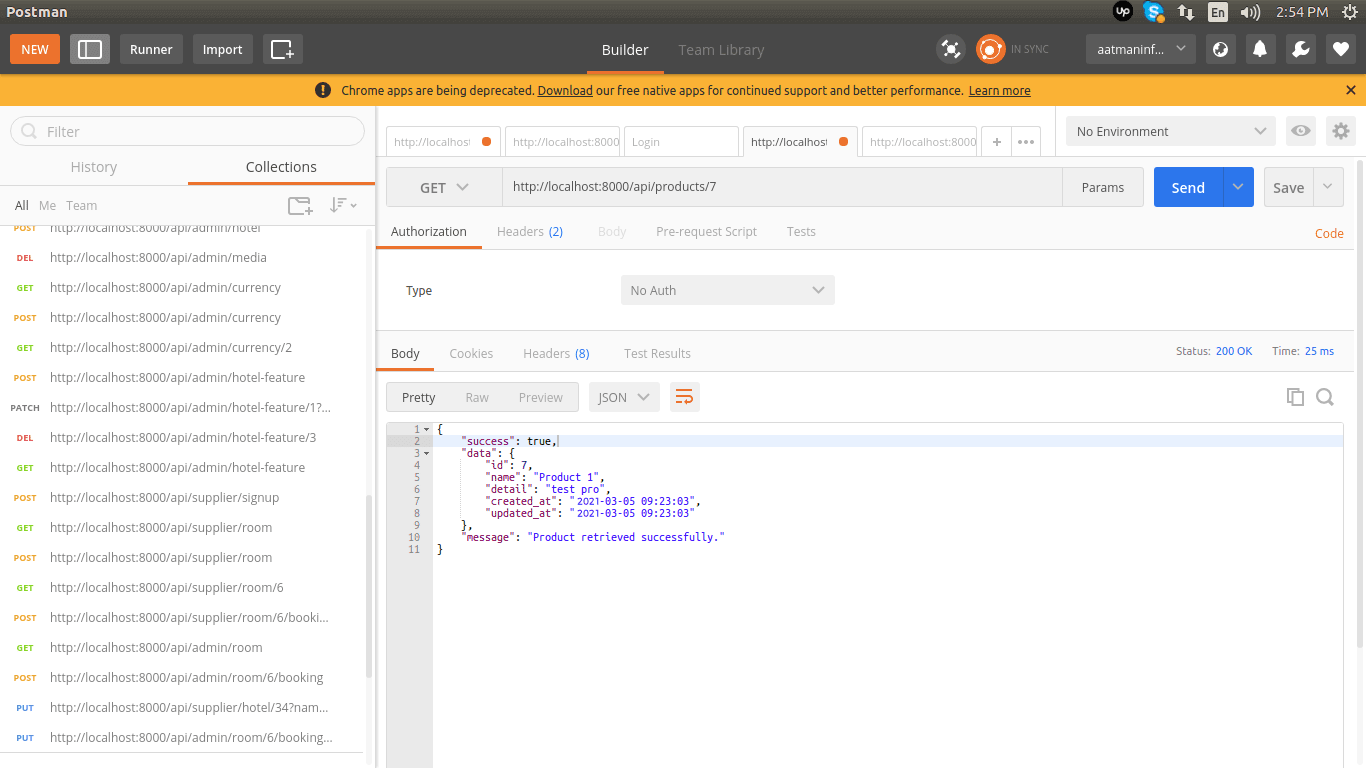
我们将使用这样的动词来描述显示路由URL:
显示: 动词:GET,URL:http://localhost:8000/api/products/{id}
当我们运行上述URL时,我们会得到以下显示API:
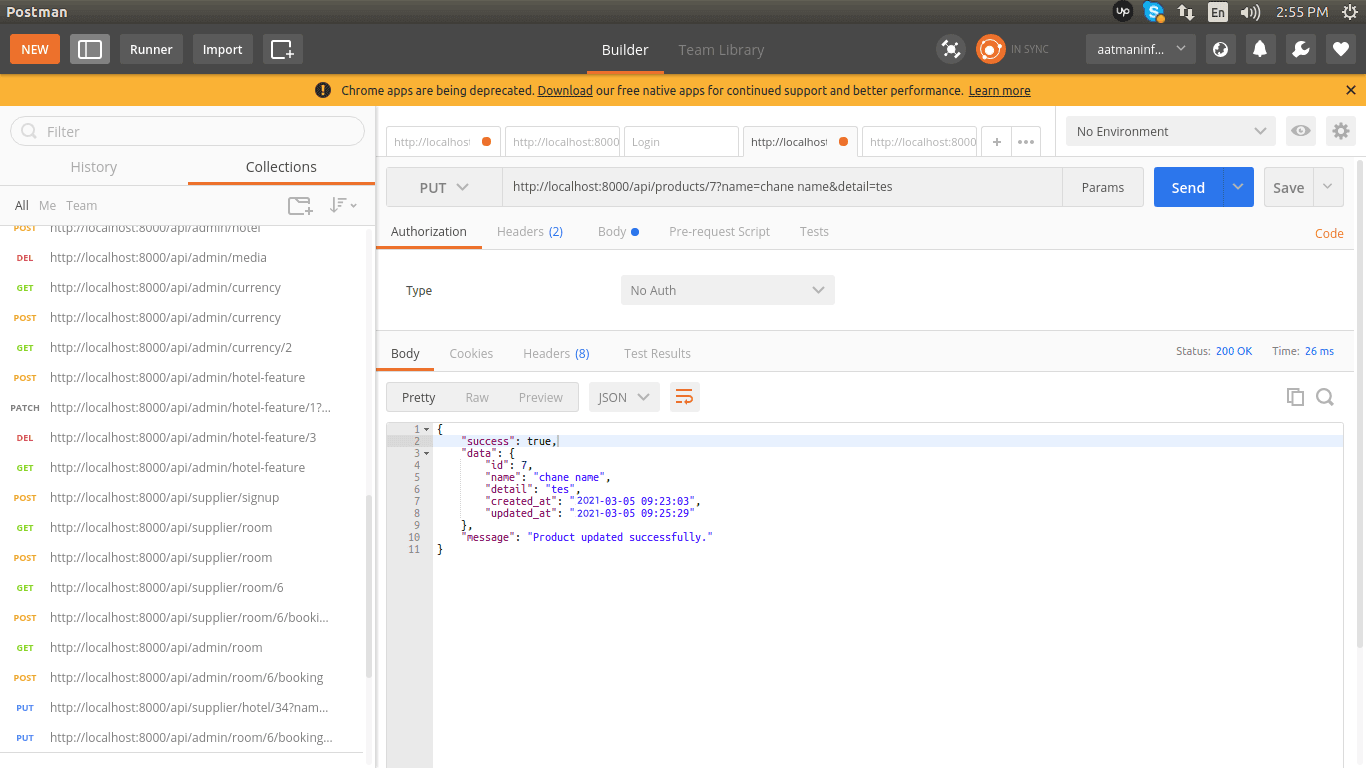
我们将使用一个动词来描述Update路由的URL,如下所示:
Update(更新): 动词(Verb):PUT,URL:http://localhost:8000/api/products/{id}
当我们访问上述URL时,我们将得到一个如下所示的Update API(更新API):
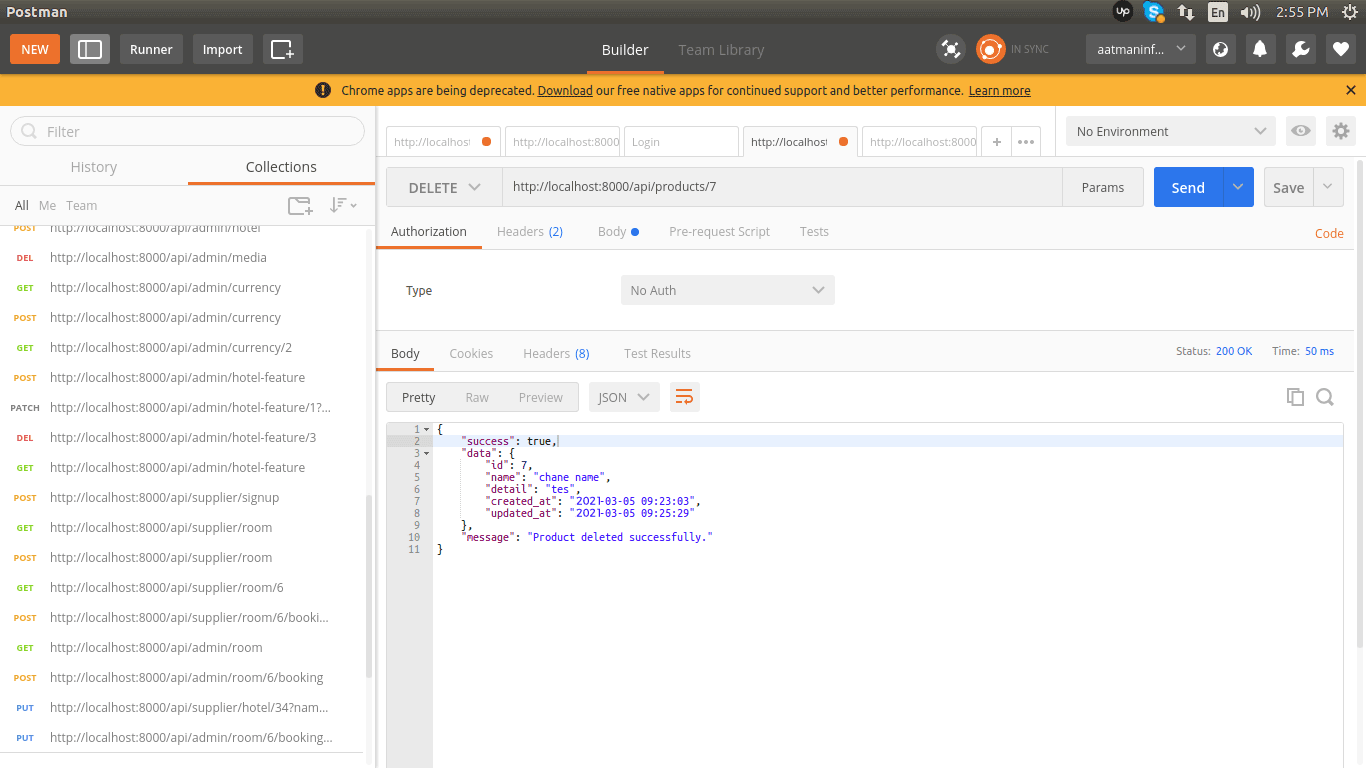
我们将使用一个动词来描述删除路由的URL,如下所示:
Delete: 动词:DELETE,URL:http://localhost:8000/api/products/{id}
当我们运行上述URL时,我们将得到如下的删除API:
 极客笔记
极客笔记