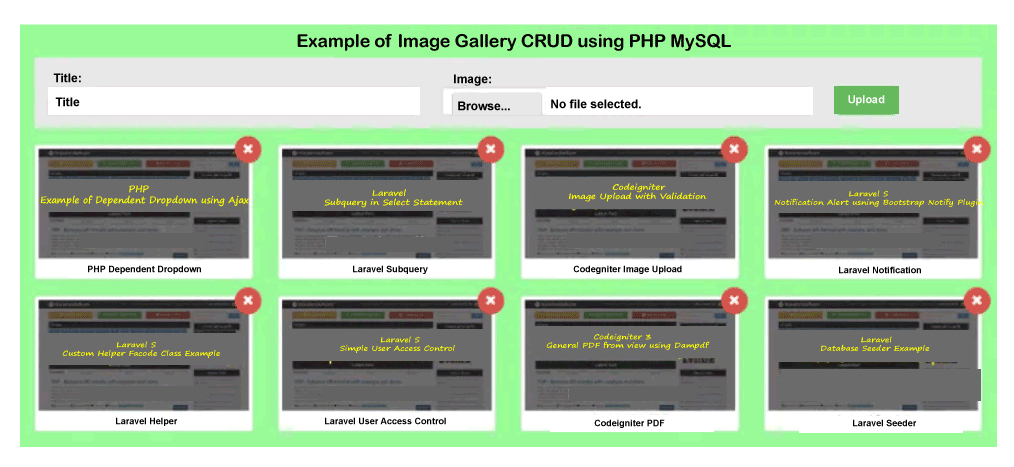
使用PHP和MySQL创建图像库CRUD
在本节中,我们将学习图像库的CURD。我们将使用PHP和MySQL来完成这个任务。有时用户、学生、员工、管理员等需要图像库、删除模块和插入更新的选项。因此,我们需要为他们创建这些功能。为了实现轻松上传照片并通过验证删除照片,我们将使用相册。在我们的应用程序中,我们将使用Bootstrap创建一个具有吸引力的图像库布局。
在这里,我们将使用基础代码来制作具有吸引力布局的相册。通过这种方式,我们可以很容易地将其与我们的应用程序一起构建起来。在我们的应用程序中,我们将使用会话来执行适当的验证,并显示成功和错误消息。如果成功插入图像,我们将得到适当的成功消息。我们的示例将创建一个名为”image_gallery”的新表,其中包含主标题和图像列。为了显示表单、验证、错误消息等,我们还将创建文件。制作相册的逐步过程如下所述:
步骤1:
在此步骤中,我们将 创建image_gallery表 。在这里,我们将使用我们的数据库来创建此表。为了创建这个表,我们将使用一些SQL查询,描述如下:
项目表:
CREATE TABLE `image_gallery` (
  `id` int(10) UNSIGNED NOT NULL,
  `title` varchar(255) COLLATE utf8mb4_unicode_ci NOT NULL,
  `image` varchar(255) COLLATE utf8mb4_unicode_ci NOT NULL,
  `created_at` timestamp NULL DEFAULT NULL,
  `updated_at` timestamp NULL DEFAULT NULL
) ENGINE=InnoDB DEFAULT CHARSET=utf8mb4 COLLATE=utf8mb4_unicode_ci;
步骤2:
在这一步中,我们要 创建DB配置文件 。为此,我们需要在数据库中设置一些细节,例如数据库名称、phpmyadmin数据库的用户名和密码。在设置完成后,我们将使用我们的根目录创建一个名为“db_config.php”的新文件。然后,我们将像下面这样将以下代码添加到文件中:
db_config.php
<?php

define (DB_USER, "root");
define (DB_PASSWORD, "root");
define (DB_DATABASE, "sole");
define (DB_HOST, "localhost");

$mysqli = new mysqli(DB_HOST, DB_USER, DB_PASSWORD, DB_DATABASE);
?>
步骤3:
在这一步中,我们将创建index.php文件。该文件用于显示带有删除按钮的显示图像,并显示图像的标题。现在我们将使用我们的根目录,并创建一个名为”index.php”的文件。之后,我们将像下面这样在文件中添加以下代码:
index.php
<?php
  session_start();
?>

<!DOCTYPE html>
<html>
<head>
    <title>Image Gallery Example</title>
    <!-- Latest CSS which is minified and compiled -->
    <link rel="stylesheet" href="https://maxcdn.bootstrapcdn.com/bootstrap/3.3.7/css/bootstrap.min.css">
    <!-- References: https://github.com/fancyapps/fancyBox -->
    <link rel="stylesheet" href="https://cdnjs.cloudflare.com/ajax/libs/fancybox/2.1.5/jquery.fancybox.min.css" media="screen">
    <script src="https://cdnjs.cloudflare.com/ajax/libs/jquery/3.2.1/jquery.min.js"></script>
    <script src="https://cdnjs.cloudflare.com/ajax/libs/fancybox/2.1.5/jquery.fancybox.min.js"></script>

    <style type="text/css">
    .gallery
    {
        display: inline-block;
        margin-top: 20px;
    }
    .close-icon{
    border-radius: 50%;
        position: absolute;
        right: 5px;
        top: -10px;
        padding: 5px 8px;
    }
        .form-image-upload{
            background: #e8e8e8 none repeat scroll 0 0;
            padding: 15px;
        }
    </style>
</head>
<body>

<div class="container">

    <h3> Example of Image Gallery CRUD using PHP MySQL </h3>
    <form action="/imageUpload.php" class="form-image-upload" method="POST" enctype="multipart/form-data">

        <?php if(!empty(_SESSION['error'])){ ?>
            <div class="alert alert-danger">
                <strong>Whoops!</strong> Our input faces some problems. <br><br>
                <ul>
                    <li><?php echo_SESSION['error']; ?></li>
                </ul>
            </div>
        <?php unset(_SESSION['error']); } ?>

        <?php if(!empty(_SESSION['success'])){ ?>
        <div class="alert alert-success alert-block">
            <button type="button" class="close" data-dismiss="alert">?</button>
                <strong><?php echo _SESSION['success']; ?></strong>
        </div>
        <?php unset(_SESSION['success']); } ?>

        <div class="row">
            <div class="col-md-5">
                <strong>Title:</strong>
                <input type="text" name="title" class="form-control" placeholder="Title">
            </div>
            <div class="col-md-5">
                <strong>Image:</strong>
                <input type="file" name="image" class="form-control">
            </div>
            <div class="col-md-2">
                <br/>
                <button type="submit" class="btn btn-success">Upload</button>
            </div>
        </div>

    </form>

    <div class="row">
    <div class='list-group gallery'>

            <?php
            require('db_config.php');

            sql = "SELECT * FROM image_gallery";images = mysqli->query(sql);

            while(image =images->fetch_assoc()){

            ?>
                <div class='col-sm-4 col-xs-6 col-md-3 col-lg-3'>
                    <a class="thumbnail fancybox" rel="ligthbox" href="/uploads/<?php echo image['image'] ?>">
                        <img class="img-responsive" alt="" src="/uploads/<?php echoimage['image'] ?>" />
                        <div class='text-center'>
                            <small class='text-muted'><?php echo image['title'] ?></small>
                        </div> <!-- text-center / end -->
                    </a>
                    <form action="/imageDelete.php" method="POST">
                    <input type="hidden" name="id" value="<?php echoimage['id'] ?>">
                    <button type="submit" class="close-icon btn btn-danger"><i class="glyphicon glyphicon-remove"></i></button>
                    </form>
                </div> <!-- col-6 / end -->
            <?php } ?>

        </div> <!-- list-group / end -->
    </div> <!-- row / end -->
</div> <!-- container / end -->

</body>

<script type="text/javascript">
    (document).ready(function(){(".fancybox").fancybox({
            openEffect: "none",
            closeEffect: "none"
        });
    });
</script>
</html>
步骤4:
在这一步骤中,我们将 创建一个imageUpload.php文件 . 这个文件用于验证使用会话、插入数据库代码和图片上传代码。所以我们将使用根目录并创建一个名为”imageUpload.php”的新文件。然后,我们将像以下这样将以下代码添加到文件中:
imageUpload.php
<?php

session_start();
require('db_config.php');

if(isset(_POST) && !empty(_FILES['image']['name']) && !empty(_POST['title'])){name = _FILES['image']['name'];
    list(txt, ext) = explode(".",name);
    image_name = time().".".ext;
    tmp =_FILES['image']['tmp_name'];

    if(move_uploaded_file(tmp, 'uploads/'.image_name)){

        sql = "INSERT INTO image_gallery (title, image) VALUES ('"._POST['title']."', '".image_name."')";mysqli->query(sql);_SESSION['success'] = 'Uploading of image is successfully.';
        header("Location: http://localhost:8000");
    }else{
        _SESSION['error'] = 'Uploading of image is failed';
        header("Location: http://localhost:8000");
    }
}else{_SESSION['error'] = 'Please Select Image or Write title';
    header("Location: http://localhost:8000");
}

?>
步骤5:
在这一步中,我们将 创建一个 imageDelete.php 文件 。这个文件用于从数据库中删除记录。因此,我们将使用我们的根目录,并创建一个名为 “imageDelete.php” 的新文件。在之后,我们将像下面这样,将以下代码添加到文件中:
imageDelete.php
<?php

session_start();
require('db_config.php');

if(isset(_POST) && !empty(_POST['id'])){

        sql = "DELETE FROM image_gallery WHERE id = "._POST['id'];
        mysqli->query(sql);

        _SESSION['success'] = 'Deletion of image is successfully.';
        header("Location: http://localhost:8000");
}else{_SESSION['error'] = 'Please Select Image or Write title';
    header("Location: http://localhost:8000");
}

?>
现在我们上面的图片库示例已经准备好运行了。为了运行这个示例,我们将使用我们的根目录并创建一个名为”upload”的新文件夹。在继续之前,我们希望完全拥有权限,因为upload文件夹将保存所有的图片。现在我们将使用我们的根目录并运行以下命令:
php -S localhost:8000
现在我们可以使用浏览器打开下面的URL:
http://localhost:8000/
打开后,我们可以看到以下输出:

 极客笔记
极客笔记