Django 基于类的通用视图
Django是Python中最受欢迎的Web框架,用于快速开发Web应用程序。它提供了一个内置的界面,使得使用它变得容易。它也被称为”电池包括框架”,因为它为每个操作提供了内置的功能。
我们大多数人可能已经熟悉了基于函数的视图,并知道如何使用基于函数的视图处理请求。如果你对它们不熟悉,请访问我们的Django教程。
在这个教程中,我们将介绍基于类的通用视图。这些是高级的内置视图集,用于实现选择性的CRUD(创建、检索、更新和删除)操作。使用基于类的视图,我们可以轻松处理视图的GET和POST请求。
它们不能替代基于函数的视图,但是在基于函数的视图上提供了一些额外的功能。
让我们简要地了解一下基于函数的视图和基于类的视图。
基于函数的视图
基于函数的视图适合初学者;初学者可以很容易地理解它们。与基于类的视图相比,它相当容易理解。
- 它易于理解和使用。
- 它提供了明确的代码流程。
- 使用装饰器的使用简单明了。
但基于函数的视图无法扩展,并且会导致代码冗余。
基于类的视图
基于类的视图可以用来替代基于函数的视图。所有的操作都使用Python对象而不是函数进行处理。它们在基于函数的视图上提供了一些很好的示例。基于类的视图可以以简单的方式实现CRUD操作。
- 它遵循Django的DRY约定。
- 我们可以扩展基于类的视图,并根据需求使用Mixin添加更多功能。
- 它允许继承另一个类,可以根据各种用例进行修改。
但是这些视图难以理解和阅读。它们有隐式的代码流程。
使用基于类的视图执行CRUD(创建、检索、更新、删除)
我们将演示如何使用基于类的视图创建基本的CRUD应用程序。
我们将创建名为”Hello”的项目,其中包含一个名为”sampleapp”的应用。如果你不知道如何在Django中创建应用程序,请参考Django应用程序教程。
在应用程序中,我们将在”model.py”文件中创建一个Employee模型。
示例 –
from django.db import models

# Create your models here.

class Employee(models.Model):
    first_name = models.CharField(max_length=30)
    last_name = models.CharField(max_length=30)
    mobile = models.CharField(max_length=10)
    email = models.EmailField()

    def __str__(self):
        return "%s %s" % (self.first_name, self.last_name)
然后我们运行以下命令。
makemigrationsmigrate
现在,我们将在form.py文件中为此模型创建Django ModelForm 。它将用于向模板显示表单。
forms.py
from django.forms import fields
from .models import Employee
from django import forms

class EmployeeForm(forms.ModelForm):

    class Meta:
        # To specify the model to be used to create form
        model = Employee
        # It includes all the fields of model
        fields = '__all__'
实现基于类的视图
基于函数的视图根据不同的HTTP请求方法返回不同的类实例方法。所以基于函数的视图看起来如下所示。
from django.http import HttpResponse
def function_view(request):
    if request.method == 'GET':
        # View logic will place here
        return HttpResponse('response')
如果我们实现基于类的视图,它会如下所示。
from django.http import HttpResponse
from django.views import View
class NewView(View):
    def get(self, request):
        # View logic will place here
        return HttpResponse('response')
为了处理基于类的视图,我们需要在urls.py文件中使用 as_view() 。
# urls.py
from django.urls import path
from myapp.views import NewView

urlpatterns = [
    path('about/', NewView.as_view()),
]
创建表的视图
CreateView实现了在数据库中创建表的视图。这个视图会自动完成创建实例的所有工作。我们只需要指定要创建视图的模型名称和字段。基于类的创建视图将搜索employee_form.html。让我们看下创建视图的以下示例。
注意 – employee_form.html文件应该包含在template/app_name/employee_form.html中。在我们的例子中,文件位置是template/sampleapp/employee_form.html。
View.py
from .models import Employee
from .forms import EmployeeForm
from django.views.generic.edit import CreateView

class EmployeeCreate(CreateView):
    model = Employee

    fields = '__all__'
urls.py
from django.urls import path
from .views import EmployeeCreate

urlpatterns = [
    path('', EmployeeCreate.as_view(), name = 'EmployeeCreate')
]
现在我们在本地主机上运行服务器。
输出:

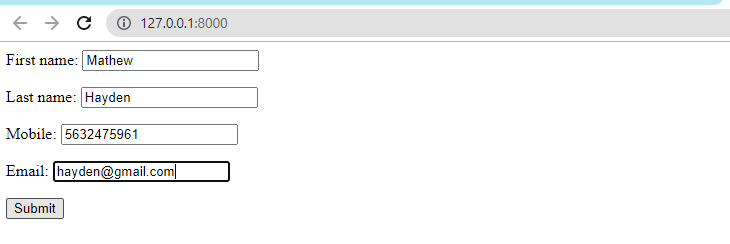
在这里,我们得到了一个可以创建员工的表单。让我们看看创建员工的演示。

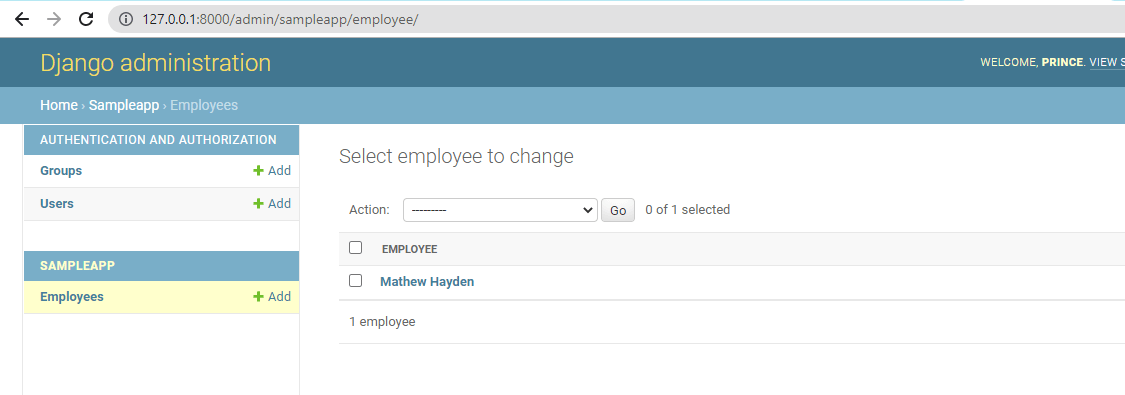
正如我们在管理面板中所看到的,员工已在数据库中创建。

检索视图
有两种类型的检索视图 – ListView 和 DetailView 。 我们将使用ListView,它是用来显示数据库表中多个实例的视图。我们只需要指定应用ListView的模型名称,基于类的ListView会自动完成工作。要检索数据,我们需要创建 app_name/modelname_list.html 文件。
views.py
from django.views.generic.list import ListView

class EmployeeRetrieve(ListView):
    model = Employee
url.py
from django.urls import path
from .views import EmployeeCreate, EmployeeRetrieve

urlpatterns = [
    path('', EmployeeCreate.as_view(), name = 'EmployeeCreate'),
    path('retrieve/', EmployeeRetrieve.as_view(), name = 'EmployeeRetrieve')
]
sampleapp/template/employee_list.html
{% extends 'base.html' %}

{% block content %}
    <ul class="nav flex-column">
        <!-- Iterate over object_list -->
        {% for object in object_list %}
        <!-- Display Objects -->
        <li class="nav-item">First Name: {{ object.first_name }}</li>
        <li class="nav-item">Last Name: {{ object.last_name }}</li>
        <li class="nav-item">Mobile: {{ object.mobile }}</li>
        <li class="nav-item"> Email: {{ object.email }}</li>

        <hr/>
        <!-- If object_list is empty -->
        {% empty %}
        <li class="nav-item">No objects Find</li>
        {% endfor %}
    </ul>

{% endblock content %}
现在,我们运行 localhost 服务器并发送请求来获取数据。

详情视图
DetailView 与列表视图不同,它展示的是数据库中一条数据的详细信息。Django会自动为每个条目分配一个主键,我们需要在请求中指定 <pk> 。DetailView会自动完成所有的操作。DetailView的实现与ListView相同,我们需要创建 modelname_detail.html 。
让我们看一下DetailView的实现。
View.py
from django.views.generic.detail import DetailView

class EmployeeDetail(DetailView):
    model = Employee
url.py
from django.urls import path
from .views import EmployeeCreate, EmployeeDetail, EmployeeRetrieve

urlpatterns = [
    path('', EmployeeCreate.as_view(), name = 'EmployeeCreate'),
    path('retrieve/', EmployeeRetrieve.as_view(), name = 'EmployeeRetrieve'),
    path('retrieve/', EmployeeDetail.as_view(), name = 'EmployeeDetail')
]
sampleapp/template/employee_detail.html
{% extends 'base.html' %}

{% block content %}

    <h1>{{ object.first_name }} {{object.last_name}}</h1>

    <p>{{ object.email }}</p>
    <p>{{ object.mobile }}</p>

{% endblock content %}
我们创建了一个新员工,并将2分配为主键。运行服务器并提供具有主键的请求。
输出:

更新视图
UpdateView 允许更新数据库中特定实例的表,并添加更多细节。该视图用于修改数据库中的条目。例如,我们想要更改用户的名字。我们只需要指定模型名称,它将自动完成一切。让我们来看看UpdateView的以下实现。
我们已经在模板中创建了 employee_form.html 文件。在我们的案例中,它位于 D:\python_project\Myfirstdjangoproject\hello\template\employee_form.html
View.py
from django.views.generic.edit import UpdateView
class EmployeeUpdate(UpdateView):
    model = Employee
url.py
from django.urls import path
from .views import EmployeeCreate, EmployeeDetail, EmployeeRetrieve, EmployeeUpdate, EmployeeDelete

urlpatterns = [
    path('', EmployeeCreate.as_view(), name = 'EmployeeCreate'),
    path('retrieve/', EmployeeRetrieve.as_view(), name = 'EmployeeRetrieve'),
    path('', EmployeeDetail.as_view(), name = 'EmployeeDetail'),
    path('/update/', EmployeeUpdate.as_view(), name = 'EmployeeUpdate'),
    path('/delete/', EmployeeDelete.as_view(), name = 'EmployeeDelete')

]
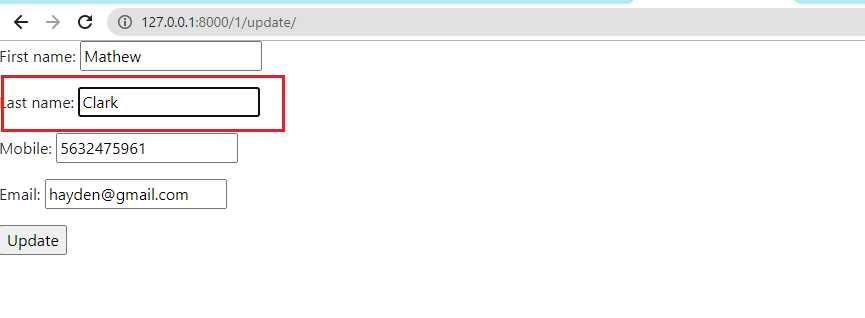
输出:

我们已经更新了对象的姓氏。更新后的值将自动添加到数据库中。

DeleteView
DeleteView允许从数据库中删除表的实例。它用于删除数据库中的记录。
我们只需要指定模型名称,它会自动完成所有操作。让我们看一下UpdateView的以下实现。
view.py
from django.views.generic.edit DeleteView

class EmployeeDelete(DeleteView):
    model = Employee

    # here we can specify the URL
    # to redirect after successful deletion
    success_url = '/'
现在,我们创建URL路径映射视图。
url.py
from django.urls import path
from .views import EmployeeCreate, EmployeeDetail, EmployeeRetrieve, EmployeeUpdate, EmployeeDelete

urlpatterns = [
    path('', EmployeeCreate.as_view(), name = 'EmployeeCreate'),
    path('retrieve/', EmployeeRetrieve.as_view(), name = 'EmployeeRetrieve'),
    path('', EmployeeDetail.as_view(), name = 'EmployeeDetail'),
    path('/update/', EmployeeUpdate, name = 'EmployeeUpdate'),
    path('/delete/', EmployeeDelete, name = 'EmployeeDelete')

]
现在,我们创建 template/sampleapp/employee_confirm_delete.html。
{% extends 'base.html' %}

{% block content %}

    <form method="post">
{% csrf_token %}

    <p>Are you sure you want to delete "{{ object }}"?</p>

    <input type="submit" value="Confirm">
</form>

{% endblock content %}
输出:

当我们点击确认按钮时,该对象将被删除并重定向到主页。
我们使用该类创建了CRUD操作。
代码
下面是基于类的通用视图的完整代码。
View.py
from django.shortcuts import redirect, render
from django.urls import reverse, reverse_lazy
from django.contrib import messages
from .models import Employee
from .forms import EmployeeForm
from django.views.generic.edit import CreateView, DeleteView, UpdateView
from django.views.generic.list import ListView
from django.views.generic.detail import DetailView

class EmployeeCreate(CreateView):
    model = Employee

    fields = '__all__'
    success_url = reverse_lazy('sampleapp: EmployeeRetrieve')

class EmployeeRetrieve(ListView):
    model = Employee
    success_url = reverse_lazy('sampleapp: EmployeeRetrieve')

class EmployeeDetail(DetailView):
    model = Employee
    success_url = reverse_lazy('sampleapp: EmployeeRetrieve')

class EmployeeUpdate(UpdateView):
    model = Employee
    template_name_suffix = '_update_form'
    fields = '__all__'
    success_url = reverse_lazy('sampleapp: EmployeeRetrieve')

    # def get_success_url(self):


class EmployeeDelete(DeleteView):
    model = Employee
    # here we can specify the URL
    # to redirect after successful deletion
    success_url = '/'
Hello/urls.py
"""Hello URL Configuration

The `urlpatterns` list routes URLs to views. For more information please see:
    https://docs.djangoproject.com/en/3.1/topics/http/urls/
Examples:
Function views
    1. Add an import:  from my_app import views
    2. Add a URL to urlpatterns:  path('', views.home, name='home')
Class-based views
    1. Add an import:  from other_app.views import Home
    2. Add a URL to urlpatterns:  path('', Home.as_view(), name='home')
Including another URLconf
    1. Import the include() function: from django.urls import include, path
    2. Add a URL to urlpatterns:  path('blog/', include('blog.urls'))
"""
from django.contrib import admin
from django.urls import path
from django.urls.conf import include

urlpatterns = [
    path('admin/', admin.site.urls),
    path('', include(('sampleapp.urls'), namespace='sampleapp'))

]
sampleapp/url.py
from django.urls import path
from .views import EmployeeCreate, EmployeeDetail, EmployeeRetrieve, EmployeeUpdate, EmployeeDelete

app_name = 'sampleapp'
urlpatterns = [
    path('', EmployeeCreate.as_view(), name = 'EmployeeCreate'),
    path('retrieve/', EmployeeRetrieve.as_view(), name = 'EmployeeRetrieve'),
    path('', EmployeeDetail.as_view(), name = 'EmployeeDetail'),
    path('/update/', EmployeeUpdate.as_view(), name = 'EmployeeUpdate'),
    path('/delete/', EmployeeDelete.as_view(), name = 'EmployeeDelete')

]
template/base.html
<!doctype html>
<html lang="en">
  <head>
    <!-- Required meta tags -->
    <meta charset="utf-8">
    <meta name="viewport" content="width=device-width, initial-scale=1">

    <!-- Bootstrap CSS -->
    <link href="https://cdn.jsdelivr.net/npm/bootstrap@5.0.2/dist/css/bootstrap.min.css" rel="stylesheet" integrity="sha384-EVSTQN3/azprG1Anm3QDgpJLIm9Nao0Yz1ztcQTwFspd3yD65VohhpuuCOmLASjC" crossorigin="anonymous">

    <title>Register Page</title>
  </head>
  <body>
  <div class = 'col-md-8'>
     {% if messages %}
        <ul>
            {% for message in messages %}
              <div class = 'alert alert-{{message.tags}}'>
                {{ message }}
              </div>
              {% endfor %}
        </ul>
    {% endif %}
  </div>
  {% block content %}
    <script src="https://cdn.jsdelivr.net/npm/bootstrap@5.0.2/dist/js/bootstrap.bundle.min.js" integrity="sha384-MrcW6ZMFYlzcLA8Nl+NtUVF0sA7MsXsP1UyJoMp4YLEuNSfAP+JcXn/tWtIaxVXM" crossorigin="anonymous"></script>


    {% endblock content %}
  </body>
</html>
template/sampleapp/employe_list
{% extends 'base.html' %}

{% block content %}

<table class="table table-borderless">
    <thead class="border-bottom font-weight-bold">
        <tr>
            <td>First Name</td>
            <td>Last Name</td>
            <td>Mobile</td>
            <td>Email</td>
                {% comment %} <a href="{% url 'EmployeeRetrieve' %}" class="btn btn-outline-success">
                    <i class="fas fa-plus"></i> Add New {% endcomment %}
                </a>
            </td>
        </tr>
    </thead>

    {% for object in object_list %}
        <!-- Display Objects -->
        <tr>
                <td>{{ object.first_name }}</td>
                <td> {{object.last_name }}</td>
                <td> {{object.mobile }}</td>
                <td>{{object.email }} </td>

            <td>
            <td><button><a href = '/{{object.pk}}/delete' class = 'class="btn text-secondary px-0'> Delete
            </a></button></td>

            <td><button><a href = '/{{object.pk}}/update' class = 'class="btn text-secondary px-0'> Update
            </a></button></td>
    {% endfor %}

</table>
template/sampleapp/employe_detail
{% extends 'base.html' %}

{% block content %}

    <h1>{{ object.first_name }} {{object.last_name}}</h1>

    {{ object.email }}
    {{ object.mobile }}

    <td><button><a href = '/{{object.pk}}/delete' class = 'class="btn text-secondary px-0'> Delete
    </a></button></td>

    <td><button><a href = '/{{object.pk}}/update' class = 'class="btn text-secondary px-0'> Update
  </a></button></td>
{% endblock content %}
template/sampleapp/employe_update_form.html
{% extends 'base.html' %}

{% block content %}
    <form method="post">
    {% csrf_token %}
        {{ form.as_p }}
        <input type="submit" value="Update">
    </form>
{% endblock content %}
template/sampleapp/employe_confirm_delete.html
{% extends 'base.html' %}

{% block content %}

    <form method="post">{% csrf_token %}

    Are you sure you want to delete "{{ object }}"?

    <input type="submit" value="Confirm">
</form>
{% endblock content %}
结论
在本教程中,我们讨论了基于类的视图以及它们与基于函数的视图的区别。我们使用内置视图实现了crud操作。
CBV是从现有视图继承和重写属性 (template_name) 或方法的一种强大的方式。
这些视图有预先编写的代码,所以我们不需要进行硬编码。但是这不推荐给初学者,因为它不会帮助理解Django的核心深度。一旦你对基于函数的视图的概念熟悉了,你可以转向基于类的视图。
 极客笔记
极客笔记