OpenCV Python 实现Shi-Tomasi角点检测器
Shi-Tomasi角点检测器是Harris角点检测器的改良算法。为了实现Shi-Tomasi角点检测器,OpenCV提供了cv2.goodFeaturesToTrack()函数。它能够在图像中检测出N个最强的角点。
步骤
要使用Shi-Tomasi角点检测器在图像中检测角点,可以按照以下步骤进行:
- 导入所需的库,包括OpenCV和NumPy。确保已经安装了这些库。
-
使用cv2.imread()方法读取输入图像。指定图像的完整路径。使用cv2.cvtColor()方法将输入图像转换为灰度图像。
-
在灰度图像上应用cv2.goodFeaturesToTrack()函数。将适当数量的角点、质量水平和两个角点之间的欧氏距离作为参数传递给该方法。该函数将以浮点数形式返回图像中的角点。将这些浮点数形式的角点转换为整数。
-
在输入图像上绘制角点,以小半径的实心圆表示。
-
显示带有检测到的角点的图像。
让我们通过示例来看如何使用Shi-Tomasi角点检测器在图像中检测角点。
输入图像
我们将在下面的示例中使用此图像作为输入文件。

示例
在这个示例中,我们使用Shi-Tomasi角点检测器检测输入图像中的角点。
# import required libraries
import numpy as np
import cv2

# read the input image
img = cv2.imread('building.jpg')

# convert the image to grayscale
gray = cv2.cvtColor(img,cv2.COLOR_BGR2GRAY)

# apply Shi-Tomasi corner detector on gray image

# to detect 50 best corners
corners = cv2.goodFeaturesToTrack(gray,50,0.01,10)

# convert floating points to integers
corners = np.int0(corners)

# loop over all points and draw corner points as circles
for i in corners:
   x,y = i.ravel()
   cv2.circle(img,(x,y),3,(0,0,255),-1)
# Display image with corner points drawn on it
cv2.imshow("Corners", img)
cv2.waitKey(0)
cv2.destroyAllWindows()
输出
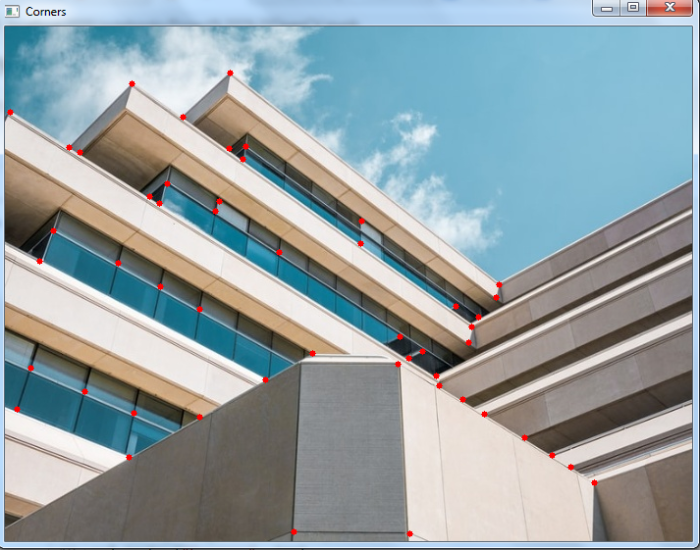
当你运行上述的Python程序时,它将产生如下的输出窗口-

上面的输出图像显示了使用 Shi-Tomasi 角点检测器检测到的角点。角点以红色显示。
 极客笔记
极客笔记