NumPy中如何将2D数组重塑为3D数组:reshape函数详解
NumPy是Python中用于科学计算的核心库之一,它提供了强大的多维数组对象和用于处理这些数组的工具。在数据处理和机器学习领域中,经常需要对数组的形状进行调整,以适应不同的算法或模型要求。本文将详细介绍如何使用NumPy的reshape函数将2D数组重塑为3D数组,并提供多个实用示例。
1. NumPy reshape函数简介
NumPy的reshape函数是一个非常强大和灵活的工具,用于改变数组的形状而不改变其数据。这个函数可以将一个数组重新排列成具有指定形状的新数组。
reshape函数的基本语法如下:
numpy.reshape(a, newshape, order='C')
其中:
– a是要重塑的数组
– newshape是一个整数或者整数元组,指定新的形状
– order参数决定元素在内存中的读取顺序,默认为’C’(按行优先)
下面是一个简单的示例,展示如何使用reshape函数:
import numpy as np

# 创建一个包含numpyarray.com字符串的1D数组
arr = np.array(['numpy', 'array', 'com', 'reshape', 'example'])

# 将1D数组重塑为2D数组
reshaped_arr = arr.reshape(1, 5)

print(reshaped_arr)
Output:

在这个例子中,我们将一个1D数组重塑为一个1行5列的2D数组。
2. 从2D到3D:理解维度的概念
在深入讨论如何将2D数组重塑为3D数组之前,我们需要理解维度的概念。
- 1D数组:可以看作是一条线,只有一个方向(例如:一列数字)
- 2D数组:可以看作是一个平面,有两个方向(例如:一个表格)
- 3D数组:可以看作是一个立方体,有三个方向(例如:多个堆叠的表格)
将2D数组重塑为3D数组,实际上是在原有的两个维度基础上添加了第三个维度。这通常用于处理时间序列数据、图像处理或者在深度学习中处理批量数据。
3. 使用reshape函数将2D数组转换为3D数组
现在,让我们看一个具体的例子,展示如何使用reshape函数将2D数组转换为3D数组:
import numpy as np

# 创建一个2D数组,包含numpyarray.com相关的字符串
arr_2d = np.array([['numpy', 'array', 'com'],
                   ['reshape', '2d', '3d'],
                   ['example', 'data', 'processing']])

# 将2D数组重塑为3D数组
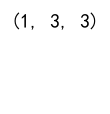
arr_3d = arr_2d.reshape(1, 3, 3)

print(arr_3d.shape)
Output:

在这个例子中,我们创建了一个3×3的2D数组,然后将其重塑为一个1x3x3的3D数组。新的形状(1, 3, 3)表示:
– 1个”层”
– 每层有3行
– 每行有3列
这种转换可以理解为将原来的2D表格”提升”到了3D空间中的一个平面。
4. 计算新形状的维度
在使用reshape函数时,一个关键点是要确保新形状的元素总数与原数组的元素总数相同。我们可以使用NumPy的prod函数来计算数组形状的乘积:
import numpy as np

# 创建一个2D数组
arr_2d = np.array([['numpyarray.com' for _ in range(4)] for _ in range(6)])

# 计算原数组的元素总数
total_elements = np.prod(arr_2d.shape)

# 计算新的3D形状
new_shape = (2, 3, -1)  # -1表示让NumPy自动计算这个维度

# 重塑数组
arr_3d = arr_2d.reshape(new_shape)

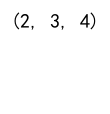
print(arr_3d.shape)
Output:

在这个例子中,我们使用-1作为新形状的一个维度,这告诉NumPy自动计算这个维度的大小,以确保总元素数量保持不变。
5. 处理不规则形状的2D数组
有时,我们可能需要处理不规则形状的2D数组。在这种情况下,我们需要特别注意确保重塑操作是有效的:
import numpy as np

# 创建一个不规则形状的2D数组
arr_2d = np.array([['numpy', 'array'],
                   ['com', 'reshape', '2d', '3d'],
                   ['example', 'irregular', 'shape']])

# 将数组展平
flattened = arr_2d.flatten()

# 计算新的3D形状
new_shape = (1, 3, -1)

# 重塑数组
arr_3d = flattened.reshape(new_shape)

print(arr_3d.shape)
在这个例子中,我们首先将不规则的2D数组展平为1D数组,然后再重塑为3D数组。这种方法可以处理各种不规则形状的输入。
6. 使用reshape函数处理图像数据
在图像处理中,reshape函数经常被用来调整图像数据的形状。例如,将多张图片组合成一个3D数组:
import numpy as np

# 模拟3张28x28的灰度图像
image1 = np.random.rand(28, 28)
image2 = np.random.rand(28, 28)
image3 = np.random.rand(28, 28)

# 将图像组合成一个3D数组
images_3d = np.array([image1, image2, image3])

print(f"Shape of 3D image array: {images_3d.shape}")

# 添加一个维度以适应某些深度学习模型的输入要求
images_4d = images_3d.reshape(-1, 28, 28, 1)

print(f"Shape of 4D image array: {images_4d.shape}")
Output:

这个例子展示了如何将多个2D图像组合成一个3D数组,然后再添加一个维度创建4D数组,这在深度学习中处理图像数据时很常见。
7. 在时间序列数据中应用reshape
在处理时间序列数据时,reshape函数可以帮助我们将数据组织成适合某些算法的形状:
import numpy as np

# 创建一个模拟时间序列数据的2D数组
time_series = np.array([['numpyarray.com', 'time', 'series', 'data'] for _ in range(24)])

# 将数据重塑为3D数组,每8小时为一组
reshaped_series = time_series.reshape(3, 8, -1)

print(f"Shape of reshaped time series: {reshaped_series.shape}")
Output:

这个例子展示了如何将24小时的数据重组为3个8小时的组,这种操作在分析日内模式或准备序列模型的输入时很有用。
8. 使用reshape进行数据增强
在机器学习中,数据增强是一种常用的技术,用于扩展训练数据集。reshape函数可以在这个过程中发挥作用:
import numpy as np

# 创建一个代表图像的2D数组
image = np.array([['numpyarray.com' for _ in range(4)] for _ in range(4)])

# 使用reshape创建多个视图
views = image.reshape(1, 4, 4, 1)
flipped = np.flip(views, axis=2)
rotated = np.rot90(views.squeeze(), k=1, axes=(1, 2)).reshape(1, 4, 4, 1)

# 组合原始和增强的图像
augmented = np.concatenate([views, flipped, rotated], axis=0)

print(f"Shape of augmented data: {augmented.shape}")
这个例子展示了如何使用reshape结合其他NumPy函数来创建图像的不同变体,从而增加数据集的多样性。
9. 在批处理操作中使用reshape
在处理大量数据时,我们经常需要将数据组织成批次。reshape函数在这种情况下非常有用:
import numpy as np

# 创建一个大的2D数组,代表多个样本
data = np.array([['numpyarray.com', 'batch', 'processing'] for _ in range(100)])

# 将数据重塑为批次
batch_size = 10
num_batches = len(data) // batch_size
batched_data = data.reshape(num_batches, batch_size, -1)

print(f"Shape of batched data: {batched_data.shape}")
Output:

这个例子展示了如何将一个大的2D数组重塑为多个批次,每个批次包含10个样本。这种操作在实现小批量梯度下降等算法时非常有用。
10. 使用reshape进行特征工程
在特征工程过程中,reshape函数可以帮助我们重组数据,创造新的特征:
import numpy as np

# 创建一个代表多个时间序列的2D数组
time_series = np.array([['numpyarray.com', 'feature', 'engineering'] for _ in range(24)])

# 使用reshape创建滑动窗口
window_size = 3
num_windows = len(time_series) - window_size + 1
windowed_data = np.array([time_series[i:i+window_size] for i in range(num_windows)])

print(f"Shape of windowed data: {windowed_data.shape}")
Output:

这个例子展示了如何使用reshape创建滑动窗口,这是一种常用的时间序列特征工程技术。
11. 在矩阵运算中应用reshape
reshape函数在矩阵运算中也有重要应用,特别是在需要调整矩阵维度以进行特定运算时:
import numpy as np

# 创建两个2D矩阵
matrix1 = np.array([['numpy', 'array', 'com'] for _ in range(3)])
matrix2 = np.array([['reshape', 'matrix', 'ops'] for _ in range(3)])

# 将矩阵重塑为适合矩阵乘法的形状
reshaped_matrix1 = matrix1.reshape(3, 1, 3)
reshaped_matrix2 = matrix2.reshape(1, 3, 3)

# 执行广播矩阵乘法
result = np.matmul(reshaped_matrix1, reshaped_matrix2)

print(f"Shape of result: {result.shape}")
这个例子展示了如何使用reshape函数来准备矩阵,以便进行广播矩阵乘法操作。
12. 在深度学习中使用reshape
在深度学习中,reshape函数经常用于调整数据的形状以匹配神经网络的输入要求:
import numpy as np

# 创建一个代表图像数据集的数组
images = np.array([[['numpyarray.com' for _ in range(3)] for _ in range(28)] for _ in range(100)])

# 重塑图像以适应卷积神经网络的输入
reshaped_images = images.reshape(-1, 28, 28, 3)

print(f"Shape of reshaped images for CNN: {reshaped_images.shape}")

# 重塑图像以适应全连接神经网络的输入
flattened_images = images.reshape(images.shape[0], -1)

print(f"Shape of flattened images for FCN: {flattened_images.shape}")
这个例子展示了如何使用reshape函数来准备图像数据,以适应卷积神经网络(CNN)和全连接神经网络(FCN)的不同输入要求。
13. 使用reshape进行数据规范化
在数据预处理阶段,reshape函数可以帮助我们标准化数据的形状:
import numpy as np

# 创建一个不规则的2D数组
irregular_data = np.array([['numpyarray.com', 'data', 'normalization'],
                           ['reshape', 'example'],
                           ['standardize', 'input', 'shape', 'for', 'model']])

# 找出最长的子数组长度
max_length = max(len(row) for row in irregular_data)

# 创建一个新的规范化数组
normalized_data = np.full((len(irregular_data), max_length), 'pad_value', dtype=object)

# 填充数据
for i, row in enumerate(irregular_data):
    normalized_data[i, :len(row)] = row

print(f"Shape of normalized data: {normalized_data.shape}")
这个例子展示了如何使用reshape和其他NumPy函数来规范化不规则数据的形状,这在处理自然语言处理任务中的变长序列时特别有用。
14. 在数据可视化中应用reshape
reshape函数在准备数据进行可视化时也很有用,特别是在处理多维数据时:
import numpy as np

# 创建一个3D数组,代表一年中每天的温度数据
temperature_data = np.random.rand(365, 24)  # 365天,每天24小时

# 重塑数据以便于可视化

reshaped_data = temperature_data.reshape(52, 7, 24)  # 52周,每周7天,每天24小时

print(f"Shape of reshaped data for visualization: {reshaped_data.shape}")
这个例子展示了如何将一年的温度数据重塑为更易于可视化的形式,例如创建热图来显示每周的温度模式。
15. 使用reshape进行数据压缩和解压缩
reshape函数可以用于简单的数据压缩和解压缩操作:
import numpy as np

# 创建一个3D数组
original_data = np.array([[['numpyarray.com' for _ in range(3)] for _ in range(4)] for _ in range(5)])

# 压缩数据(将3D数组压缩为1D)
compressed_data = original_data.reshape(-1)

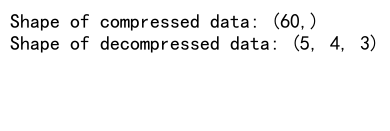
print(f"Shape of compressed data: {compressed_data.shape}")

# 解压数据(将1D数组恢复为原始的3D形状)
decompressed_data = compressed_data.reshape(5, 4, 3)

print(f"Shape of decompressed data: {decompressed_data.shape}")
Output:

这个例子展示了如何使用reshape函数将3D数据压缩为1D,然后再解压回原始的3D形状。这种技术在数据存储和传输中可能会有用。
16. 在信号处理中使用reshape
在信号处理中,reshape函数可以用来重组信号数据,例如将时域信号转换为频域表示:
import numpy as np

# 创建一个模拟时域信号的1D数组
time_signal = np.array(['numpyarray.com' for _ in range(1024)])

# 将信号重塑为2D数组,每行代表一个时间窗口
window_size = 64
num_windows = len(time_signal) // window_size
reshaped_signal = time_signal.reshape(num_windows, window_size)

print(f"Shape of reshaped signal: {reshaped_signal.shape}")

# 模拟对每个窗口进行傅里叶变换
frequency_domain = np.fft.fft(reshaped_signal)

print(f"Shape of frequency domain representation: {frequency_domain.shape}")
这个例子展示了如何使用reshape函数将一维时域信号重组为二维数组,其中每一行代表一个时间窗口。这种操作在进行短时傅里叶变换(STFT)等分析时很常见。
17. 在图像处理中使用reshape进行颜色空间转换
reshape函数在图像处理中的颜色空间转换操作中也很有用:
import numpy as np

# 创建一个模拟RGB图像的3D数组
rgb_image = np.array([[['numpyarray.com' for _ in range(3)] for _ in range(100)] for _ in range(100)])

# 将RGB图像重塑为2D数组,每行代表一个像素
reshaped_image = rgb_image.reshape(-1, 3)

print(f"Shape of reshaped image: {reshaped_image.shape}")

# 模拟颜色空间转换(例如,RGB到HSV)
# 这里我们只是创建一个新的数组来代表转换后的结果
hsv_image = np.array([['hsv' for _ in range(3)] for _ in range(reshaped_image.shape[0])])

# 将转换后的图像重塑回原始的3D形状
converted_image = hsv_image.reshape(100, 100, 3)

print(f"Shape of converted image: {converted_image.shape}")
Output:

这个例子展示了如何使用reshape函数在RGB和HSV颜色空间之间进行转换。虽然这里没有实际执行转换,但它展示了reshape在这类操作中的应用。
18. 在自然语言处理中使用reshape
在自然语言处理任务中,reshape函数可以用来准备文本数据以供模型使用:
import numpy as np

# 创建一个代表句子的2D数组,每个句子由单词组成
sentences = np.array([['numpyarray.com', 'is', 'useful'],
                      ['reshape', 'in', 'nlp', 'tasks'],
                      ['processing', 'text', 'data']])

# 将句子重塑为一个长序列
flattened = sentences.reshape(-1)

print(f"Shape of flattened sentences: {flattened.shape}")

# 假设我们要创建固定长度的序列,不足的部分用填充值
sequence_length = 5
num_sequences = len(flattened) // sequence_length + 1

padded = np.full(num_sequences * sequence_length, 'PAD', dtype=object)
padded[:len(flattened)] = flattened

reshaped_sequences = padded.reshape(-1, sequence_length)

print(f"Shape of reshaped sequences: {reshaped_sequences.shape}")
这个例子展示了如何使用reshape函数将不规则的句子数据转换为固定长度的序列,这在准备文本数据以供循环神经网络或转换器模型使用时很常见。
19. 在数据增强中使用reshape进行旋转
reshape函数结合其他NumPy操作可以用于实现简单的图像旋转,这是数据增强的一种常见技术:
import numpy as np

# 创建一个代表2x2图像的2D数组
image = np.array([['numpyarray.com', 'rotation'],
                  ['data', 'augmentation']])

# 使用reshape和转置操作进行90度旋转
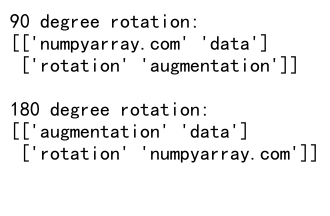
rotated_90 = image.reshape(1, 2, 2, 1).transpose(0, 2, 1, 3).reshape(2, 2)

print("90 degree rotation:")
print(rotated_90)

# 使用reshape和翻转操作进行180度旋转
rotated_180 = image.reshape(1, 2, 2, 1)[:, ::-1, ::-1, :].reshape(2, 2)

print("\n180 degree rotation:")
print(rotated_180)
Output:

这个例子展示了如何使用reshape函数结合转置和翻转操作来实现简单的图像旋转。这种技术可以扩展到更大的图像和更复杂的旋转角度。
20. 在神经网络中使用reshape调整张量形状
在深度学习中,经常需要调整张量的形状以适应不同层的输入要求。reshape函数在这种情况下非常有用:
import numpy as np

# 创建一个代表批量图像数据的4D数组
batch_images = np.array([[['numpyarray.com' for _ in range(3)] for _ in range(28)] for _ in range(32)])

# 重塑为适合卷积层的输入
conv_input = batch_images.reshape(-1, 28, 28, 3)
print(f"Shape for convolutional layer: {conv_input.shape}")

# 重塑为适合全连接层的输入
fc_input = batch_images.reshape(batch_images.shape[0], -1)
print(f"Shape for fully connected layer: {fc_input.shape}")

# 重塑为适合LSTM层的输入(假设我们将每行像素视为一个时间步)
lstm_input = batch_images.reshape(batch_images.shape[0], 28, -1)
print(f"Shape for LSTM layer: {lstm_input.shape}")
这个例子展示了如何使用reshape函数来调整批量图像数据的形状,以适应卷积层、全连接层和LSTM层的不同输入要求。这种操作在构建和训练复杂的神经网络模型时经常使用。
总结
通过以上详细的介绍和多个实例,我们深入探讨了NumPy中reshape函数的强大功能,特别是在将2D数组重塑为3D数组方面的应用。我们看到,reshape函数不仅可以简单地改变数组的形状,还可以在各种数据处理、机器学习和深度学习任务中发挥关键作用。
从基本的维度转换到复杂的数据预处理,从图像处理到自然语言处理,reshape函数都展现出了其多样性和实用性。它能够帮助我们灵活地调整数据结构,以满足不同算法和模型的需求,同时保持数据的完整性。
在实际应用中,熟练掌握reshape函数可以大大提高数据处理的效率和灵活性。无论是在数据准备、特征工程、模型构建还是结果分析阶段,reshape函数都是一个不可或缺的工具。
通过本文的学习,读者应该能够更好地理解和运用reshape函数,特别是在处理多维数组时。希望这些示例和解释能够帮助你在日常的数据科学和机器学习工作中更有效地使用NumPy的reshape功能。
 极客笔记
极客笔记