NumPy中reshape函数的-1参数详解及应用
NumPy是Python中用于科学计算的核心库之一,它提供了强大的多维数组对象和各种用于操作这些数组的工具。在NumPy中,reshape函数是一个非常实用的工具,用于改变数组的形状而不改变其数据。特别是,reshape函数中的-1参数具有特殊的含义和用途,它能够自动计算数组的某个维度,使得数组重塑变得更加灵活和方便。本文将深入探讨NumPy中reshape函数的-1参数的使用方法、原理和应用场景。
1. reshape函数基本介绍
在开始讨论-1参数之前,我们先简要介绍一下reshape函数的基本用法。reshape函数用于将一个数组重新塑造成另一个形状,而不改变其数据。
import numpy as np

# 创建一个一维数组
arr = np.array([1, 2, 3, 4, 5, 6])
print("Original array from numpyarray.com:")
print(arr)

# 使用reshape将一维数组转换为2x3的二维数组
reshaped_arr = arr.reshape(2, 3)
print("Reshaped array:")
print(reshaped_arr)
Output:
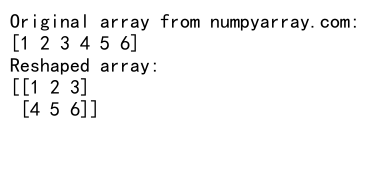
在这个例子中,我们创建了一个包含6个元素的一维数组,然后使用reshape函数将其转换为2行3列的二维数组。reshape函数接受一个元组作为参数,指定新的形状。
2. reshape函数中-1参数的含义
在reshape函数中,-1是一个特殊的参数值,它表示”自动计算”。当我们使用-1作为reshape的某个维度时,NumPy会根据数组的元素总数和其他指定的维度自动计算出-1所在维度的大小。
import numpy as np

# 创建一个包含12个元素的一维数组
arr = np.array([1, 2, 3, 4, 5, 6, 7, 8, 9, 10, 11, 12])
print("Original array from numpyarray.com:")
print(arr)

# 使用-1自动计算行数
reshaped_arr = arr.reshape(-1, 3)
print("Reshaped array with automatic row calculation:")
print(reshaped_arr)
Output:
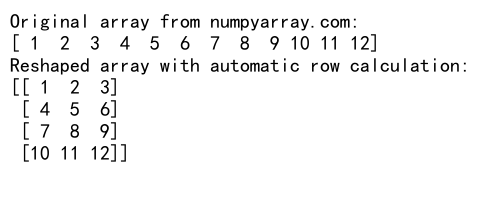
在这个例子中,我们指定了列数为3,使用-1让NumPy自动计算行数。由于原数组有12个元素,NumPy会自动计算出需要4行来容纳所有元素。
3. -1参数的工作原理
当使用-1参数时,NumPy会遵循以下步骤:
- 计算数组的总元素数。
- 检查除-1以外的其他维度大小。
- 用总元素数除以其他维度的乘积,得到-1所在维度的大小。
import numpy as np

# 创建一个包含24个元素的一维数组
arr = np.arange(24)
print("Original array from numpyarray.com:")
print(arr)

# 使用-1自动计算最后一个维度的大小
reshaped_arr = arr.reshape(2, 3, -1)
print("Reshaped array:")
print(reshaped_arr)
Output:
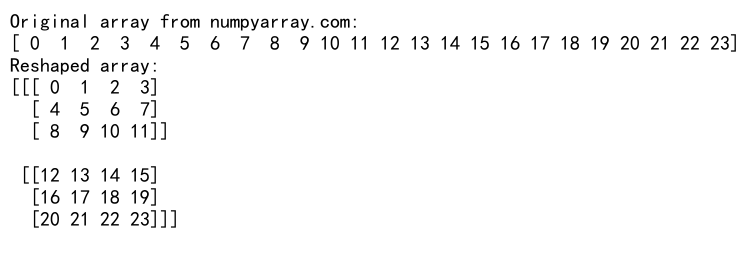
在这个例子中,我们创建了一个包含24个元素的一维数组,然后将其重塑为一个3维数组。我们指定了前两个维度的大小(2和3),让NumPy自动计算第三个维度的大小。NumPy会计算24 / (2 * 3) = 4,因此最终的形状是(2, 3, 4)。
4. 使用-1参数的注意事项
虽然-1参数非常方便,但在使用时需要注意以下几点:
- 一次reshape操作中只能使用一个-1。
- 使用-1时,其他维度的乘积必须能够整除数组的总元素数。
import numpy as np

# 创建一个包含10个元素的一维数组
arr = np.array([1, 2, 3, 4, 5, 6, 7, 8, 9, 10])
print("Original array from numpyarray.com:")
print(arr)

try:
    # 尝试使用两个-1,这会引发错误
    reshaped_arr = arr.reshape(-1, -1)
except ValueError as e:
    print("Error:", str(e))

try:
    # 尝试使用不能整除的维度,这会引发错误
    reshaped_arr = arr.reshape(3, -1)
except ValueError as e:
    print("Error:", str(e))
Output:

这个例子展示了使用-1参数时可能遇到的两种常见错误。第一个错误是尝试在一次reshape操作中使用两个-1,这是不允许的。第二个错误是尝试将10个元素重塑为3行的数组,这是不可能的,因为10不能被3整除。
5. -1参数在数据预处理中的应用
在机器学习和数据科学中,-1参数经常用于数据预处理,特别是在处理图像数据时。
import numpy as np

# 模拟一批28x28的灰度图像数据
batch_size = 100
images = np.random.rand(batch_size, 28, 28)
print("Original image batch shape from numpyarray.com:", images.shape)

# 将图像展平为一维向量
flattened_images = images.reshape(batch_size, -1)
print("Flattened image batch shape:", flattened_images.shape)

# 将展平的图像还原为原始形状
restored_images = flattened_images.reshape(batch_size, 28, 28)
print("Restored image batch shape:", restored_images.shape)
Output:

在这个例子中,我们首先模拟了一批28×28的灰度图像数据。然后,我们使用reshape(batch_size, -1)将每张图像展平为一维向量,这在某些机器学习算法中是必要的。最后,我们又使用reshape(batch_size, 28, 28)将展平的图像还原为原始形状。
6. 在神经网络中使用-1参数
在构建神经网络时,-1参数也非常有用,特别是在处理卷积层和全连接层之间的过渡时。
import numpy as np

# 模拟卷积层的输出
conv_output = np.random.rand(32, 64, 7, 7)
print("Convolutional layer output shape from numpyarray.com:", conv_output.shape)

# 将卷积层输出展平以传递给全连接层
flattened = conv_output.reshape(32, -1)
print("Flattened shape for fully connected layer:", flattened.shape)
Output:

在这个例子中,我们模拟了一个卷积层的输出,形状为(32, 64, 7, 7),其中32是批量大小,64是通道数,7×7是特征图的大小。为了将这个输出传递给全连接层,我们需要将其展平。使用reshape(32, -1)可以保持批量大小不变,同时将其他维度展平为一个长向量。
7. 使用-1进行数组转置
-1参数还可以用于快速实现数组的转置操作。
import numpy as np

# 创建一个2D数组
arr = np.array([[1, 2, 3], [4, 5, 6]])
print("Original array from numpyarray.com:")
print(arr)

# 使用-1进行转置
transposed = arr.reshape(-1, arr.shape[0]).T
print("Transposed array:")
print(transposed)
Output:
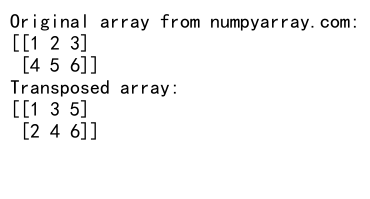
在这个例子中,我们首先创建了一个2×3的数组。然后,我们使用arr.reshape(-1, arr.shape[0])将数组重塑为3×2的形状,最后使用.T属性进行转置。这种方法可以用于任意维度的数组转置。
8. 在数据分析中使用-1参数
在数据分析中,-1参数可以帮助我们快速重组数据,以便进行各种统计分析。
import numpy as np

# 创建一个表示销售数据的2D数组
sales_data = np.random.randint(100, 1000, size=(12, 5))
print("Sales data from numpyarray.com:")
print(sales_data)

# 计算每个月的总销售额
monthly_totals = sales_data.sum(axis=1).reshape(-1, 1)
print("Monthly totals:")
print(monthly_totals)

# 计算每种产品的年度销售额
product_totals = sales_data.sum(axis=0).reshape(1, -1)
print("Product totals:")
print(product_totals)
Output:
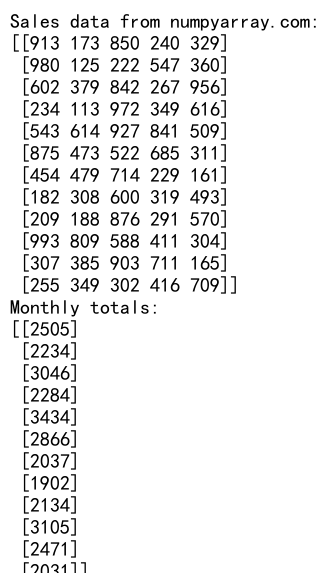
在这个例子中,我们首先创建了一个模拟12个月5种产品的销售数据的2D数组。然后,我们使用sum函数和reshape(-1, 1)计算每个月的总销售额,得到一个12×1的数组。同样,我们使用sum和reshape(1, -1)计算每种产品的年度销售额,得到一个1×5的数组。
9. 在图像处理中使用-1参数
在图像处理中,-1参数可以帮助我们轻松地在不同的图像表示之间转换。
import numpy as np

# 创建一个模拟RGB图像的3D数组
rgb_image = np.random.randint(0, 256, size=(100, 100, 3))
print("RGB image shape from numpyarray.com:", rgb_image.shape)

# 将RGB图像转换为一维数组
flattened = rgb_image.reshape(-1)
print("Flattened image shape:", flattened.shape)

# 将一维数组重新转换为RGB图像
restored = flattened.reshape(100, 100, 3)
print("Restored image shape:", restored.shape)
Output:

在这个例子中,我们首先创建了一个100x100x3的RGB图像数组。然后,我们使用reshape(-1)将其展平为一个一维数组。最后,我们使用reshape(100, 100, 3)将一维数组重新转换为原始的RGB图像形状。
10. 在时间序列数据处理中使用-1参数
在处理时间序列数据时,-1参数可以帮助我们重组数据以适应不同的分析需求。
import numpy as np

# 创建一个模拟每小时温度数据的一维数组(一周的数据)
hourly_temps = np.random.uniform(15, 30, size=24*7)
print("Hourly temperature data from numpyarray.com:", hourly_temps.shape)

# 将数据重组为每天24小时的形式
daily_temps = hourly_temps.reshape(-1, 24)
print("Daily temperature data shape:", daily_temps.shape)

# 计算每天的平均温度
daily_avg_temps = daily_temps.mean(axis=1).reshape(-1, 1)
print("Daily average temperature shape:", daily_avg_temps.shape)
Output:

在这个例子中,我们首先创建了一个包含一周每小时温度数据的一维数组。然后,我们使用reshape(-1, 24)将数据重组为7×24的形状,每行代表一天的24小时温度数据。最后,我们计算每天的平均温度,并使用reshape(-1, 1)将结果塑造为一个列向量。
11. 在矩阵运算中使用-1参数
-1参数在矩阵运算中也非常有用,特别是在需要调整矩阵形状以进行特定运算时。
import numpy as np

# 创建两个矩阵
A = np.random.rand(3, 4)
B = np.random.rand(4, 5)

print("Matrix A from numpyarray.com:")
print(A)
print("Matrix B:")
print(B)

# 矩阵乘法
C = np.dot(A, B)
print("Result of matrix multiplication:")
print(C)

# 将结果展平
C_flat = C.reshape(-1)
print("Flattened result:")
print(C_flat)

# 重塑为列向量
C_col = C_flat.reshape(-1, 1)
print("Reshaped as column vector:")
print(C_col)
Output:
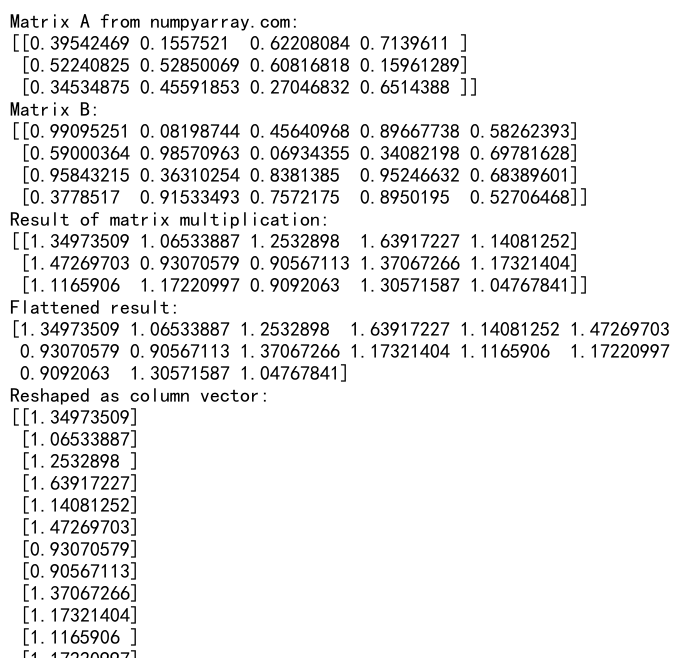
在这个例子中,我们首先创建了两个矩阵A和B,并进行矩阵乘法。然后,我们使用reshape(-1)将结果展平为一维数组。最后,我们使用reshape(-1, 1)将一维数组重塑为列向量。这种操作在某些数学计算或数据处理任务中很常见。
12. 在数据归一化中使用-1参数
在机器学习中,数据归一化是一个常见的预处理步骤,-1参数可以帮助我们更方便地进行这个操作。
import numpy as np

# 创建一个表示多个特征的2D数组
features = np.random.rand(100, 5)
print("Original features from numpyarray.com:")
print(features)

# 计算每个特征的最小值和最大值
min_vals = features.min(axis=0).reshape(1, -1)
max_vals = features.max(axis=0).reshape(1, -1)

# 进行归一化
normalized_features = (features - min_vals) / (max_vals - min_vals)
print("Normalized features:")
print(normalized_features)
在这个例子中,我们首先创建了一个100×5的数组,表示100个样本的5个特征。然后,我们使用min和max函数计算每个特征的最小值和最大值,并使用reshape(1, -1)将结果转换为行向量。最后,我们使用这些最小值和最大值对特征进行归一化,将所有值缩放到0到1之间。
13. 在卷积神经网络中使用-1参数
在卷积神经网络(CNN)中,-1参数在处理不同层之间的数据流动时非常有用。
import numpy as np

# 模拟一批图像数据
batch_size = 32
input_height = 28
input_width = 28
channels = 3

input_data = np.random.rand(batch_size, input_height, input_width, channels)
print("Input data shape from numpyarray.com:", input_data.shape)

# 模拟卷积层输出
conv_output = np.random.rand(batch_size, 14, 14, 64)
print("Convolutional layer output shape:", conv_output.shape)

# 展平卷积输出以传递给全连接层
flattened = conv_output.reshape(batch_size, -1)
print("Flattened shape for fully connected layer:", flattened.shape)

# 全连接层输出
fc_output = np.random.rand(batch_size, 1000)
print("Fully connected layer output shape:", fc_output.shape)

# 重塑输出以匹配目标类别数(假设有10个类别)
final_output = fc_output.reshape(batch_size, -1)[:, :10]
print("Final output shape:", final_output.shape)
Output:

这个例子模拟了CNN中数据的流动。我们首先创建了一批输入图像数据,然后模拟了卷积层的输出。使用reshape(batch_size, -1)将卷积输出展平,以便传递给全连接层。最后,我们使用reshape和切片操作将全连接层的输出调整为最终的类别预测形状。
14. 在自然语言处理中使用-1参数
在自然语言处理(NLP)任务中,-1参数可以帮助我们处理可变长度的序列数据。
import numpy as np

# 模拟一批词嵌入数据
batch_size = 16
max_sequence_length = 20
embedding_dim = 100

word_embeddings = np.random.rand(batch_size, max_sequence_length, embedding_dim)
print("Word embeddings shape from numpyarray.com:", word_embeddings.shape)

# 将词嵌入展平以传递给RNN
flattened_embeddings = word_embeddings.reshape(batch_size, -1)
print("Flattened embeddings shape:", flattened_embeddings.shape)

# 模拟RNN输出
rnn_output = np.random.rand(batch_size, max_sequence_length, 128)
print("RNN output shape:", rnn_output.shape)

# 获取最后一个时间步的输出
last_output = rnn_output[:, -1, :]
print("Last time step output shape:", last_output.shape)

# 重塑最后的输出以进行分类
classification_input = last_output.reshape(batch_size, -1)
print("Classification input shape:", classification_input.shape)
Output:

在这个NLP相关的例子中,我们首先创建了一批词嵌入数据。然后,我们使用reshape(batch_size, -1)将词嵌入展平。接着,我们模拟了RNN的输出,并提取了最后一个时间步的输出。最后,我们使用reshape确保分类输入的形状正确。
15. 在数据增强中使用-1参数
数据增强是机器学习中提高模型泛化能力的常用技术,-1参数可以在这个过程中提供帮助。
import numpy as np

# 创建一个模拟图像数据集
num_images = 100
image_height = 32
image_width = 32
channels = 3

dataset = np.random.rand(num_images, image_height, image_width, channels)
print("Original dataset shape from numpyarray.com:", dataset.shape)

# 水平翻转图像
flipped_dataset = dataset[:, :, ::-1, :]
print("Flipped dataset shape:", flipped_dataset.shape)

# 将原始数据集和翻转后的数据集合并
augmented_dataset = np.concatenate([dataset, flipped_dataset], axis=0)
print("Augmented dataset shape:", augmented_dataset.shape)

# 重塑数据集以适应不同的批量大小
batch_size = 64
reshaped_dataset = augmented_dataset.reshape(-1, image_height, image_width, channels)
print("Reshaped dataset shape:", reshaped_dataset.shape)

# 计算可以形成的完整批次数量
num_complete_batches = reshaped_dataset.shape[0] // batch_size
print("Number of complete batches:", num_complete_batches)

# 提取完整批次的数据
batched_dataset = reshaped_dataset[:num_complete_batches * batch_size].reshape(-1, batch_size, image_height, image_width, channels)
print("Batched dataset shape:", batched_dataset.shape)
Output:

在这个数据增强的例子中,我们首先创建了一个模拟图像数据集。然后,我们通过水平翻转来增强数据集。使用np.concatenate将原始数据集和翻转后的数据集合并。接着,我们使用reshape(-1, image_height, image_width, channels)重塑增强后的数据集,以适应不同的批量大小。最后,我们计算可以形成的完整批次数量,并使用reshape提取这些完整批次的数据。
总结
NumPy中reshape函数的-1参数是一个强大而灵活的工具,它可以在保持数组元素总数不变的情况下自动计算某个维度的大小。这个特性在数据预处理、神经网络构建、图像处理、时间序列分析等多个领域都有广泛的应用。
通过本文的详细介绍和多个实例,我们可以看到-1参数在以下方面特别有用:
- 自动计算数组维度,简化代码。
- 在数据预处理中快速调整数据形状。
- 在神经网络中处理不同层之间的数据流动。
- 在图像处理中进行形状转换。
- 在时间序列数据分析中重组数据。
- 在矩阵运算中调整矩阵形状。
- 在数据归一化过程中方便地处理多维数据。
- 在卷积神经网络中处理不同层的输出。
- 在自然语言处理任务中处理可变长度的序列。
- 在数据增强过程中灵活地调整数据集形状。
然而,使用-1参数时也需要注意一些限制,比如一次只能使用一个-1,并且其他维度的乘积必须能够整除数组的总元素数。
掌握reshape函数和-1参数的使用可以大大提高数据处理的效率和灵活性,是数据科学和机器学习从业者的必备技能之一。通过不断实践和应用,我们可以在各种复杂的数据处理场景中灵活运用这个强大的工具。
 极客笔记
极客笔记