如何使用HTML CSS和JavaScript制作导航菜单中的弯曲活动选项卡
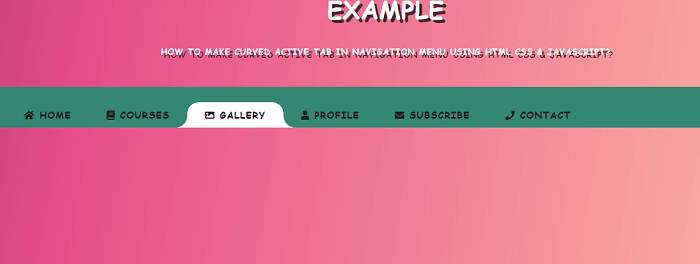
在本文中,我们将学习如何使用HTML、CSS和JavaScript制作导航菜单中带有外部曲线的活动选项卡。我们使用HTML列表元素创建导航菜单,使用CSS伪元素在菜单中添加外部曲线,使用JavaScript在菜单中添加活动类。
以下是使用HTML、CSS和JavaScript制作导航菜单中的弯曲外部非活动选项卡的各种示例。
示例1
<! DOCTYPE html>
<html lang = "en">
<meta charset = "utf-8">
    <meta name = "viewport" content = "width=device-width, initial-scale=1,
        shrink-to-fit = no">
<head>
    <title> how to make curved active tab in navigation menu using HTML, CSS & JavaScript  </title>
    <script src =
"https://ajax.googleapis.com/ajax/libs/jquery/3.5.1/jquery.min.js">
    </script>
<link rel = "stylesheet" href =
"https://cdnjs.cloudflare.com/ajax/libs/font-awesome/5.15.4/css/all.min.css" />
    <style>
    body {
  color: #fff;
  font-family: 'Raleway';
  font-size: 1.6rem;
  font-weight: 700;
  letter-spacing: 1px;
  height: 100vh;
  margin: 0;
  text-transform: uppercase;
}
.gradient-background {
  background: linear-gradient(100deg,#200c32,#e74d89,#febaa6);
  background-size: 180% 180%;
  animation: gradient-animation 9s ease infinite;
}
@keyframes gradient-animation {
  0% {
    background-position: 0% 50%;
  }
  50% {
    background-position: 100% 50%;
  }
  100% {
    background-position: 0% 50%;
  }
}
        .navbar {
            position: fixed;
            left: 0px;
            top: 160px;
            height: auto;
            width: 100%;
            background: #338773;
        }

        .navbar ul {
            display: flex;
            list-style-type: none;
            margin-block-start: 1em;
            margin-block-end: 1em;
            margin-inline-start: 0px;
            margin-inline-end: 0px;
            padding-inline-start: 0px;
            margin-bottom: 0px;
            padding-left: 40px;
        }
        .navbar ul li {
            display: inline;
            list-style: none;
            padding-left: 30px;
            padding-right: 30px;
            padding-top: 10px;
            padding-bottom: 10px;
            font-size: 1rem;
            border-radius: 20px 20px 0px 0px;
            position: relative;
        }
        .navbar ul li.active {
            background: #fff;
        }
        .navbar ul li a {
            text-decoration: none;
             font-family: 'Bangers', cursive;
            color: #22201f;
        }
    .navbar ul li.active a {
            color: #22201f;
        }
        .navbar ul li b.left-curve {
            position: absolute;
            bottom: 0px;
            left: -20px;
            height: 100%;
            width: 20px;
            background: #fff;
            display: none;
        }
        .navbar ul li b.left-curve::before {
            content: " ";
            top: 0;
            left: 0;
            position: absolute;
            width: 100%;
            height: 100%;
            border-bottom-right-radius: 20px;
            background: #338773;
        }
h3 {
  text-align: center;
  font-weight: bold;
  color: #fff;
  text-transform: uppercase;
  font-size: 1em;
  white-space: nowrap;
  font-size: 1vw;
  z-index: 1000;
  font-family: 'Bangers', cursive;
  text-shadow: 5px 5px 0 rgba(0, 0, 0, 0.7);
  @include skew(0, -6.7deg, false);
  @include transition-property(font-size);
  @include transition-duration(0.5s);
}
h2 {
  text-align: center;
  font-weight: bold;
  color: #fff;
  text-transform: uppercase;
  font-size: 1.2em;
  white-space: nowrap;
  font-size: 3vw;
  z-index: 1000;
  font-family: 'Bangers', cursive;
  text-shadow: 5px 5px 0 rgba(0, 0, 0, 0.7);
  @include skew(0, -6.7deg, false);
  @include transition-property(font-size);
  @include transition-duration(0.5s);
}
        .navbar ul li b.right-curve {
            position: absolute;
            right: -20px;
            top: 0px;
            height: 100%;
            width: 20px;
            background: #fff;
            display: none;
        }

        .navbar ul li b.right-curve::before {
            content: " ";
            right: 0;
            position: absolute;
            width: 100%;
            top: 0;
            height: 100%;
            border-bottom-left-radius: 20px;
            background: #338773;
        }
        .navbar ul li.active b.left-curve {
            display: block;
        }
            .navbar ul li.active b.right-curve {
            display: block;
        }
    </style>
</head>
<body class = "gradient-background">
  <h2> Example </h2>
  <h3> How to make curved active tab in navigation menu using HTML CSS & JavaScript? </h3>
<br />
<br />
    <div class = "navbar">
        <ul>
            <li class = "list-item">
                <b class = "left-curve"> </b>
                <b class = "right-curve"> </b>
                <a>
                    <i class = "fa fa-home"> </i>
                    Home
                </a>
            </li>
            <li class = "list-item">
                <b class = "left-curve"> </b>
                <b class = "right-curve"> </b>
                <a>
                    <i class = "fa fa-book"> </i>
                    Courses
                </a>
            </li>
            <li class = "list-item">
                <b class = "left-curve"> </b>
                <b class = "right-curve"> </b>
                <a>
                    <i class = "fa fa-image"> </i>
            Gallery
                </a>
            </li>
            <li class = "list-item">
                <b class = "left-curve"> </b>
                <b class = "right-curve"> </b>
                <a>
                    <i class = "fa fa-user"> </i>
                Profile
                </a>
            </li>
            <li class = "list-item active">
                <b class = "left-curve"> </b>
                <b class = "right-curve"> </b>
                <a>
                    <i class = "fa fa-envelope"> </i>
                    Subscribe
                </a>
            </li>
            <li class = "list-item active">
                <b class = "left-curve"> </b>
                <b class = "right-curve"> </b>
                <a>
                    <i class = "fa fa-phone"> </i>
                    Contact
                </a>
            </li>
        </ul>
    </div>
</body>
    <script>
        (function () {("li").click(function (e) {
                e.preventDefault();
                ("li").removeClass("active");(this).addClass("active");
            });
        });
    </script>
</html>
说明:
在上面的示例中,我们使用HTML、CSS和JavaScript创建了一个创建外部曲线活动标签的示例。在这个示例中,我们使用了CSS伪元素的概念来制作外部曲线。
输出:
以下是这个示例的输出。

示例2
<! DOCTYPE html>
<html lang = "en">
<meta charset = "utf-8">
    <meta name = "viewport" content = "width=device-width, initial-scale=1,
        shrink-to-fit = no">
<head>
    <title> how to make curved active tab in navigation menu using HTML, CSS & JavaScript  </title>
    <script src =
"https://ajax.googleapis.com/ajax/libs/jquery/3.5.1/jquery.min.js">
    </script>
<link rel = "stylesheet" href =
"https://cdnjs.cloudflare.com/ajax/libs/font-awesome/5.15.4/css/all.min.css" />
    <style>
    body {
  color: #fff;
  font-family: 'Raleway';
  font-size: 1.6rem;
  font-weight: 700;
  letter-spacing: 1px;
  height: 100vh;
  margin: 0;
  text-transform: uppercase;
}
.gradient-background {
  background: linear-gradient(100deg,#200c32,#e74d89,#febaa6);
  background-size: 180% 180%;
  animation: gradient-animation 9s ease infinite;
}
@keyframes gradient-animation {
  0% {
    background-position: 0% 50%;
  }
  50% {
    background-position: 100% 50%;
  }
  100% {
    background-position: 0% 50%;
  }
}
        .navbar {
            position: fixed;
            left: 0px;
            top: 160px;
            height: auto;
            width: 100%;
          background: #338773;
        }

        .navbar ul {
            display: flex;
            list-style-type: none;
            margin-block-start: 1em;
            margin-block-end: 1em;
            margin-inline-start: 0px;
            margin-inline-end: 0px;
            padding-inline-start: 0px;
            margin-bottom: 0px;
            padding-left: 40px;
        }

        .navbar ul li {
            display: inline;
            list-style: none;
            padding-left: 30px;
            padding-right: 30px;
            padding-top: 10px;
            padding-bottom: 10px;
            font-size: 1rem;
            border-radius: 20px 20px 0px 0px;
            position: relative;
        }
        .navbar ul li.active {
            background: #fff;
        }

        .navbar ul li a {
            text-decoration: none;
            color: #fff;
    font-family: 'Bangers', cursive;
        }

        .navbar ul li.active a {
            color: #308d46;
        }

        li.active a::before {
            content: " ";
            left: -30px;
            bottom: 0;
            height: 30px;
            width: 30px;
            position: absolute;
            background: #338773;
            border-radius: 50%;
            box-shadow: 15px 15px 0 #fff;
        }

        li.active a::after {
            content: " ";
            right: -30px;
            bottom: 0;
            height: 30px;
            width: 30px;
            position: absolute;
            background: #338773;
            border-radius: 50%;
            box-shadow: -15px 15px 0 #fff;
        }
h3 {
  text-align: center;
  font-weight: bold;
  color: #fff;
  text-transform: uppercase;
  font-size: 0.8em;
  white-space: nowrap;
  z-index: 1000;
font-family: 'Bangers', cursive;
  text-shadow: 1px 1px 0 rgba(0, 0, 0, 0.7);
  @include skew(0, -6.7deg, false);
  @include transition-property(font-size);
  @include transition-duration(0.5s);
}
h2 {
  text-align: center;
  font-weight: bold;
  color: #fff;
  text-transform: uppercase;
  font-size: 1.2em;
  white-space: nowrap;
  font-size: 3vw;
  z-index: 1000;
  font-family: 'Bangers', cursive;
  text-shadow: 5px 5px 0 rgba(0, 0, 0, 0.7);
  @include skew(0, -6.7deg, false);
  @include transition-property(font-size);
  @include transition-duration(0.5s);
}
</style>
</head>
<body class = "gradient-background">
  <h2> Example </h2>
  <h3> How to make curved active tab in navigation menu using HTML CSS & JavaScript? </h3>
<br />
<br />
    <div class = "navbar">
        <ul>
            <li class = "list-item">
                <b class = "left-curve"> </b>
                <b class = "right-curve"> </b>
                <a>
                    <i class = "fa fa-home"> </i>
                    Home
                </a>
            </li>
            <li class = "list-item">
                <b class = "left-curve"> </b>
                <b class = "right-curve"> </b>
                <a>
                    <i class = "fa fa-book"> </i>
                    Courses
                </a>
            </li>
            <li class = "list-item">
                <b class = "left-curve"> </b>
                <b class = "right-curve"> </b>
                <a>
                    <i class = "fa fa-image"> </i>
            Gallery
                </a>
            </li>
            <li class = "list-item">
                <b class = "left-curve"> </b>
                <b class = "right-curve"> </b>
                <a>
                    <i class = "fa fa-user"> </i>
                Profile
                </a>
            </li>
            <li class = "list-item active">
                <b class = "left-curve"> </b>
                <b class = "right-curve"> </b>
                <a>
                    <i class = "fa fa-envelope"> </i>
                    Subscribe
                </a>
            </li>
            <li class = "list-item active">
                <b class = "left-curve"> </b>
                <b class = "right-curve"> </b>
                <a>
                    <i class = "fa fa-phone"> </i>
                    Contact
                </a>
            </li>
        </ul>
    </div>
</body>
    <script>
        (function () {("li").click(function (e) {
                e.preventDefault();
                ("li").removeClass("active");(this).addClass("active");
            });
        });
    </script>
</html>
输出:
以下是该示例的输出。

示例3
<! DOCTYPE html>
<html lang = "en">
<meta charset = "utf-8">
    <meta name = "viewport" content = "width=device-width, initial-scale=1,
        shrink-to-fit = no">
<head>
    <title> how to make curved active tab in navigation menu using HTML, CSS & JavaScript  </title>
    <script src =
"https://ajax.googleapis.com/ajax/libs/jquery/3.5.1/jquery.min.js">
    </script>
<link rel = "stylesheet" href =
"https://cdnjs.cloudflare.com/ajax/libs/font-awesome/5.15.4/css/all.min.css" />
    <style>
    body {
  color: #fff;
  font-family: 'Raleway';
  font-size: 1.6rem;
  font-weight: 700;
  letter-spacing: 1px;
  height: 100vh;
  margin: 10;
  text-transform: uppercase;
}
h3 {
  text-align: center;
  font-weight: bold;
  color: #fff;
  text-transform: uppercase;
  font-size: 0.8em;
  white-space: nowrap;
  z-index: 1000;
  font-family: 'Bangers', cursive;
  text-shadow: 5px 5px 0 rgba(0, 0, 0, 0.7);
  @include skew(0, -6.7deg, false);
  @include transition-property(font-size);
  @include transition-duration(0.5s);
}
.gradient-background {
  background: linear-gradient(100deg,#200c32,#e74d89,#febaa6);
  background-size: 180% 180%;
  animation: gradient-animation 9s ease infinite;
}
@keyframes gradient-animation {
  0% {
    background-position: 0% 50%;
  }
  50% {
    background-position: 100% 50%;
  }
  100% {
    background-position: 0% 50%;
  }
}
h2 {
  text-align: center;
  font-weight: normal;
  color: #fff;
  text-transform: uppercase;
  font-size: 1.2em;
  white-space: nowrap;
  font-size: 3vw;
  z-index: 1000;
  font-family: 'Bangers', cursive;
  text-shadow: 5px 5px 0 rgba(0, 0, 0, 0.7);
  @include skew(0, -6.7deg, false);
  @include transition-property(font-size);
  @include transition-duration(0.5s);

}
.button {
  background-color: #000;
  color: #fff;
  position: relative;
  width: auto;
  display: block;
  padding: 14px 30px;
  box-sizing: border-box;
  float: left;
  left: 20%;
  transform: translateX(-50%);
  font-family: sans-serif;
  border-radius: 0 0 12px 12px;
  cursor: pointer;
  margin-right: 24px;
  -webkit-filter: drop-shadow(0px 0px 6px rgba(0, 0, 0, .7));
  filter: drop-shadow(0px 0px 2px rgba(0, 0, 0, .7));
  z-index: 1;
}
.button {
  -webkit-transition: 0s;
  transition: 0s;
}
.button:before {
  -webkit-transition: 0s;
  transition: 0s;
}
.button:after {
  -webkit-transition: 0s;
  transition: 0s;
}
.button:before, .button:after {
  content: " ";
  width: 24px;
  height: 24px;
  position: absolute;
  border-radius: 50%;
  z-index: -10;
  pointer-events: none;
}
.button:before {
  left: -36px;
  top: -12px;
  border-top: 12px solid #000;
  border-right: 12px solid transparent;
  border-left: 12px solid transparent;
  border-bottom: 12px solid transparent;
  border-radius: 50%;
  -webkit-transform: rotate(45deg);
  -moz-transform: rotate(45deg);
  -o-transform: rotate(45deg);
  transform: rotate(45deg);
}
.button:after {
  right: -36px;
  top: -12px;
  border-top: 12px solid #000;
  border-right: 12px solid transparent;
  border-left: 12px solid transparent;
  border-bottom: 12px solid transparent;
  border-radius: 50%;
  -webkit-transform: rotate(-45deg);
  -moz-transform: rotate(-45deg);
  -o-transform: rotate(-45deg);
  transform: rotate(-45deg);
}
.button:hover {
  background-color: pink;
  color: #000;
}
.button:hover:before {
  border-top: 12px solid pink;
}
.button:hover:after {
  border-top: 12px solid pink;
}
    </style>
</head>
<body class = "gradient-background">
  <h2> Example </h2>
  <h3> How to make curved active tab in navigation menu using HTML CSS & JavaScript? </h3>
<br />
<br />
    <div class = "button"> <i class = "fa fa-home"> </i> Home </div>
<div class = "button"> <i class = "fa fa-user"> </i> About </div>
<div class = "button"> <i class = "fa fa-image"> </i> Gallery </div>
<div class = "button"> <i class = "fa fa-star"> </i> Services </div>
<div class = "button"> <i class = "fa fa-phone"> </i> Contact </div>

</body>
</html>
解释:
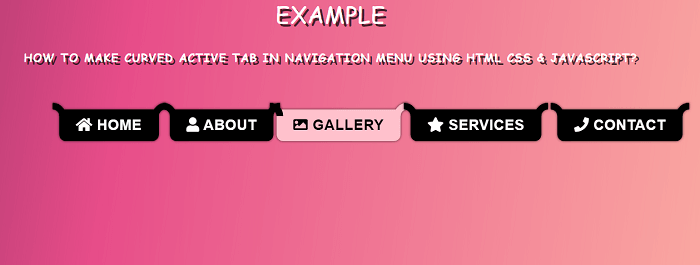
在上面的示例中,我们创建了一个使用HTML CSS创建曲线活动标签的示例。通过使用HTML按钮,我们创建了一个活动标签菜单。
输出:
以下是此示例的输出。

 极客笔记
极客笔记