Python 直方图绘制和拉伸
直方图绘制和拉伸是数据可视化和缩放中的强大工具,它允许您表示数值变量的分布,并将其在直方图数据集的完整值范围内展开。这个过程可以用来改善图像的对比度,或者提高直方图数据的可见性。
直方图是数据集频率分布的图形化表示。它可以将一组连续数据的概率的基本分布可视化。在本文中,我们将讨论如何使用Python中的内置函数创建和拉伸直方图,以及如何在不使用内置函数的情况下实现。
Python中的直方图绘制和拉伸(使用内置函数)
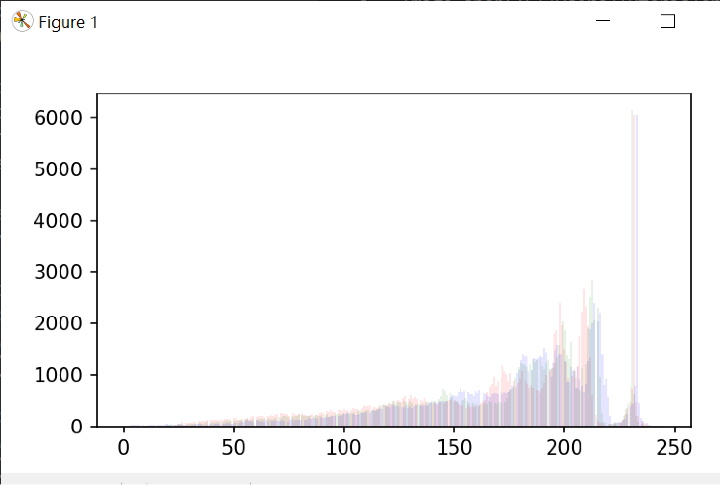
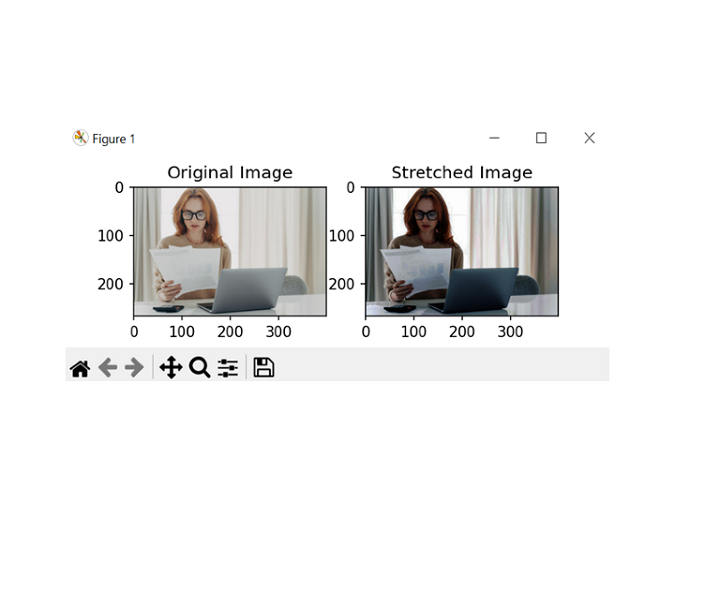
按照下述步骤使用matplotlib和OpenCV的内置函数绘制和拉伸直方图,该程序还会显示RGB通道 −
- 首先使用cv2.imread函数加载输入图像。
-
使用cv2.split函数将图像分离成红色、绿色和蓝色通道。
-
然后使用matplotlib库中的plt.hist函数为每个通道绘制直方图。
-
使用cv2.equalizeHist函数拉伸每个通道的对比度。
-
使用cv2.merge函数将通道合并在一起。
-
使用matplotlib库的plt.imshow函数和subplots函数并排显示原始图像和拉伸后的图像。
注意 − 拉伸图像的对比度可能会导致其整体外观发生变化,因此在评估结果以确保它们符合预期目标时需要小心。
下面是Python中直方图绘制和拉伸的示例程序。在此程序中,我们假设输入图像有RGB通道。如果图像具有不同的颜色空间,则可能需要额外的步骤来正确处理颜色通道。
示例
import cv2
import numpy as np
import matplotlib.pyplot as pltt

# Load the input image with RGB channels
img_sam = cv2.imread('sample.jpg', cv2.IMREAD_COLOR)

# Split the channels into red, green, and blue
rd, gn, bl = cv2.split(img_sam)

# Plot the histograms for each channel
pltt.hist(rd.ravel(), bins=277, color='red', alpha=0.10)
pltt.hist(gn.ravel(), bins=277, color='green', alpha=0.10)
pltt.hist(bl.ravel(), bins=277, color='blue', alpha=0.10)
pltt.show()

# Stretch the contrast for each channel
red_c_stretch = cv2.equalizeHist(rd)
green_c_stretch = cv2.equalizeHist(gn)
blue_c_stretch = cv2.equalizeHist(bl)

# Merge the channels back together
img_stretch = cv2.merge((red_c_stretch, green_c_stretch, blue_c_stretch))

# Display the original and stretched images side by side
pltt.subplot(121)
pltt.imshow(cv2.cvtColor(img_sam, cv2.COLOR_BGR2RGB))
pltt.title('Original_Image')

pltt.subplot(122)
pltt.imshow(cv2.cvtColor(img_stretch, cv2.COLOR_BGR2RGB))
pltt.title('Stretched_Image')

pltt.show()
输出


在Python中绘制直方图并进行拉伸(不使用内置函数)
按照以下步骤在Python中绘制RGB通道的直方图并进行拉伸,不使用内置函数。
- 使用cv2.imread函数加载输入图像。
-
使用数组切片将通道拆分为红色、绿色和蓝色。
-
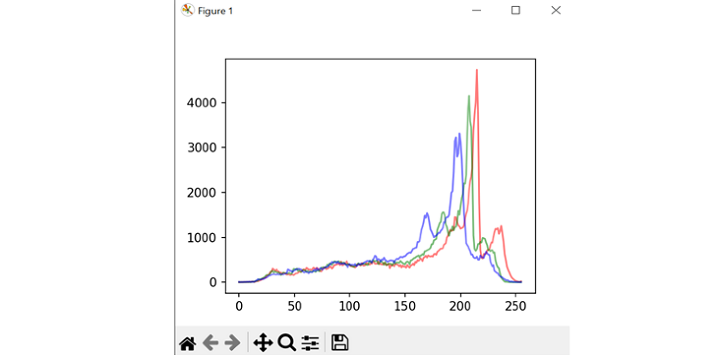
使用嵌套循环和np.zeros函数计算每个通道的直方图,以初始化一个包含零的数组。
-
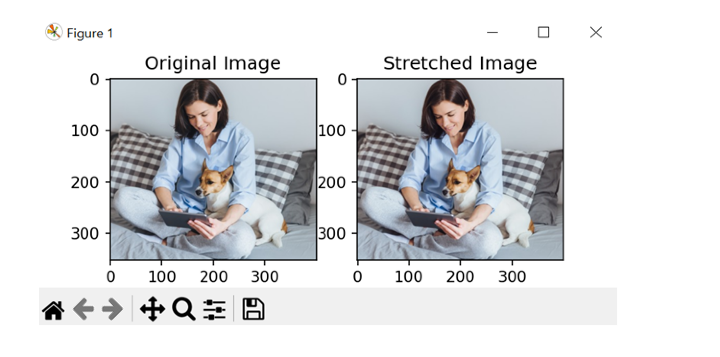
通过查找每个通道中的最小值和最大值,并应用线性变换将像素值缩放到0-255的完整范围,来拉伸每个通道的对比度。
-
在上一步中使用嵌套循环和np.uint8数据类型,确保像素值保持在0-255的范围内。
-
使用cv2.merge函数将通道合并在一起。
-
使用plt.imshow函数和matplotlib库中的subplots函数并排显示原始图像和拉伸后的图像。
以下是执行相同操作的程序示例−
注意 − 以下程序假设输入图像具有RGB通道,并且像素值表示为8位整数。如果图像具有不同的颜色空间或数据类型,则可能需要额外的步骤来正确评估结果。
示例
import cv2
import numpy as np
import matplotlib.pyplot as pltt

# Load the input image
img = cv2.imread('sample2.jpg', cv2.IMREAD_COLOR)

# Split the image into color channels
r, g, b = img[:,:,0], img[:,:,1], img[:,:,2]

# Plot the histograms for each channel
hist_r = np.zeros(256)
hist_g = np.zeros(256)
hist_b = np.zeros(256)

for i in range(img.shape[0]):
    for j in range(img.shape[1]):
      hist_r[r[i,j]] += 1
      hist_g[g[i,j]] += 1
      hist_b[b[i,j]] += 1

pltt.plot(hist_r, color='red', alpha=0.10)
pltt.plot(hist_g, color='green', alpha=0.10)
pltt.plot(hist_b, color='blue', alpha=0.10)
pltt.show()

# Stretch the contrast for each channel
min_r, max_r = np.min(r), np.max(r)
min_g, max_g = np.min(g), np.max(g)
min_b, max_b = np.min(b), np.max(b)

re_stretch = np.zeros((img.shape[0], img.shape[1]), dtype=np.uint8)
gr_stretch = np.zeros((img.shape[0], img.shape[1]), dtype=np.uint8)
bl_stretch = np.zeros((img.shape[0], img.shape[1]), dtype=np.uint8)

for i in range(img.shape[0]):
   for j in range(img.shape[1]):
      re_stretch[i,j] = int((r[i,j] - min_r) * 255 / (max_r - min_r))
      gr_stretch[i,j] = int((g[i,j] - min_g) * 255 / (max_g - min_g))
      bl_stretch[i,j] = int((b[i,j] - min_b) * 255 / (max_b - min_b))

# Merge the channels back together
img_stretch = cv2.merge((re_stretch, gr_stretch, bl_stretch))

# Display the original and stretched images side by side
pltt.subplot(121)
pltt.imshow(cv2.cvtColor(img, cv2.COLOR_BGR2RGB))
pltt.title('Original Image')

pltt.subplot(122)
pltt.imshow(cv2.cvtColor(img_stretch, cv2.COLOR_BGR2RGB))
pltt.title('Stretched Image')

pltt.show()
输出


结论
总之,在Python中进行直方图绘制和拉伸是改善数字图像对比度的非常实用的方法。我们可以通过绘制直方图颜色通道来可视化像素值的分布,并识别出低对比度的区域。我们了解到,通过线性变换拉伸对比度,甚至可以增加图像的动态范围并展示可能被隐藏的细节。
 极客笔记
极客笔记