Python Plotly中使用graph_objects类制作直方图
直方图是数据集分布的图形表示,可以使用Python库Plotly创建,该库有一个称为graph_objects的类,可以使用它创建直方图。直方图有助于了解数据集的形状,包括异常值、中心趋势和分散程度。
Plotly是一个Python库,可以创建各种格式的交互式可视化,包括散点图、折线图和直方图。graph_objects类提供了一个高级接口,用于创建一些复杂的图表,并允许我们自定义绘图的每个方面。在本文中,我们将探讨如何使用Plotly的graph_objects类创建直方图。
plotly.graph_object类
graph_objects类是Plotly的一个子库,允许用户使用更面向对象的方法创建和修改可视化。使用graph_objects,用户可以创建一个Figure对象,并将各种图表类型作为Traces添加到其中。例如,要使用graph_objects创建直方图,可以创建一个Figure对象,并在其中添加一个Histogram trace。
名为graph_objects的类通常被导入为go,并包含一个自动生成的层次结构的Python类,表示图形模式中的非叶节点。术语“graph_objects”指的是这些类的实例。
语法
plotly.graph_objects.Table(arg=None, cells=None, columnorder=None, columnordersrc=None, columnwidth=None, columnwidthsrc=None, customdata=None, customdatasrc=None, domain=None, header=None, hoverinfo=None, hoverinfosrc=None, hoverlabel=None, ids=None, idssrc=None, legendgrouptitle=None, legendrank=None, legendwidth=None, meta=None, metasrc=None, name=None, stream=None, uid=None, uirevision=None, visible=None, **kwargs)
使用图形对象类在 Plotly 中绘制直方图
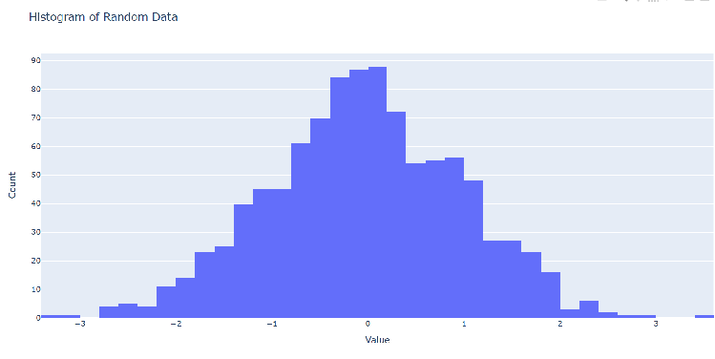
使用图形对象创建直方图(通过生成随机数据)
按照以下步骤,在 Plotly 中使用图形对象类创建直方图,通过使用 numpy 生成的随机数据:
- 导入 plotly.graph_objects 模块,该模块包含了我们将用来创建图表的 Histogram 类以及 Figure 类。
-
使用 numpy.random.normal 函数生成一些随机数据,该函数可以生成来自正态分布的随机数。
-
使用 Histogram 类创建直方图,并将我们的随机数据作为 x 参数传入。这将创建一个具有默认设置的直方图,稍后我们可以自定义它。
-
使用 Figure 类的 update_layout 方法为我们的图表添加坐标轴标签和标题。
-
使用 title 参数指定标题,使用 xaxis_title 和 yaxis_title 参数指定 x 轴和 y 轴标签。
-
使用 Figure 类的 show 方法在新窗口中显示我们的图表。
示例
import plotly.graph_objects as go
import numpy as np

# Generate some random data
np.random.seed(123)
x = np.random.normal(size=1000)

# Create the histogram using graph_objects
fig = go.Figure(data=[go.Histogram(x=x)])

# Add axis labels and title
fig.update_layout(
   title="Histogram of Random Data",
   xaxis_title="Value",
   yaxis_title="Count",
)

# Show the plot
fig.show()
输出
使用graph_objects创建直方图(内置数据集)
按照以下步骤使用graph_objects类和Python Seaborn库中的tips数据集创建直方图 –
- 导入必要的库,包括plotly.graph_objects模块和seaborn模块。
-
使用load_dataset(‘tips’)函数加载内置的tips数据集。
-
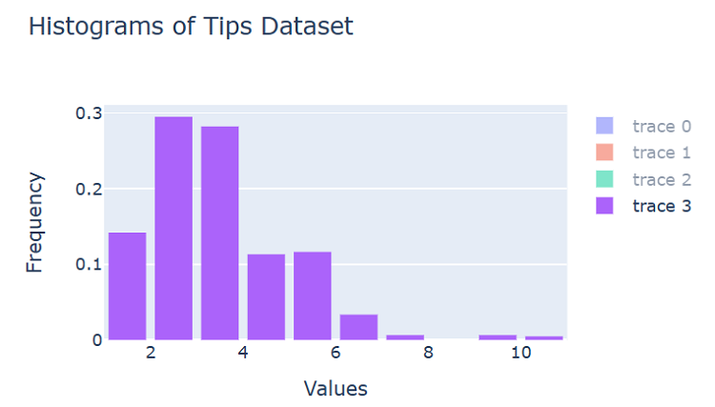
使用go.Histogram()函数创建四种不同类型的直方图。
-
第一个直方图是使用Total Bill列的基本直方图对象。
-
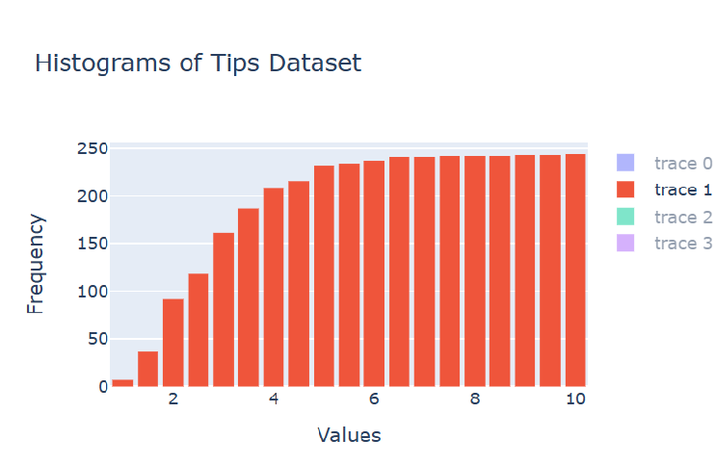
第二个直方图是使用Tip列的累积直方图对象,cumulative_enabled参数设置为True。
-
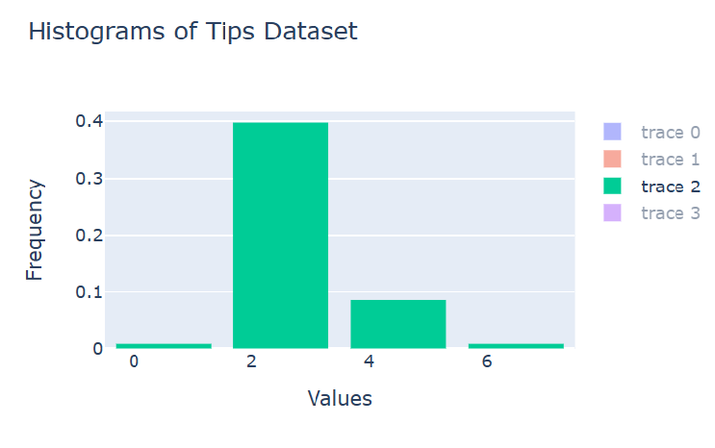
第三个直方图是使用Size列的归一化直方图对象,histnorm参数设置为’probability’。
-
第四个直方图是使用Tip和Size列的堆叠直方图对象,每列有不同的标记颜色和图例名称。
-
使用go.Figure()函数创建一个图形对象,并将所有四个直方图添加到其中。
-
使用update_layout()方法自定义图形的布局,添加标题和轴标签。
-
使用show()方法显示图形。
示例
import seaborn as s
import plotly.graph_objects as go

# Load the built-in tips dataset
d= s.load_dataset('tips')

# Create a basic histogram object using the Total Bill column
hist1 = go.Histogram(x=d['total_bill'], nbinsx=30)

# Create a cumulative histogram object using the Tip column
hist2 = go.Histogram(x=d['tip'], nbinsx=20, cumulative_enabled=True)

# Create a normalized histogram object using the Size column
hist3 = go.Histogram(x=d['size'], nbinsx=5, histnorm='probability density')

# Create a stacked histogram object using the Tip and Size columns
hist4 = go.Histogram(x=d['tip'], y=d['size'], nbinsx=10, nbinsy=5, histfunc='sum', histnorm='probability')

# Create a figure object and add all histograms to it
tfig = go.Figure(data=[hist1, hist2, hist3, hist4])

# Customize the layout of the figure
tfig.update_layout(
   title='Histograms of Tips Dataset',
   xaxis_title='Values',
   yaxis_title='Frequency',
   barmode='overlay',
   bargap=0.1,
   bargroupgap=0.1
)

# Display the figure
tfig.show()
输出
基本直方图对象使用Total Bill列−
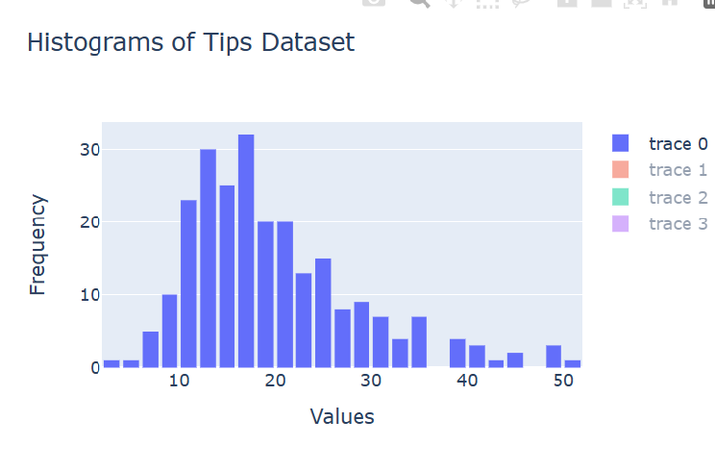
使用Tip列的累积直方图对象
使用Size列的归一化直方图对象−
使用Tip和Size列的堆叠直方图对象−
结论
总之,Plotly中的graph_objects类为我们提供了一个优化且功能强大的工具,用于创建可自定义的可视化图形,包括直方图。我们知道使用graph_objects,我们可以轻松地使用内置数据集生成不同类型的直方图(基本、归一化、累积、堆叠),或者根据用户的创建的数据集,并根据其需求自定义条形数、图例、颜色和其他参数。生成的可视化图形是交互式的,用户可以缩放、平移和悬停在数据点上以获取更多信息。
 极客笔记
极客笔记