使用Python进行图像隐写术
计算机领域的现代世界围绕着“数据”一词展开。然而,为什么数据如此迷人?在这个现代社会,人们开始意识到数据的重要性,以扩大业务的范围。业主们利用数据来潜在地预测客户趋势,增加销售额,并将组织推向新的高度。随着技术和数据的快速发展,数据的安全性变得至关重要。随着每天从一个地方传输到另一个地方的成千上万条消息和数据的传播增加,数据保护成为发件人的关键关注点,而且我们通过一种只有接收者才能理解的秘密方法对消息进行加密。
在以下教程中,我们将学习了解隐写术的概念,并使用Python编程语言进行实际实现。
理解隐写术的概念
隐写术指的是在更大的消息中隐藏秘密消息的过程,以使某人无法知道隐藏消息的存在或内容。隐写术的目标是在两个参与方之间保持秘密通信。与可以隐藏秘密消息内容的密码学不同,隐写术隐藏了消息传输的事实。尽管隐写术与密码学不同,但两者之间存在着各种相似之处。有些作者将隐写术归类为密码学的一种形式,因为隐藏通信看起来像是一条秘密消息。
了解使用隐写术而不是仅使用密码学的好处
众所周知,密码学一直在保护发件人和预期收件人之间的保密性方面发挥着重要作用。然而,逐渐增加的使用隐写术方法与仅使用密码学相结合,可以为隐藏数据提供更多的保护层。使用隐写术而不仅仅使用密码学的好处之一是,所提议的秘密消息不会引起人们对其进行审查的注意。无论加密消息有多么难以破解,可见的加密消息都会引起兴趣,并且在加密属于非法行为的国家中,它们本身可能成为证据。
了解隐写术的类型
隐写术的作品已在各种传输媒体上进行了分类,分为不同类型:
- 文本隐写术
- 图像隐写术
- 视频隐写术
- 音频隐写术
- 网络隐写术
- 电子邮件隐写术

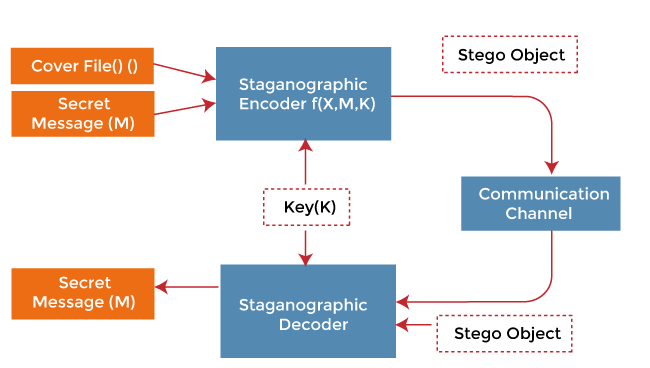
现在,让我们来了解隐写学的基本模型
隐写学的基本模型

从上面的图像中可以看出,实际文件(X)和必须隐藏的秘密信息(M)都作为输入被输入到隐写编码器中。隐写编码器函数f(X, M, K)使用最低有效位编码等技术将秘密信息嵌入到封面图像文件中。结果的隐写图像与您的封面图像文件非常相似,没有明显的变化。这完成了编码过程。要检索秘密信息,隐写对象被输入到隐写解码器中。
本教程将帮助我们使用Python编程语言实现图像隐写术。它将帮助我们编写Python脚本,以使用最低有效位技术隐藏文本消息。
理解最低有效位隐写术
我们可以将数字图像描述为有限的一组数字值,称为像素。像素是图像的最小单个元素,保存表示特定点亮度的值。因此,我们可以将图像视为由静态行和列组成的像素矩阵(或二维数组)。
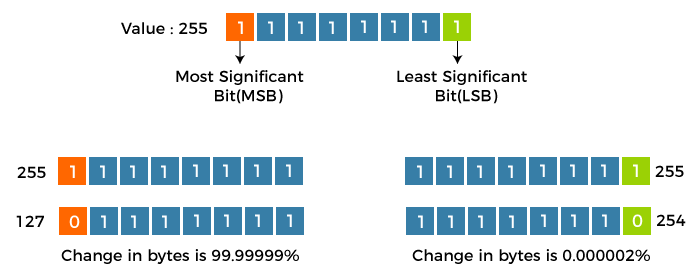
最低有效位(LSB)是一种方法,我们可以修改每个像素的最后一位,将其替换为秘密消息的数据位。

从上面的图像中,我们可以观察到,如果我们改变最高有效位(Most Significant Bit,简称MSB),对最终值的影响会更大;然而,如果我们改变最低有效位(Least Significant Bit,简称LSB),对最终值的影响很小。因此,我们使用最低有效位(Least Significant Bit,简称LSB)隐写术。
理解最低有效位技术的工作原理
每个像素由三个值组成-红色,绿色,蓝色。这些值的范围是从0到255,也就是说它们是8位值。让我们通过一个示例来理解这个技术的工作原理。假设我们想把消息“hi”隐藏到一个大小为4×4的图像中,该图像的像素值如下所示:
[(225, 12, 99), (155, 2, 50), (99, 51, 15), (15, 55, 22), (155, 61, 87), (63, 30, 17), (1, 55, 19), (99, 81, 66), (219l, 77, 91), (69, 39, 50), (18, 200, 33), (25, 54, 190)]
借助ASCII表,我们可以将秘密信息转换为十进制值,然后转换为二进制形式: 0110100 0110101 。现在,我们可以依次遍历像素值。一旦我们将它们转换为二进制,我们就可以逐个顺序地用该消息位替换每个最低有效位(例如, 225 的二进制为 11100001 ,然后我们可以用初始数据位(0)替换最后一位、右边的位(1),依此类推)。这将允许我们仅通过+1或-1来修改像素的值,而这完全不可察觉。执行了最低有效位替换后,像素的输出值如下:
[(224, 13, 99), (154, 3, 50), (98, 50, 15), (15, 54, 23), (154, 61, 87), (63, 30, 17), (1, 55, 19), (99, 81, 66), (219, 77, 91), (69, 39, 50), (18, 200, 33), (25, 54, 190)]
使用Python在图像中隐藏文本
以下部分主要关注使用Python脚本进行隐藏和显示过程的逐步方法。
该方法的步骤如下:
步骤1: 导入所需的Python库。
步骤2: 定义一个函数,将任意类型的数据转换为二进制数,在编码和解码阶段将使用该函数将秘密数据和像素值转换为二进制数。
步骤3: 定义另一个函数,通过更改最低有效位在图像中隐藏秘密信息。
步骤4: 编写一个函数,从隐写图像中解码隐藏的消息。
步骤5: 编写另一个函数,接受用户的图像名称和秘密消息,并调用 hide_data() 函数进行编码。
步骤6: 定义一个函数,要求用户输入需要解码的图像名称,并调用 show_data() 函数返回解码的消息。
步骤7: 定义主函数。
让我们看看以上步骤的实际操作:
导入Python库
我们将开始导入项目所需的必要库。如果系统中找不到任何使用的库,请使用pip安装程序进行安装。
让我们看下面的Python脚本以了解相同的操作:
示例:
# importing the required libraries
import cv2
import numpy as np
import types
解释:
在上面的代码片段中,我们导入了 OpenCV 库以及 NumPy 和 types 库。
将类型转换为二进制
现在我们将定义一个函数来将任何类型的数据转换为二进制。我们将在编码和解码阶段使用这种方法将秘密数据和像素值转换为二进制。
让我们考虑以下Python脚本来理解相同的内容:
示例:
# converting types to binary
def msg_to_bin(msg):
    if type(msg) == str:
        return ''.join([format(ord(i), "08b") for i in msg])
    elif type(msg) == bytes or type(msg) == np.ndarray:
        return [format(i, "08b") for i in msg]
    elif type(msg) == int or type(msg) == np.uint8:
        return format(msg, "08b")
    else:
        raise TypeError("Input type not supported")
输出:
解释:
在上面的代码片段中,我们定义了一个名为 msg_to_bin() 的函数,它接受用户输入的 msg 参数。然后,我们使用 if-elif-else 条件语句来检查输入的秘密数据(即消息和图像)的数据类型,并将它们转换为二进制格式。
将秘密数据隐藏在图像中
一旦转换成二进制格式完成,我们将定义一个函数来通过改变最低有效位来隐藏图像中的秘密消息。
让我们来看下面的示例来理解这个过程:
示例:
# defining function to hide the secret message into the image
def hide_data(img, secret_msg):
    # calculating the maximum bytes for encoding
    nBytes = img.shape[0] * img.shape[1] * 3 // 8
    print("Maximum Bytes for encoding:", nBytes)
    # checking whether the number of bytes for encoding is less
    # than the maximum bytes in the image
    if len(secret_msg) > nBytes:
        raise ValueError("Error encountered insufficient bytes, need bigger image or less data!!")
    secret_msg += '#####'       # we can utilize any string as the delimiter
    dataIndex = 0
    # converting the input data to binary format using the msg_to_bin() function
    bin_secret_msg = msg_to_bin(secret_msg)

    # finding the length of data that requires to be hidden
    dataLen = len(bin_secret_msg)
    for values in img:
        for pixels in values:
            # converting RGB values to binary format
            r, g, b = msg_to_bin(pixels)
            # modifying the LSB only if there is data remaining to store
            if dataIndex < dataLen:
                # hiding the data into LSB of Red pixel
                pixels[0] = int(r[:-1] + bin_secret_msg[dataIndex], 2)
                dataIndex += 1
            if dataIndex < dataLen:
                # hiding the data into LSB of Green pixel
                pixels[1] = int(g[:-1] + bin_secret_msg[dataIndex], 2)
                dataIndex += 1
            if dataIndex < dataLen:
                # hiding the data into LSB of Blue pixel
                pixels[2] = int(b[:-1] + bin_secret_msg[dataIndex], 2)
                dataIndex += 1
            # if data is encoded, break out the loop
            if dataIndex >= dataLen:
                break

    return img
说明:
在上面的代码片段中,我们定义了一个接受两个参数的函数,参数分别是图像文件和秘密消息。然后我们计算了编码的最大字节数,并检查要编码的字节数是否小于图像中的最大字节数。然后我们将数据的索引设置为0,并将秘密数据转换为二进制格式。然后我们找到了数据的长度,并使用for循环迭代图像中的像素值,将RGB值转换为二进制格式,并隐藏每个像素的数据。
从隐写图像中解码隐藏消息
现在,我们将编写一个函数来从隐写图像中解码隐藏的消息。让我们考虑下面的脚本以理解同样的情况:
示例:
def show_data(img):
    bin_data = ""
    for values in img:
        for pixels in values:
            # converting the Red, Green, Blue values into binary format
            r, g, b = msg_to_bin(pixels)
            # data extraction from the LSB of Red pixel
            bin_data += r[-1]
            # data extraction from the LSB of Green pixel
            bin_data += g[-1]
            # data extraction from the LSB of Blue pixel
            bin_data += b[-1]
    # splitting by 8-bits
    allBytes = [bin_data[i: i + 8] for i in range(0, len(bin_data), 8)]
    # converting from bits to characters
    decodedData = ""
    for bytes in allBytes:
        decodedData += chr(int(bytes, 2))
        # checking if we have reached the delimiter which is "#####"
        if decodedData[-5:] == "#####":
            break
    # print(decodedData)
    # removing the delimiter to display the actual hidden message
    return decodedData[:-5]
解释:
在上面的代码片段中,我们定义了一个名为 show_data() 的函数,该函数接受图像文件作为输入。在这个函数内部,我们定义了一个空的二进制数据,并使用for循环遍历图像像素并将RGB像素转换为二进制格式。我们还从每个像素中提取了数据,然后通过8位分割并将其转换为字符。最后,我们检查了分隔符并将其删除以显示实际隐藏的消息。
编码消息
现在,我们将定义一个函数,该函数接受图像名称和用户输入的秘密消息。我们还将调用 hide_data() 函数来编码消息。
让我们考虑以下脚本来理解这个过程:
示例:
# defining function to encode data into Image
def encodeText():
    img_name = input("Enter image name (with extension): ")
    # reading the input image using OpenCV-Python
    img = cv2.imread(img_name)

    # printing the details of the image
    print("The shape of the image is: ", img.shape) # checking the image shape to calculate the number of bytes in it
    print("The original image is as shown below: ")
    # resizing the image as per the need
    resizedImg = cv2.resize(img, (500, 500))
    # displaying the image
    cv2_imshow(resizedImg)
    data = input("Enter data to be encoded: ")
    if (len(data) == 0):
        raise ValueError('Data is Empty')

    file_name = input("Enter the name of the new encoded image (with extension): ")
    # calling the hide_data() function to hide the secret message into the selected image
    encodedImage = hide_data(img, data)
    cv2.imwrite(file_name, encodedImage)
说明:
在上面代码片段中,我们定义了一个名为 encodeText() 的函数来编码包含密文的图片。在函数内部,我们使用 input() 函数来询问用户图片文件的名称,并使用 OpenCV 库来读取该文件。然后,我们打印了图片的详细信息和图片本身。接下来,我们询问用户要编码的文本消息和编码后图片的新文件名。最后,我们调用 hide_data() 函数来将秘密消息隐藏在选定的图片中。
解码消息
现在,我们将定义一个函数来询问用户输入要解码的图片文件名,并调用 show_data() 函数来返回解码后的消息。
让我们考虑以下Python脚本示例:
示例:
# defining the function to decode the data in the image
def decodeText():
    # reading the image containing the hidden image
    img_name = input("Enter the name of the Steganographic image that has to be decoded (with extension): ")
    img = cv2.imread(img_name)  # reading the image using the imread() function

    print("The Steganographic image is as follow: ")
    resizedImg = cv2.resize(img, (500, 500))    # resizing the actual image as per the needs
    cv2_imshow(resizedImg)  # displaying the Steganographic image

    text = show_data(img)
    return text
解释:
在上面的代码片段中,我们定义了另一个函数 decodeText() 允许用户解码任何图像文件。在这个函数中,我们要求用户输入要解码的图像文件的名称,并使用 OpenCV 库的一个函数来读取该文件。然后,我们调整了图像的大小并显示了隐写图像。我们还通过调用 show_data() 函数从图像文件中提取了秘密文本数据,并向用户返回了文本。
主要函数
现在,我们将设置主函数,以开始图像隐写操作。我们将为用户添加一个菜单,供其选择是编码数据还是解码数据,并在执行后继续进行操作。
让我们考虑以下示例 Python 脚本来进行演示:
示例:
图像隐写
# image steganography
def steganography():
    n = int(input("Image Steganography \n1. Encode the data \n2. Decode the data \n Select the option: "))
    if (n == 1):
        print("\nEncoding...")
        encodeText()

    elif (n == 2):
        print("\nDecoding...")
        print("Decoded message is " + decodeText())

    else:
        raise Exception("Inserted value is incorrect!")

steganography() # encoding the image
解释:
在上面的代码片段中,我们定义了一个名为 steganography() 的主函数。我们在这个函数中创建了一个菜单,并询问用户他们的输入类型为 ‘int’ 。然后,我们使用了 if-elif-else 条件语句根据用户输入执行函数。最后,我们调用这个主函数执行程序。
让我们看看完整的程序代码以及执行后的输出。
完整的程序
文件: imgSteganography.py
# importing the required libraries
import cv2
import numpy as np
import types
from google.colab.patches import cv2_imshow

# converting types to binary
def msg_to_bin(msg):
    if type(msg) == str:
        return ''.join([format(ord(i), "08b") for i in msg])
    elif type(msg) == bytes or type(msg) == np.ndarray:
        return [format(i, "08b") for i in msg]
    elif type(msg) == int or type(msg) == np.uint8:
        return format(msg, "08b")
    else:
        raise TypeError("Input type not supported")

# defining function to hide the secret message into the image
def hide_data(img, secret_msg):
    # calculating the maximum bytes for encoding
    nBytes = img.shape[0] * img.shape[1] * 3 // 8
    print("Maximum Bytes for encoding:", nBytes)
    # checking whether the number of bytes for encoding is less
    # than the maximum bytes in the image
    if len(secret_msg) > nBytes:
        raise ValueError("Error encountered insufficient bytes, need bigger image or less data!!")
    secret_msg += '#####'       # we can utilize any string as the delimiter
    dataIndex = 0
    # converting the input data to binary format using the msg_to_bin() function
    bin_secret_msg = msg_to_bin(secret_msg)

    # finding the length of data that requires to be hidden
    dataLen = len(bin_secret_msg)
    for values in img:
        for pixels in values:
            # converting RGB values to binary format
            r, g, b = msg_to_bin(pixels)
            # modifying the LSB only if there is data remaining to store
            if dataIndex < dataLen:
                # hiding the data into LSB of Red pixel
                pixels[0] = int(r[:-1] + bin_secret_msg[dataIndex], 2)
                dataIndex += 1
            if dataIndex < dataLen:
                # hiding the data into LSB of Green pixel
                pixels[1] = int(g[:-1] + bin_secret_msg[dataIndex], 2)
                dataIndex += 1
            if dataIndex < dataLen:
                # hiding the data into LSB of Blue pixel
                pixels[2] = int(b[:-1] + bin_secret_msg[dataIndex], 2)
                dataIndex += 1
            # if data is encoded, break out the loop
            if dataIndex >= dataLen:
                break

    return img

def show_data(img):
    bin_data = ""
    for values in img:
        for pixels in values:
            # converting the Red, Green, Blue values into binary format
            r, g, b = msg_to_bin(pixels)
            # data extraction from the LSB of Red pixel
            bin_data += r[-1]
            # data extraction from the LSB of Green pixel
            bin_data += g[-1]
            # data extraction from the LSB of Blue pixel
            bin_data += b[-1]
    # split by 8-Bits
    allBytes = [bin_data[i: i + 8] for i in range(0, len(bin_data), 8)]
    # converting from bits to characters
    decodedData = ""
    for bytes in allBytes:
        decodedData += chr(int(bytes, 2))
        # checking if we have reached the delimiter which is "#####"
        if decodedData[-5:] == "#####":
            break
    # print(decodedData)
    # removing the delimiter to display the actual hidden message
    return decodedData[:-5]

# defining function to encode data into Image
def encodeText():
    img_name = input("Enter image name (with extension): ")
    # reading the input image using OpenCV-Python
    img = cv2.imread(img_name)

    # printing the details of the image
    print("The shape of the image is: ", img.shape) # checking the image shape to calculate the number of bytes in it
    print("The original image is as shown below: ")
    # resizing the image as per the need
    resizedImg = cv2.resize(img, (500, 500))
    # displaying the image
    cv2_imshow(resizedImg)

    data = input("Enter data to be encoded: ")
    if (len(data) == 0):
        raise ValueError('Data is Empty')

    file_name = input("Enter the name of the new encoded image (with extension): ")
    # calling the hide_data() function to hide the secret message into the selected image
    encodedImage = hide_data(img, data)
    cv2.imwrite(file_name, encodedImage)

# defining the function to decode the data in the image
def decodeText():
    # reading the image containing the hidden image
    img_name = input("Enter the name of the Steganographic image that has to be decoded (with extension): ")
    img = cv2.imread(img_name)  # reading the image using the imread() function

    print("The Steganographic image is as follow: ")
    resizedImg = cv2.resize(img, (500, 500))    # resizing the actual image as per the needs
    cv2_imshow(resizedImg)  # displaying the Steganographic image

    text = show_data(img)
    return text

# image steganography
def steganography():
    n = int(input("Image Steganography \n1. Encode the data \n2. Decode the data \n Select the option: "))
    if (n == 1):
        print("\nEncoding...")
        encodeText()

    elif (n == 2):
        print("\nDecoding...")
        print("Decoded message is " + decodeText())

    else:
        raise Exception("Inserted value is incorrect!")

steganography() # encoding the image
数据编码的输出:
Image Steganography
1. Encode the data
2. Decode the data
Select the option: 1
Encoding...
Enter image name (with extension): my_image.jpg
The shape of the image is: (1080, 1920, 3)
The original image is as shown below:

Enter data to be encoded: python tutorial
Enter the name of the new encoded image (with extension): testimage.jpg
Maximum bytes to encode: 589693
数据解码的输出:
Image Steganography
1. Encode the data
2. Decode the data
Select the option: 2
Decoding...
Enter the name of the Steganographic image that has to be decoded (with extension): testimage.jpg
The Steganographic image is as follow:

Decoded message is python tutorial
 极客笔记
极客笔记