JavaScript和CSS 将文字转为粒子溶解效果
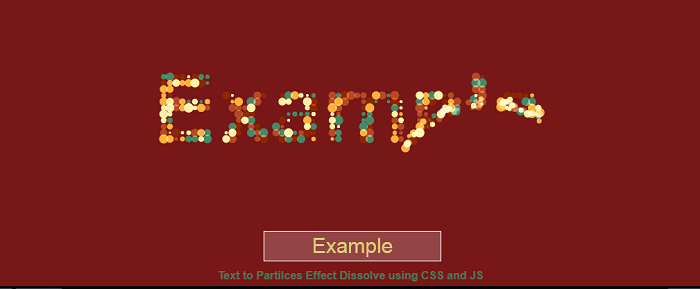
在本文中,我们将了解如何使用JavaScript和CSS创建文字转为粒子溶解效果的示例。粒子溶解效果用于在与鼠标和触摸事件交互的Canvas元素上创建动画、交互式、可配置的粒子动画。
这是一组独特且动态的专业设计和创意动画文字动画集合。它用于增强企业业务、幻灯片、电视节目、电影、影片以及促销和活动视频的外观和感觉。
以下是文字转为粒子溶解效果JavaScript和CSS的示例。
示例1
<! DOCTYPE html>
<html>
    <head>
        <meta http-equiv = "Content-Type"
            content = "text/html; charset=UTF-8" />
        <title> Example of  Text to Particles Dissolve Effect JS & CSS </title>
        <meta name = "description"/>
         <meta content = "width=800, initial-scale=1"
        name = "viewport" />
<script src = ?https://cdnjs.cloudflare.com/ajax/libs/jquery/3.1.0/jquery.min.js?> </script>
<style>
@import url(https://fonts.googleapis.com/css?family=Work+Sans:400,300,700|Open+Sans:400italic,300italic);
html {
  display: block;
  align-items: center;
  justify-content: center;
  width: 100%;
  height: 100%;
  overflow: hidden;
  background-color: #333;
  position: relative;
  z-index: 1;
}
body {
    background: linear-gradient(180deg, #6deaff, #68ffb9);
    background-position: center;
    background-size: cover;
    transition: all 0.8s;
             align-items: center;
            justify-content: center;
    position: relative;
}
canvas {
background: #781717;
width: 100vw;
height: 100vh;
}
input {
width: 250px;
height: 40px;
line-height: 40px;
position: absolute;
bottom: 35px;
left: calc(50% - 125px);
background: none;
color: #ddca7e;
font-size: 30px;
font-family: arial;
text-align: center;
border: 1px solid white;
background: rgba(255,255,255,0.2);
}
  &:focus {
    outline: none;
    border-bottom: 1px solid #28a2a2;
  }
h1 {
  position: fixed;
  left: 0;
  bottom:5px;
  color: #24cf98;
  z-index: 10;
  font-size: 16px;
  font-family: Helvetica, Verdana, sans-serif;
  opacity:0.5;
  width: 100%;
  text-align: center;
  margin: 0;
}
</style>
<body>
<canvas id = "scene"> </canvas>
    <input id = "copy" type = "text" value = "Example" />
<h1> Text to Particles Effect Dissolve using CSS and JS </h1>
<script>
var canvas = document.querySelector("#scene"),
  ctx = canvas.getContext("2d"),
  particles = [],
  amount = 0,
  mouse = {x:0,y:0},
  radius = 1;
var colors = ["#468966","#FFF0A5", "#FFB03B","#B64926", "#8E2800"];
var copy = document.querySelector("#copy");
var ww = canvas.width = window.innerWidth;
var wh = canvas.height = window.innerHeight;
function Particle(x,y){
  this.x =  Math.random()*ww;
  this.y =  Math.random()*wh;
  this.dest = {
    x : x,
    y: y
  };
  this.r =  Math.random()*5 + 2;
  this.vx = (Math.random()-0.5)*20;
  this.vy = (Math.random()-0.5)*20;
  this.accX = 0;
  this.accY = 0;
  this.friction = Math.random()*0.05 + 0.94;
  this.color = colors[Math.floor(Math.random()*6)];
}
Particle.prototype.render = function() {
  this.accX = (this.dest.x - this.x)/1000;
  this.accY = (this.dest.y - this.y)/1000;
  this.vx += this.accX;
  this.vy += this.accY;
  this.vx *= this.friction;
  this.vy *= this.friction;
  this.x += this.vx;
  this.y +=  this.vy;
  ctx.fillStyle = this.color;
  ctx.beginPath();
  ctx.arc(this.x, this.y, this.r, Math.PI * 2, false);
  ctx.fill();
  var a = this.x - mouse.x;
  var b = this.y - mouse.y;
  var distance = Math.sqrt( a*a + b*b );
  if(distance<(radius*70)){
    this.accX = (this.x - mouse.x)/100;
    this.accY = (this.y - mouse.y)/100;
    this.vx += this.accX;
    this.vy += this.accY;
  }
}
function onMouseMove(e) {
  mouse.x = e.clientX;
  mouse.y = e.clientY;
}
function onTouchMove(e) {
  if(e.touches.length > 0 ) {
    mouse.x = e.touches[0].clientX;
    mouse.y = e.touches[0].clientY;
  }
}
function onTouchEnd(e) {
mouse.x = -9999;
mouse.y = -9999;
}
function initScene() {
  ww = canvas.width = window.innerWidth;
  wh = canvas.height = window.innerHeight;
  ctx.clearRect(0, 0, canvas.width, canvas.height);
  ctx.font = "bold "+(ww/10)+"px sans-serif";
  ctx.textAlign = "center";
  ctx.fillText(copy.value, ww/2, wh/2);
  var data  = ctx.getImageData(0, 0, ww, wh).data;
  ctx.clearRect(0, 0, canvas.width, canvas.height);
  ctx.globalCompositeOperation = "screen";
  particles = [];
  for(var i=0;i<ww;i+=Math.round(ww/150)){
    for(var j=0;j<wh;j+=Math.round(ww/150)){
      if(data[ ((i + j*ww)*4) + 3] > 150){
        particles.push(new Particle(i,j));
      }   }  }
  amount = particles.length;
}
function onMouseClick() {
  radius++;
  if(radius === 5) {
    radius = 0;
  }
}
function render(a) {
  requestAnimationFrame(render);
  ctx.clearRect(0, 0, canvas.width, canvas.height);
  for (var i = 0; i < amount; i++) {
    particles[i].render();
  }
};
copy.addEventListener("keyup", initScene);
window.addEventListener("resize", initScene);
window.addEventListener("mousemove", onMouseMove);
window.addEventListener("touchmove", onTouchMove);
window.addEventListener("click", onMouseClick);
window.addEventListener("touchend", onTouchEnd);
initScene();
requestAnimationFrame(render);
</script>
</body>
</html>
解释:
在上面的示例中,我们使用JavaScript和CSS创建了一个将文本转换为粒子溶解效果的函数。在这个片段中,我们有一个文本输入框。当我们在输入框中输入文本时,它将被转换成溶解效果。
输出:
以下是这个示例的输出。

示例2
<! DOCTYPE html>
<html>
    <head>
        <meta http-equiv = "Content-Type"
            content = "text/html; charset=UTF-8" />
        <title> Example of  Text to Particles Dissolve Effect JS & CSS </title>
        <meta name = "description"/>
         <meta content = "width=800, initial-scale=1"
        name = "viewport" />
<script src = ?https://cdnjs.cloudflare.com/ajax/libs/jquery/3.1.0/jquery.min.js?> </script>
<style>
@import url(https://fonts.googleapis.com/css?family=Work+Sans:400,300,700|Open+Sans:400italic,300italic);
.dissolve {
  height: 50vh;
  width: 100vw;
  display: flex;
  flex-direction: column;
  align-items: center;
  justify-content: center;
  text-align: center;
  font-family: 'Georgia';
  font-size: 5vw;
  font-weight: 400;
  letter-spacing: 0.1em;
}
@import url('https://fonts.googleapis.com/css2?family=Modak&display=swap');
h2 {
  position: relative;
  left: 0;
  bottom: 5px;
  color: #24cf98;
  z-index: 10;
  font-size: 36px;
  opacity: 0.5;
  width: 100%;
  text-align: center;
font-family: 'Quantico', sans-serif;
  margin: 0;
}
html {
  display: block;
  align-items: center;
  justify-content: center;
  width: 100%;
  height: 100%;
  overflow: hidden;
  background-color: #333;
  position: relative;
  z-index: 1;
}
body {
  display: block;
  align-items: center;
  justify-content: center;
  width: 100%;
  height: 100%;
  overflow: hidden;
  background-color: #333;
  position: relative;
  z-index: 1;
}
.content {
  filter: url("#content");
  font-size: 64px;
  color: #FA565F;
}
input[type="range"] {
  display: block;
  margin-top: 2vw;
  cursor: pointer;
}
input[type="range"] {
  background: linear-gradient(to right, #82CFD0 0%, #82CFD0 40%, #fff 40%, #fff 100%);
  border: solid 2px #82CFD0;
  border-radius: 8px;
  height: 7px;
  width: 400px;
  outline: none;
  transition: background 450ms ease-in;
  -webkit-appearance: none;
}
input[type="range"]::--moz-range-track {
  width: 20px;
  height: 20px;
  border-radius: 50%;
  -webkit-appearance: none;
  cursor: ew-resize;
  background: #434343;
}
input[type="range"]::- -ms-track {
  width: 20px;
  height: 20px;
  border-radius: 50%;
  -webkit-appearance: none;
  cursor: ew-resize;
  background: #434343;
}
input[type="range"]::-webkit-slider-thumb {
  width: 20px;
  height: 20px;
  border-radius: 50%;
  -webkit-appearance: none;
  cursor: ew-resize;
  background: #434343;
}
</style>
<body>
<div class = "dissolve">
  <h1 class = "content"> Example </h1>
  <h2> Text to Particles Dissolve Effect JS & CSS </h2>
  <input type = "range" min = "300" max = "300" value = "45" oninput = "updateContent(this.value);" onchange = "updateContent(this.value);" />
</div>
<svg id = "animate">
  <defs>
    <filter class="animat" id="content">
            <range baseFrequency = "0.015" numOctaves = "3" result = "warp" type = "fractalNoise"> </range>
            <rangeMap id = "liquid" in= "SourceGraphic" in2 = "warp" scale = "35" xChannelSelector = "R" yChannelSelector = "B"> </rangeMap>
        </filter>
  </defs>
</svg>
<script>
var updateContent = function(val) {
  document.getElementById('liquid').setAttribute('scale', val);
};
</script>
</body>
</html>
解释:
在上面的示例中,我们使用JavaScript和CSS创建了一个将文本转换为粒子溶解效果的函数。为此,我们有一个范围滑块来控制溶解文本效果的数量。
输出:
以下是此示例的输出。

 极客笔记
极客笔记