Tkinter Text标签
标签(Tags)是指一个区域文字,然后我们可以为这个区域取一个名字,这个名字称作标签,可以使用此标签名字代表这个区域文字。有了标签后,我们可以针对此标签做更进一步的工作,例如,将字形、色彩等应用在此标签上。下列是常用的标签方法。
(1)tag_add(tagname,startindex[,endindex] …):将startindex和endindex间的文字命名为tagname标签。
(2)tag_config(tagname,options, … ):可以为标签执行特定的编辑,或动作绑定。
background:背景颜色。borderwidth:文字外围厚度,默认是0。font:字形。foreground:前景颜色。justify:对齐方式,默认是LEFT,也可以是RIGHT或CENTER。overstrike:如果是True,加上删除线。underline:如果是True,加上下画线。wrap:当使用wrap模式时,可以使用NONE、CHAR或WORD。
(3)tag_delete(tagname):删除此标签,同时移除此标签特殊的编辑或绑定。
(4)tag_remove(tagname[,startindex[,endindex]] … ):删除标签,但是不移除此标签特殊的编辑或绑定。
除了可以使用tag_add( )自行定义标签外,系统还有一个内建标签SEL,代表所选取的区间。
了解了标签的概念后,现在我们可以针对特定区间文字或所选取的文字做编辑了。
示例1
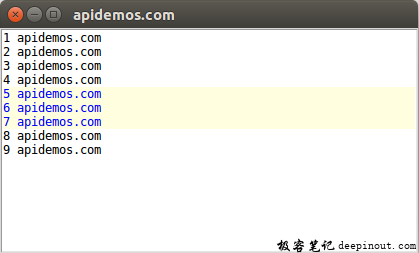
这个程序的第14、15行会先设定两个书签,然后第18行将两个书签间的文字设为tag1,最后针对此tag1设置前景颜色是蓝色,背景颜色是浅黄色。
from tkinter import *

root = Tk()
root.title("apidemos.com")
root.geometry("300x180")
# 建立Text
text = Text(root)

for i in range(1,10):
    text.insert(END,str(i) + ' Python GUI设计王者归来 \n')

# 设置书签
text.mark_set("mark1","5.0") # 指定标签mark1
text.mark_set("mark2","8.0") # 指定标签mark2

# 设置书签
text.tag_add("tag1","mark1","mark2") # 将mark1和mark2之间的文字命名为tag1标签
text.tag_config("tag1",foreground="blue",background="lightyellow") # 为标签执行特定的编辑或绑定
text.pack(fill=BOTH,expand=True)

root.mainloop()
输出:

示例2
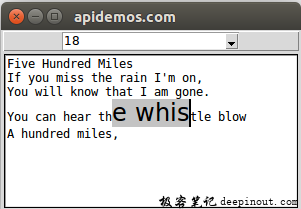
设计当选取文字时,可以依所选的文字大小显示所选文字。
from tkinter import *
from tkinter.font import Font
from tkinter.ttk import *

def sizeSelected(event):
    f=Font(size=sizeVar.get())    # 取得新的font size
    text.tag_config(SEL,font=f)

root = Tk()
root.title("apidemos.com")
root.geometry("300x180")

# 建立工具栏
toolbar = Frame(root,relief=RAISED,borderwidth=1)
toolbar.pack(side=TOP,fill=X,padx=2,pady=1)

# 建立font size Combobox
sizeVar = IntVar()
size = Combobox(toolbar,textvariable=sizeVar)
sizeFamily = [x for x in range(8,30)]
size["value"] = sizeFamily
size.current(4)
size.bind("<<ComboboxSelected>>",sizeSelected)
size.pack()

# 建立Text
text = Text(root)
text.pack(fill=BOTH,expand=True,padx=3,pady=2)
text.insert(END,"Five Hundred Miles\n")
text.insert(END,"If you miss the rain I'm on,\n")
text.insert(END,"You will know that I am gone.\n")
text.insert(END,"You can hear the whistle blow\n")
text.insert(END,"A hundred miles,\n")
text.focus_set()

root.mainloop()
输出:

上述程序在设计时我们是使用SEL当作变更字号的依据,可参考第8行,所以当我们取消选取时,原先所编辑的文字又将返回原先大小。在程序设计时我们也可以在insert( )方法的第三个参数增加标签tag,之后则可以直接设置此标签。
示例3
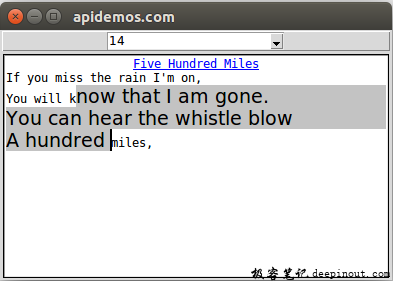
插入歌曲标题时,同时设置此标题为Tag标签“a”,然后在第37行设置标签为居中对齐、蓝色、含下画线。
from tkinter import *
from tkinter.font import Font
from tkinter.ttk import *

def sizeSelected(event):
    f=Font(size=sizeVar.get())    # 取得新的font size
    text.tag_config(SEL,font=f)

root = Tk()
root.title("apidemos.com")
root.geometry("300x180")

# 建立工具栏
toolbar = Frame(root,relief=RAISED,borderwidth=1)
toolbar.pack(side=TOP,fill=X,padx=2,pady=1)

# 建立font size Combobox
sizeVar = IntVar()
size = Combobox(toolbar,textvariable=sizeVar)
sizeFamily = [x for x in range(8,30)]
size["value"] = sizeFamily
size.current(4)
size.bind("<<ComboboxSelected>>",sizeSelected)
size.pack()

# 建立Text
text = Text(root)
text.pack(fill=BOTH,expand=True,padx=3,pady=2)
text.insert(END,"Five Hundred Miles\n","a")           # 插入时同时设置Tag
text.insert(END,"If you miss the rain I'm on,\n")
text.insert(END,"You will know that I am gone.\n")
text.insert(END,"You can hear the whistle blow\n")
text.insert(END,"A hundred miles,\n")
text.focus_set()
# 将Tag a 设置为居中,蓝色,含下划线
text.tag_config("a",foreground="blue",justify=CENTER,underline=True)

root.mainloop()
输出:

 极客笔记
极客笔记