用Python实现GUI的闹钟
闹钟一直以来都是一个有用的工具,用于在我们睡觉、小睡或提醒我们一些可能会忘记的重要日子。
闹钟是为了在指定的时间提醒我们而创建的一个时钟。这些闹钟的主要功能是叫醒人们从夜间睡眠或短暂小睡中醒来;有时也用于其他提醒。
在以下教程中,我们将使用Python编程语言中的 Tkinter 库开发基本的闹钟。
Python项目简介
在这个Python项目中,我们将考虑使用一些Python库,包括 Tkinter 和 datetime 。我们将在这个项目中使用当前日期和时间,以及根据当前日期和时间设置闹钟的功能。
现在让我们开始使用 Tkinter 构建闹钟。
构建GUI闹钟
这个Python项目的过程可以分为几个步骤。
步骤1: 导入所需模块
步骤2: 创建闹钟的函数
步骤3: 创建 Tkinter 窗口
接下来我们将详细了解这些步骤。
导入所需模块
在开始构建任何项目之前,首要步骤是导入我们需要的所有重要库和模块。在这种情况下,我们将需要 Tkinter 库以及 datetime 、 time 和 winsound 模块。
- Tkinter库: 这个库将允许我们为用户创建一个窗口,以便使用该应用程序。
- Datetime和time模块: 这些模块将允许我们处理日期和时间,并在需要时对其进行操作。
- Winsound模块: 这个模块将允许我们为闹钟生成声音。
现在让我们来看下面的代码片段,示例了导入所需模块。
文件:alarmClock.py
# importing the required modules
from tkinter import *
import datetime as dt
import time
import winsound as ws
解释:
在上面的代码片段中,我们已经导入了所需的模块。
创建闹钟功能
一旦导入完成,我们将继续下一步,包括创建闹钟功能的函数。
让我们考虑以下演示相同功能的代码片段。
文件:alarmClock.py
# defining the function for the alarm clock
def alarm(setAlarmTimer):
    while True:
        time.sleep(1)
        actualTime = dt.datetime.now()
        currentTime = actualTime.strftime("%H : %M : %S")
        currentDate = actualTime.strftime("%d / %m / %Y")
        the_message = "Current Time: " + str(currentTime)
        print(the_message)
        if currentTime == setAlarmTimer:
            ws.PlaySound("sound.wav", ws.SND_ASYNC)
            break

def getAlarmTime():
    alarmSetTime = f"{hour.get()} : {minute.get()} : {second.get()}"
    alarm(alarmSetTime)
解释:
在上面的代码片段中,我们定义了一个函数作为alarm,参数为setAlarmTimer。在这个函数内部,我们使用了while循环来判断True。在这个循环内部,我们使用了time模块的sleep函数来暂停程序的执行,直到它获取到用户输入的时间值。然后,我们使用datetime模块的datetime.now()函数获取当前的日期和时间,并将其存储在一个变量中。然后,我们使用strftime函数将时间和日期分别存储在具有特定格式的变量中。然后,我们打印表示当前时间的消息。然后,我们使用if条件语句来检查当前时间是否等于设置的闹钟时间,并使用winsound模块播放相应的声音,否则闹钟继续运行。然后,我们定义了另一个函数getAlarmTime(),它接受用户设置的闹钟时间并将其传递给之前的函数。
创建Tkinter窗口
现在我们已经创建了闹钟函数,接下来是创建应用程序的主窗口并定义所有小部件和功能的最后一步。
让我们考虑以下示例代码:
文件: alarmClock.py
# creating the GUI for the application
guiWindow = Tk()
guiWindow.title("The Alarm Clock")
guiWindow.geometry("464x200")
guiWindow.config(bg = "#87BDD8")
guiWindow.resizable(width = False, height = False)

timeFormat = Label(
    guiWindow,
    text = "Remember to set time in 24-hour format!",
    fg = "white",
    bg = "#36486B",
    font = ("Arial", 15)
    ).place(
        x = 0,
        y = 160
        )

add_time = Label(
    guiWindow,
    text = "Hour     Minute     Second",
    font = 60,
    fg = "white",
    bg = "#87BDD8"
    ).place(
        x = 220,
        y = 10
        )

setAlarm = Label(
    guiWindow,
    text = "Set Time for Alarm: ",
    fg = "white",
    bg = "#034F84",
    relief = "solid",
    font = ("Helevetica", 13, "bold")
    ).place(
        x = 5,
        y = 50
        )

hour = StringVar()
minute = StringVar()
second = StringVar()

hourTime = Entry(
    guiWindow,
    textvariable = hour,
    bg = "#FEFBD8",
    width = 4,
    font = (20)
    ).place(
        x = 220,
        y = 53
        )
minuteTime = Entry(
    guiWindow,
    textvariable = minute,
    bg = "#FEFBD8",
    width = 4,
    font = (20)
    ).place(
        x = 297,
        y = 53
        )
secondTime = Entry(
    guiWindow,
    textvariable = second,
    bg = "#FEFBD8",
    width = 4,
    font = (20)
    ).place(
        x = 390,
        y = 53
        )

submit = Button(
    guiWindow,
    text = "Set The Alarm",
    fg = "white",
    bg = "#82B74B",
    width = 15,
    command = getAlarmTime,
    font = (20)
    ).place(
        x = 140,
        y = 100
        )

guiWindow.mainloop()
解释:
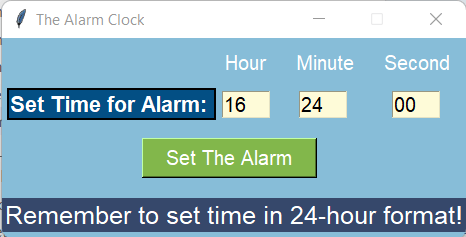
在上面的代码片段中,我们使用 Tk() 类创建了一个GUI窗口。我们设置了窗口的标题和尺寸,分别使用 title() 和 geometry() 方法。我们使用 config() 方法中的 bg 属性来设置窗口的背景色为 #87BDD8 。通过在 resizable() 方法中将 width 和 height 设置为 False ,我们固定了窗口的尺寸。接下来,我们使用 Label 类定义了不同的标签,用于在窗口上显示文本,并提供一些参数来装饰文本。然后,我们定义了一些变量来保存字符串的值。我们使用 Entry 类添加了三个文本框,用于输入闹钟的时间,并提供一些参数进行装饰。我们使用 Button 类添加了一个按钮,与之前创建的 getAlarmTime() 函数相关联,并使用一些参数进行装饰。最后,我们使用 mainloop() 方法来显示窗口。
“ 带有GUI的闹钟 ”项目的编码最终完成。我们现在可以保存文件并运行程序以查看它是否正常工作。
要运行程序,我们可以在命令行或终端中输入以下命令:
命令:
$ python alarmClock.py
但是在看输出之前,这是一个完整的项目代码。
完整的项目代码
以下程序文件是“GUI闹钟”项目的完整代码。
文件:alarmClock.py
# importing the required modules
from tkinter import *
import datetime as dt
import time
import winsound as ws

# defining the function for the alarm clock
def alarm(setAlarmTimer):
    while True:
        time.sleep(1)
        actualTime = dt.datetime.now()
        currentTime = actualTime.strftime("%H : %M : %S")
        currentDate = actualTime.strftime("%d / %m / %Y")
        the_message = "Current Time: " + str(currentTime)
        print(the_message)
        if currentTime == setAlarmTimer:
            ws.PlaySound("sound.wav", ws.SND_ASYNC)
            break

def getAlarmTime():
    alarmSetTime = f"{hour.get()} : {minute.get()} : {second.get()}"
    alarm(alarmSetTime)

# creating the GUI for the application
guiWindow = Tk()
guiWindow.title("The Alarm Clock")
guiWindow.geometry("464x200")
guiWindow.config(bg = "#87BDD8")
guiWindow.resizable(width = False, height = False)

timeFormat = Label(
    guiWindow,
    text = "Remember to set time in 24-hour format!",
    fg = "white",
    bg = "#36486B",
    font = ("Arial", 15)
    ).place(
        x = 0,
        y = 160
        )

add_time = Label(
    guiWindow,
    text = "Hour     Minute     Second",
    font = 60,
    fg = "white",
    bg = "#87BDD8"
    ).place(
        x = 220,
        y = 10
        )

setAlarm = Label(
    guiWindow,
    text = "Set Time for Alarm: ",
    fg = "white",
    bg = "#034F84",
    relief = "solid",
    font = ("Helevetica", 13, "bold")
    ).place(
        x = 5,
        y = 50
        )

hour = StringVar()
minute = StringVar()
second = StringVar()

hourTime = Entry(
    guiWindow,
    textvariable = hour,
    bg = "#FEFBD8",
    width = 4,
    font = (20)
    ).place(
        x = 220,
        y = 53
        )
minuteTime = Entry(
    guiWindow,
    textvariable = minute,
    bg = "#FEFBD8",
    width = 4,
    font = (20)
    ).place(
        x = 297,
        y = 53
        )
secondTime = Entry(
    guiWindow,
    textvariable = second,
    bg = "#FEFBD8",
    width = 4,
    font = (20)
    ).place(
        x = 390,
        y = 53
        )

submit = Button(
    guiWindow,
    text = "Set The Alarm",
    fg = "white",
    bg = "#82B74B",
    width = 15,
    command = getAlarmTime,
    font = (20)
    ).place(
        x = 140,
        y = 100
        )

guiWindow.mainloop()
输出:
Current Time: 16 : 23 : 46
Current Time: 16 : 23 : 47
Current Time: 16 : 23 : 48
Current Time: 16 : 23 : 49
Current Time: 16 : 23 : 50
Current Time: 16 : 23 : 51
Current Time: 16 : 23 : 52
Current Time: 16 : 23 : 53
Current Time: 16 : 23 : 54
Current Time: 16 : 23 : 55
Current Time: 16 : 23 : 56
Current Time: 16 : 23 : 57
Current Time: 16 : 23 : 58
Current Time: 16 : 23 : 59
Current Time: 16 : 24 : 00
*ALARM*

 极客笔记
极客笔记