JavaScript 什么是服务器发送事件
什么是JavaScript中的服务器发送事件
在JavaScript中,服务器发送事件(SSE)使得服务器能够向客户端发送数据。客户端需要与服务器建立连接以从服务器获取数据。
服务器发送事件与WebSocket类似,因为它也在客户端和服务器之间建立连接,并且在双方之间发送数据很有用。但是,服务器发送事件允许单向通信,这意味着服务器可以向客户端发送数据,而客户端无法向服务器发送数据。
让我们构建一个实时的React和Node应用程序来使用服务器发送事件。这里React是我们的前端,Node是我们的后端。
示例
用户需要按照以下步骤使用实时应用程序的服务器发送事件。
- 步骤1 - 创建一个React应用程序。
-
步骤2 - 在应用程序的项目目录中,运行以下命令以在项目中安装’axios’ NPM包。
npm i axios
-
第3步 - 在App()组件中,使用useState钩子来更新我们从服务器接收到的消息。
-
第3.1步 - 使用useEffect钩子来建立客户端与服务器之间的连接。在这里,我们需要使用EventSource()构造函数通过传递服务器的URL来建立与服务器的连接。
-
第3.2步 - 同样,添加’message’事件监听器在事件源上,每当客户端从服务器接收到消息时,调用handleMessage()函数。
-
第3.3步 - 接下来,创建一个对象,它移除’message’事件并关闭客户端与服务器之间的连接,并将对象返回。
-
第4步 - 在handleMessage()函数中,获取从服务器接收到的数据,并将它推送到’messageData’钩子中。
-
第5步 - 添加显示从服务器接收到的所有消息的HTML代码。
-
第5.1步 - 添加’getMessage’按钮,调用’sendMessage()’函数。
-
第5.2步 - sendMessage()函数从字符串数组中选择任意随机消息,并使用’axios’将其发送给服务器。服务器接收到消息后,再通过服务器推送的事件将其再次发送给客户端。
-
第6步 - 将以下代码添加到app.js文件中。
import React from "react";
import { useState, useEffect } from "react";
import axios from "axios";

const App = () => {
   const [messageData, setMessageData] = useState([]);

   useEffect(() => {
      // add the client to the server
      const newConnection = new EventSource("http://localhost:5000/addClient");
      newConnection.addEventListener("message", handleMessage);
      return () => {
         // close the event listener
         newConnection.removeEventListener("message", handleMessage);
         newConnection.close();
      };
   }, []);

   // getting message from server
   const handleMessage = (evt) => {
      const eventData = JSON.parse(evt.data);
      setMessageData((messages) => messages.concat(eventData));
   };

   // Send a random message to the server, which the server will send to the client via server-sent events
   const sendMessage = () => {
      let messages = [
         "JavaScript",
         "React",
         "Node",
         "Express",
         "MongoDB",
         "MySQL",
         "Python",
         "Django",
         "Flask",
         "Java",
         "Spring",
         "Spring Boot",
         "Spring MVC",
         "Spring Security",
         "Spring Data",
      ];
      const random = Math.floor(Math.random() * messages.length);
      axios.post("http://localhost:5000/message", {
         message: messages[random],
      });
   };

   return (
      <div>
         <h2> Server Sent Events </h2>
         <div>
            <h4> Click the below button to get a message from the server </h4>
            <button onClick = {sendMessage}> Get message </button>
         </div>
         <div>
            <h4> All messages </h4>
            <p> Total messages: {messageData.length} </p>
            {messageData.map((item, index) => (
               <div key={index}> {item.message} </div>
            ))}
         </div>
      </div>
   );
};

export default App;
- 第7步 − 使用以下命令运行服务器。
npm start
现在,用户需要创建一个节点应用程序来设置服务器。
- 步骤8 - 在节点应用程序的项目目录中执行以下命令以安装NPM软件包。
npm i cors body-parser express
- 第9步 - 导入所需的NPM包并设置应用程序的服务器。
-
第10步 - 创建一个API端点来接收客户端的请求。
-
第11步 - 当服务器收到来自“addClient”的请求时,它将调用“addClient()”函数。
-
第11.1步 - 在addClient()函数内创建标头。然后,创建一个客户端对象,将id和“res”添加到该对象并将其推送到“allConnectedClients”数组中。
-
第11.2步 - 监听“close”事件,在服务器和客户端的内容结束时,将客户端从“allConnectedClients”数组中移除。
-
第12步 - 在sendMessage()函数中,从客户端获取消息并将其添加到“res”。之后,调用sendToClient()函数,该函数通过服务器端事件将相同的消息发送给所有客户端。
-
第13步 - 将以下代码添加到app.js文件中。
const express = require("express");
const bodyParser = require("body-parser");
const cors = require("cors");
const app = express();
const PORT = 5000;
// array to store all connected clients
let allConnectedClients = [];

// add the client to the list
const addClient = (req, res) => {

   // Set headers
   const headers = {
      "Content-Type": "text/event-stream",
      Connection: "keep-alive",
   };

   // adding 200 response code
   res.writeHead(200, headers);

   // create a client object and add it to the list
   const id = Date.now();
   const client = {
      id,
      res,
   };
   allConnectedClients.push(client);
   console.log(`Client is connected Successfully and its id is: {id}`);
   req.on("close", () => {
      console.log(`Client is disconnected Successfully and its id is:{id}`);

      // remove the client from the list when it gets disconnected
      allConnectedClients = allConnectedClients.filter(
         (client) => client.id !== id
      );
   });
};
const sendToClient = (msg) => {

   // iterate over all clients and send the message
   allConnectedClients.forEach((singleClient) =>
      singleClient.res.write(`data: {JSON.stringify(msg)}

`)
   );
};
const sendMessage = (req, res) => {

   // Get the message from the request body
   const msg = req.body;

   // add message to response
   res.json(msg);
   return sendToClient(msg);
};

// use cors and body parser
app.use(cors());
app.use(bodyParser.json());
app.use(bodyParser.urlencoded({ extended: false }));

// adding endpoints
app.get("/addClient", addClient);
app.post("/message", sendMessage);

// run the server
app.listen(PORT, () => {
   console.log(`App listening on port{PORT}`);
});
- 第14步 − 使用下面的命令运行Node应用程序的代码。
node app.js
注意 - 用户需要确保服务器和客户端在不同的主机上运行,并根据服务器端口更改客户端中的API端点。
输出
当客户端成功连接时,用户将在节点应用程序的终端中看到以下输出。

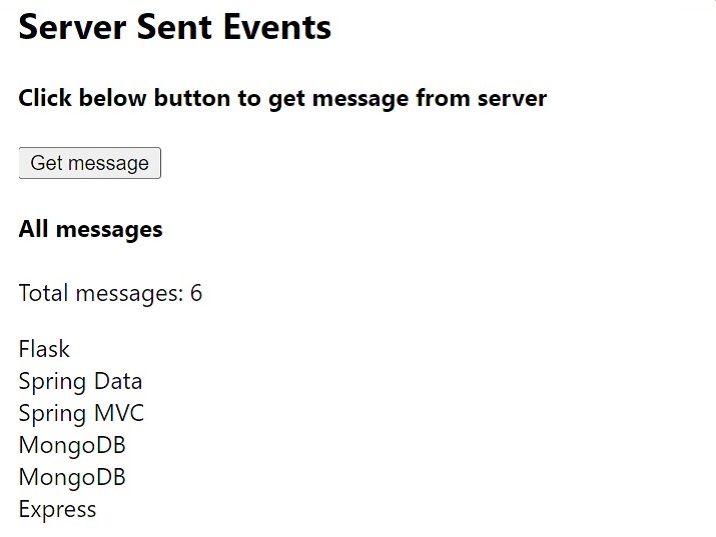
对于前端部分,用户将看到以下输出。

上述应用程序的流程
成功运行两个服务器之后,当用户打开前端部分时,它将请求“addClient”端点,建立服务器和客户端之间的连接。
之后,当用户点击“获取消息”按钮时,它将向“message”端点发送一个带有特定消息的POST请求。服务器接收到消息后,通过服务器发送的事件将其发送回客户端。
客户端接收到消息,存储消息数据并在浏览器上显示出来。在这里,我们为了测试目的从客户端发送数据。然而,如果我们使用数据库和在数据库中进行任何数据更新,我们可以直接将更新后的数据发送到服务器。
 极客笔记
极客笔记