在Snack中使用选项卡
选项卡是用于在应用中实现多页面视图的。选项卡通常位于屏幕的顶部或底部。一些库允许在移动应用中创建选项卡。选项卡也可以使用简单的组件(如按钮)来创建。本文将展示使用React Native和JavaScript代码的两个不同示例,其中第一个示例使用按钮来创建选项卡。在另一个示例中,使用’@react-navigation/material-top-tabs’中的createMaterialTopTabNavigator来创建选项卡,然后将这些选项卡渲染到设备的屏幕上。
步骤1
步骤1 - 从’react-native’导入Text、View、StyleSheet和Button。
步骤2 -编写独立的函数,显示不同页面的内容。
步骤3 - 创建App.js并编写代码。创建四个按钮,并将其放置为顶部选项卡。
步骤4 - 创建指定选项卡的页面内容,并通过按钮点击显示。
步骤5 - 创建一个新的样式,并将其命名为selectedOne。当选择给定的选项卡时,设置此样式。这将使指定的选项卡与该行中的其他非选定选项卡看起来不同。
步骤6 - 检查结果。
示例1:在Snack上使用按钮创建选项卡
该项目中使用的重要文件为
- App.js
App.js:这是该项目的主要javascript文件。
示例
import{Component}from'react';
import{Text,View,StyleSheet,Button}from'react-native';

exportdefaultclassAppextendsComponent{
   constructor(props){
      super(props);
      this.state={
         LessonSelected:'One',
         btnClr:"#6690ad",
      };
   }
   render(){
      return(
         <Viewstyle={styles.mainSpace}>
            <Viewstyle={styles.Lessonbuttons}>

               <Viewstyle={this.state.LessonSelected==='One'?styles.selectedOne:null}>
                  <Button
                  onPress={()=>{
                     this.setState({LessonSelected:'One'});
                  }}
                  title="Lesson1"
                  color={this.state.btnClr}
                  borderColor='#000'
                  />
               </View>
               <Viewstyle={this.state.LessonSelected==='Two'?styles.selectedOne:null}>
                  <Button
                  onPress={()=>{
                     this.setState({LessonSelected:'Two'});
                  }}
                  title="Lesson2"
                  color={this.state.btnClr}
                  />
               </View>
               <Viewstyle={this.state.LessonSelected==='Three'?styles.selectedOne:null}>
                  <Button
                  onPress={()=>{
                     this.setState({LessonSelected:'Three'});
                  }}
                  title="Lesson3"
                  color={this.state.btnClr}
                  />

               </View>
               <Viewstyle={this.state.LessonSelected==='Four'?styles.selectedOne:null}>
                  <Button
                  onPress={()=>{
                     this.setState({LessonSelected:'Four'});
                  }}
                  title="Lesson4"
                  color={this.state.btnClr}
                  />
               </View>
            </View>

            {this.state.LessonSelected==='One'?this.showLesson1()
               :this.state.LessonSelected==='Two'?this.showLesson2()
               :this.state.LessonSelected==='Three'?this.showLesson3()
               :this.state.LessonSelected==='Four'?this.showLesson4()
               :this.showLesson1()
            }
         </View>
      );
   }
   showLesson1=()=>(
      <Viewstyle={[styles.Lessoncontents,styles.Lessons]}>
         <Textstyle={styles.LessonHeader}>Lesson1</Text>
         <Textstyle={styles.LessonContent}>Contents</Text>
      </View>
   );

   showLesson2=()=>(
      <Viewstyle={[styles.Lessoncontents,styles.Lessons]}>
         <Textstyle={styles.LessonHeader}>Lesson2</Text>
         <Textstyle={styles.LessonContent}>Contents</Text>
      </View>
   );

   showLesson3=()=>(
      <Viewstyle={[styles.Lessoncontents,styles.Lessons]}>
         <Textstyle={styles.LessonHeader}>Lesson3</Text>
         <Textstyle={styles.LessonContent}>Contents</Text>
      </View>
   );

   showLesson4=()=>(
      <Viewstyle={[styles.Lessoncontents,styles.Lessons]}>
         <Textstyle={styles.LessonHeader}>Lesson4</Text>
         <Textstyle={styles.LessonContent}>Contents</Text>
      </View>
   );
}

conststyles=StyleSheet.create({
   mainSpace:{
      flex:1,
      marginTop:50,
   },
   Lessonbuttons:{
      width:'100%',
      flexDirection:'row',
      justifyContent:'space-between',
   },
   Lessoncontents:{
      flex:1,
      width:'100%',
      padding:10,
      marginTop:10,
      borderWidth:1,
      borderColor:'black',
   },
   LessonHeader:{
      color:'black',
      fontSize:28,
      textAlign:'center',
   },
   selectedOne:{
      borderBottomWidth:10,
      borderBottomColor:'#ffc181',
   },
});
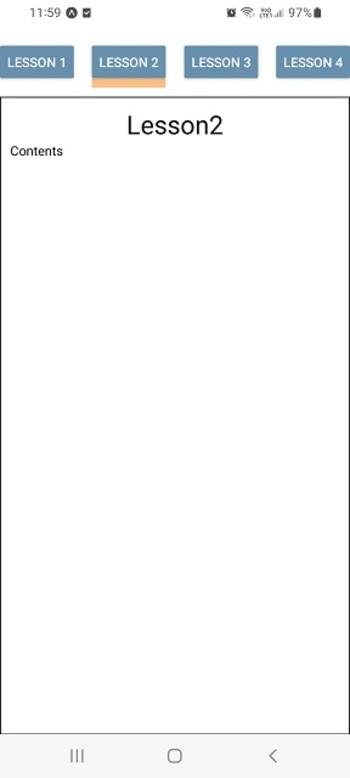
结果
尽管结果可以在线上查看,但是在这里展示的是个人移动设备上的显示效果。

步骤2
步骤1 - 从’react-native’导入Text,View,StyleSheet。
步骤2 - 从’@react-navigation/native’导入NavigationContainer,然后从’@react-navigation/material-top-tabs’导入createMaterialTopTabNavigator。
步骤3 - 编写显示不同页面内容的单独函数。
步骤4 - 创建App.js并编写代码。使用createMaterialTopTabNavigator()创建一个LessonTab。
步骤5 - 创建NavigationContainer标签,并在其中创建LessonTab.Navigator。在不同的LessonTab.Screen中调用页面内容函数。
步骤6 - 检查结果
示例2:使用’@react-navigation/material-top-tabs’创建选项卡
该项目中使用的重要文件是
- App.js
App.js:这是该项目的主要JavaScript文件。
示例
import {Component} from 'react';
import { Text, View, StyleSheet } from 'react-native';
import { NavigationContainer } from '@react-navigation/native';
import { createMaterialTopTabNavigator } from '@react-navigation/material-top-tabs';

const LessonTab = createMaterialTopTabNavigator();

export default class TopTabs extends Component {
   constructor(props) {
      super(props);
      this.state = {
         LessonSelected: 'One',
         btnClr: "#6690ad",
      };
   }
   render(){
      return (
         <View style={styles.mainSpace}>
            <NavigationContainer>
               <LessonTab.Navigator
               tabBarOptions={{
               activeTintColor: '#e3486a',
               inactiveTintColor: '#7448e3',
               }}
               >
                  <LessonTab.Screen name="Lesson 1" component={this.showLesson1} />
                  <LessonTab.Screen name="Lesson 2" component={this.showLesson2} />
                  <LessonTab.Screen name="Lesson 3" component={this.showLesson3} />
                  <LessonTab.Screen name="Lesson 4" component={this.showLesson4} />
               </LessonTab.Navigator>
            </NavigationContainer>
         </View>
      );
   }
   showLesson1 = () => (
      <View style={[styles.Lessoncontents, styles.Lessons]}>
         <Text style={styles.LessonHeader}>Lesson1</Text>
         <Text style={styles.LessonContent}>Contents</Text>
      </View>
   );
   showLesson2 = () => (
      <View style={[styles.Lessoncontents, styles.Lessons]}>
         <Text style={styles.LessonHeader}>Lesson2</Text>
         <Text style={styles.LessonContent}>Contents</Text>
      </View>
   );

   showLesson3 = () => (
      <View style={[styles.Lessoncontents, styles.Lessons]}>
         <Text style={styles.LessonHeader}>Lesson3</Text>
         <Text style={styles.LessonContent}>Contents</Text>
      </View>
   );

   showLesson4 = () => (
      <View style={[styles.Lessoncontents, styles.Lessons]}>
         <Text style={styles.LessonHeader}>Lesson 4 </Text>
         <Text style={styles.LessonContent}>Contents</Text>
      </View>
   );
}

const styles = StyleSheet.create({
   mainSpace: {
      flex: 1,
      marginTop: 50,
   },
   Lessoncontents: {
      flex: 1,
      width: '100%',
      padding: 10,
      marginTop: 10,
      borderWidth: 1,
      borderColor: 'black',
   },
   LessonHeader: {
      color: 'black',
      fontSize: 28,
      textAlign: 'center',
   },
});
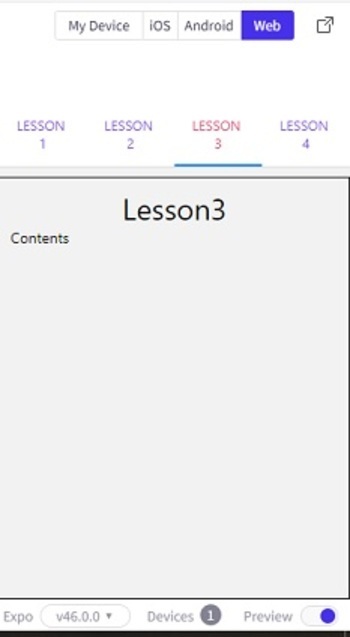
输出
结果可以在线上查看。当用户输入代码时,默认选择Web视图,结果即时显示。

在本文中,使用两个不同的示例介绍了在Expo Snack上制作顶部选项卡的方法。 首先介绍了使用简单按钮制作选项卡的方法,然后介绍了使用 createMaterialTopTabNavigator from ‘@react-navigation/material-top-tabs’ 制作顶部选项卡的方法,并展示了在在线Web视图和个人移动设备上的输出。
 极客笔记
极客笔记