使用Snack中的音频
音频是移动应用程序的常见组件。音频可以用在应用程序中的许多方面。音频可以从移动设备中选择,可以使用任何在线链接,也可以作为本地音频包含在项目本身中。Expo-av可以在所有这些情况下用于将声音集成到移动应用程序中。本文显示了React Native和JavaScript代码的三个不同示例,其中第一个示例从设备中浏览音频文件,第二个示例从在线链接中选择音频并与本地存储的音频文件混合,第三个示例演示了音频的播放和停止。
步骤-1
步骤 1 - 从’react-native’中导入View、Text、TouchableOpacity和StyleSheet。还要从’expo-av’和’expo-document-picker’中导入Audio和DocumentPicker。
步骤 2 - 创建一个名为App.js的文件。
步骤 3 - 创建一个名为selectAudioFunc的函数。现在调用DocumentPicker.getDocumentAsync函数,并从设备中获取音乐文件。
步骤 4 - 创建一个新函数,并将其命名为playyAudioo(),编写代码以播放选择的音频文件。
步骤 5 - 使用TouchableOpacity,并在点击时调用playyAudioo()。
步骤 6 - 检查结果。
示例1:从设备中选择音频文件进行播放
项目中使用的重要文件是
- App.js
示例
import {useState} from 'react';
import { TouchableOpacity, StyleSheet,View, Text } from 'react-native';
import { Audio } from 'expo-av';
import * as DocumentPicker from 'expo-document-picker';


export default function AudioExampleOne() {
   var [myaudio, settAud] = useState([]);

   selectAudioFunct= async ()=> {
      settAud(
         await DocumentPicker.getDocumentAsync({
            type: 'audio/*',
            copyToCacheDirectory: true,
         })
      );
   }

   playyAudioo= async ()=> {
      const myAudioSrc = myaudio.uri;
      const audioObj = new Audio.Sound();
      audioObj.setOnPlaybackStatusUpdate();
      await audioObj.loadAsync({ uri: myAudioSrc });
      await audioObj.playAsync();
   }

   return (
      <View style={styles.mainSpace}>
         <View style={{ flexDirection: 'row', justifyContent: 'center' }}>
            <TouchableOpacity
               onPress={() => selectAudioFunct()
               }
               style={styles.BtnStyleIt}>
               <View >
                  <Text style={styles.BtnTxt1}>Select Audio</Text>
               </View>
            </TouchableOpacity>
         </View>

         <View style={{ flexDirection: 'row', justifyContent: 'center' }}>
            <TouchableOpacity
            onPress={() =>
               playyAudioo()
               }
               style={styles.BtnStyleIt}>
               <View>
                  <Text style={styles.BtnTxt1}>PLAY</Text>
               </View>
            </TouchableOpacity>
         </View>
      </View>
   );
}

const styles = StyleSheet.create({
   mainSpace: {
      flex: 1,
      backgroundColor: '#4d8b40',
      alignItems: 'center',
      justifyContent: 'center',
   },

   BtnStyleIt: {
      margin: 10,
      width: 150,
      height: 150,
      borderRadius: 30,
      backgroundColor: '#aaa',
      alignItems: 'center',
      justifyContent: 'center',
   },

   BtnTxt1: {
      color: '#76150A',
      fontSize: 20,
      fontWeight: "bold",
      textAlign: 'center'
   },
});
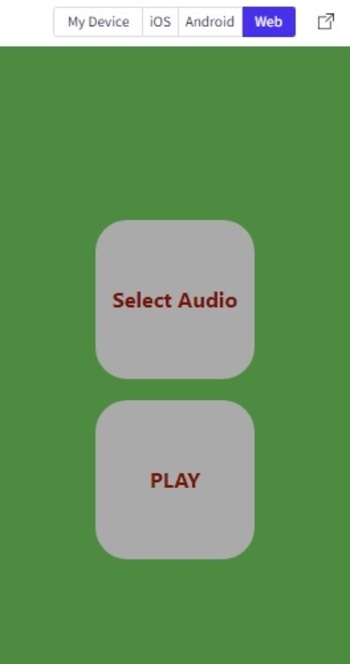
输出
结果可以在线查看。

步骤-2
步骤1 – 从’react-native’导入视图、文本和按钮。
步骤2 – 创建App.js并编写代码。
步骤3 – 创建一个新函数并将其命名为theonlineSong。从音频链接中获取歌曲以获取音乐文件来测试此功能。
步骤4 – 创建一个新函数并将其命名为thelocalfile,以选择任何本地存储在同一项目中的音频文件。
步骤5 – 使用来自react-native的按钮来创建按钮,并从中调用上述函数代码。
步骤6 – 检查结果
示例2:混合在线和本地音频文件
项目中使用的重要文件是
- App.js
示例
import{Component}from'react';
import{View,Text,Button,StyleSheet}from'react-native';
import{Audio}from'expo-av';

exportdefaultclassAudioExampleTwoextendsComponent{

   theonlineSong=async()=>{
   awaitAudio.Sound.createAsync(
   {uri:'<any_audio_file_link.mp3>'},
   //Foregthislinkwasusedfordemo
   //{uri:'https://pwdown.info/112168/06.%20Ek%20Aisi%20Ghazal.mp3'},
   {shouldPlay:true},);}
   thelocalfile=async()=>{
      awaitAudio.Sound.createAsync(
      {uri:require("./raining.mp3")},
      {shouldPlay:true,isLooping:true},
   );}

   render(){
      return(
         <View>
            <Viewstyle={{paddingTop:20}}>
            <Textstyle={{
               fontWeight:'bold',
               fontSize:30,marginBottom:20}}
               >
               MixtheRainwiththeSong
            </Text>

            <Button
               style={{paddingTop:20}}
               title='OnlineSong'
               color='blue'
               onPress={this.theonlineSong}
               >
            </Button>
            <Button
               style={{paddingTop:20}}
               title='AddtheRainSound'
               color='purple'
               onPress={this.thelocalfile}
               >
            </Button>
         </View>
         </View>
      );
   }
}
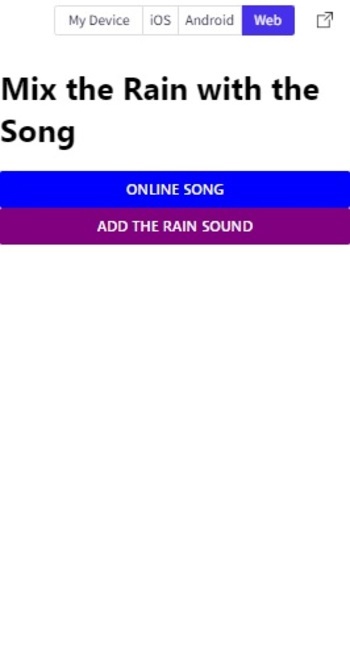
输出
结果可以在线上看到。

步骤-3
步骤1 − 从’react-native’中导入View、Text、Button。同时,从’expo-av’中导入Audio。还要从’react’中导入useState和useEffect。
步骤2 − 创建App.js并编写代码。
步骤3 − 使用Audio.Sound()创建一个新的音频对象,并使用loadAsync(require<文件名及路径>)来加载所需的音频文件。
步骤4 − 根据标志条件尝试播放和停止文件。
步骤5 − 使用react-native中的Button制作一个按钮,并在反转标志条件时更改按钮的颜色。
步骤6 − 检查结果。
示例3:开始和停止音频
项目中使用的重要文件是
- App.js
示例
import {useState,useEffect} from 'react';
import {View, Text, Button } from 'react-native';
import { Audio } from 'expo-av';

export default function AudioExampleThree() {
   const [audioFlag, setaudioFlag] = useState(false)
   const [rain] = useState(new Audio.Sound());

   useEffect(()=>{
      (async () => {
         console.log('Audio Flag', audioFlag)
         if (audioFlag) {
            await rain.loadAsync(require("./raining.mp3"))
            try {
               await rain.playAsync()
            } catch (e) {
               console.log(e)
            }
         } else {
            await rain.stopAsync()
            await rain.unloadAsync()
         }
      })()
   },[audioFlag, rain])

   return (
      <View style={{ justifyContent:"center", alignItems : "center"}}>
         <Text style={{marginTop: 50, marginBottom: 50, fontSize:28}}>Rain Sound </Text>
         <Buttoncolor={audioFlag ? '#d61676' : '#24dd4d'} title={'PLAY AUDIO | STOP AUDIO'} onPress={()=>setaudioFlag(!audioFlag)} />
      </View>
   );
}
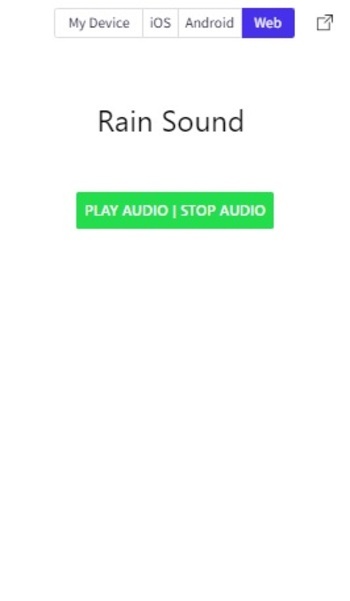
结果
结果可以在线查看。

 极客笔记
极客笔记