Python Tkinter 输入框
Entry部件用于为用户提供单行文本框,以接受用户输入的值。我们可以使用Entry部件来接收用户输入的文本字符串。它只能用于接收用户的单行文本。对于多行文本,我们必须使用文本部件。
使用Entry部件的语法如下所示。
语法
w = Entry (parent, options)
下面是可能的选项列表。
| SN | Option | 描述 |
|---|---|---|
| 1 | bg | 小部件的背景颜色。 |
| 2 | bd | 小部件的边框宽度(以像素为单位)。 |
| 3 | cursor | 鼠标指针将更改为设置为箭头、点等的光标类型。 |
| 4 | exportselection | 默认情况下,输入框中写入的文本将自动复制到剪贴板。我们可以将exportselection设置为0来阻止复制。 |
| 5 | fg | 表示文本的颜色。 |
| 6 | font | 表示文本的字体类型。 |
| 7 | highlightbackground | 它表示在小部件没有输入焦点时,在遍历高亮区域显示的颜色。 |
| 8 | highlightcolor | 它表示当小部件具有输入焦点时,用于绘制围绕小部件的遍历高亮矩形的颜色。 |
| 9 | highlightthickness | 它表示一个非负值,表示当小部件具有输入焦点时,在小部件外部绘制高亮矩形的宽度。 |
| 10 | insertbackground | 它表示用作插入光标覆盖区域的背景的颜色。这个颜色通常会覆盖小部件的正常背景。 |
| 11 | insertborderwidth | 它表示一个非负值,指示要绘制在插入光标周围的3D边框的宽度。该值可以是Tk_GetPixels接受的任何形式之一。 |
| 12 | insertofftime | 它表示一个非负整数值,指示插入光标在每个闪烁周期中应该“关闭”的毫秒数。如果此选项为零,则光标不闪烁:它始终处于打开状态。 |
| 13 | insertontime | 指定一个非负整数值,表示插入光标在每个闪烁周期中应该“打开”的毫秒数。 |
| 14 | insertwidth | 它表示插入光标的总宽度值。该值可以采用任何Tk_GetPixels接受的形式。 |
| 15 | justify | 如果文本包含多行,它指定文本的组织方式。 |
| 16 | relief | 它指定边框的类型。默认值为FLAT。 |
| 17 | selectbackground | 选定文本的背景颜色。 |
| 18 | selectborderwidth | 在选定的任务周围显示的边框宽度。 |
| 19 | selectforeground | 选定任务的字体颜色。 |
| 20 | show | 用于显示其他类型的条目文本,而不是字符串。例如,密码使用星号(*)输入。 |
| 21 | textvariable | 将其设置为StringVar的实例,以从条目中检索文本。 |
| 22 | width | 显示的文本或图像的宽度。 |
| 23 | xscrollcommand | 如果我们希望用户输入的文本长度超过小部件的实际宽度,则可以将条目小部件链接到水平滚动条。 |
示例
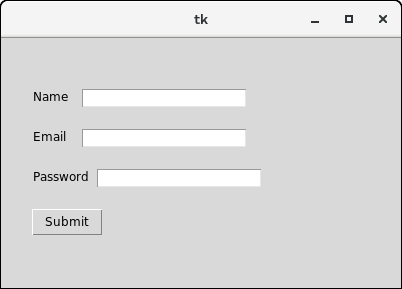
# !/usr/bin/python3

from tkinter import *

top = Tk()

top.geometry("400x250")

name = Label(top, text = "Name").place(x = 30,y = 50)

email = Label(top, text = "Email").place(x = 30, y = 90)

password = Label(top, text = "Password").place(x = 30, y = 130)

sbmitbtn = Button(top, text = "Submit",activebackground = "pink", activeforeground = "blue").place(x = 30, y = 170)

e1 = Entry(top).place(x = 80, y = 50)


e2 = Entry(top).place(x = 80, y = 90)


e3 = Entry(top).place(x = 95, y = 130)

top.mainloop()
输出:

输入框控件方法
Python提供了各种方法来配置在小部件内输入的数据。Entry小部件提供了以下方法:
| SN | 方法 | 描述 |
|---|---|---|
| 1 | delete(first, last = none) | 用于删除部件内指定的字符。 |
| 2 | get() | 用于获取部件内的文本。 |
| 3 | icursor(index) | 用于更改插入光标的位置。可以指定光标放置在之前的字符的索引。 |
| 4 | index(index) | 用于将光标放置在指定索引处写的字符的左边。 |
| 5 | insert(index,s) | 用于在指定索引处放置的字符之前插入指定的字符串。 |
| 6 | select_adjust(index) | 包括选择指定索引处的字符。 |
| 7 | select_clear() | 如果已经选择了一些文本,则清除选择。 |
| 8 | select_form(index) | 将锚点索引位置设置为由索引指定的字符。 |
| 9 | select_present() | 如果Entry中有选定的文本,则返回true,否则返回false。 |
| 10 | select_range(start,end) | 选择存在于指定范围之间的字符。 |
| 11 | select_to(index) | 从开头到指定索引选择所有字符。 |
| 12 | xview(index) | 用于将部件与水平滚动条链接起来。 |
| 13 | xview_scroll(number,what) | 用于使输入框可以水平滚动。 |
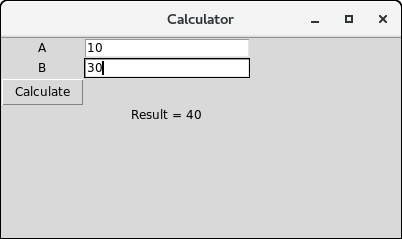
示例:一个简单的计算器
import tkinter as tk
from functools import partial


def call_result(label_result, n1, n2):
    num1 = (n1.get())
    num2 = (n2.get())
    result = int(num1)+int(num2)
    label_result.config(text="Result = %d" % result)
    return

root = tk.Tk()
root.geometry('400x200+100+200')

root.title('Calculator')

number1 = tk.StringVar()
number2 = tk.StringVar()

labelNum1 = tk.Label(root, text="A").grid(row=1, column=0)

labelNum2 = tk.Label(root, text="B").grid(row=2, column=0)

labelResult = tk.Label(root)

labelResult.grid(row=7, column=2)

entryNum1 = tk.Entry(root, textvariable=number1).grid(row=1, column=2)

entryNum2 = tk.Entry(root, textvariable=number2).grid(row=2, column=2)

call_result = partial(call_result, labelResult, number1, number2)

buttonCal = tk.Button(root, text="Calculate", command=call_result).grid(row=3, column=0)

root.mainloop()
输出:

 极客笔记
极客笔记