Tkinter 拖曳Listbox中的项目
在建立Listbox的过程中,另一个很重要的应用是可以拖曳选项,下面将以实例讲解这方面的应用。
示例1
先建立Listbox,然后可以拖曳所选的项目。
from tkinter import *
def getIndex(event):                 # 处理单击选项
    lb.index = lb.nearest(event.y)   # 目前选项的索引
cnt = 0
def dragJob(event):
    newIndex = lb.nearest(event.y)

    global cnt
    cnt += 1
    print("**********************",cnt)
    if newIndex < lb.index:
        x = lb.get(newIndex)
        lb.delete(newIndex)
        lb.insert(newIndex+1,x)
        lb.index = newIndex
        print("Upward adjustment successfully...")
    elif newIndex > lb.index:
        x = lb.get(newIndex)
        lb.delete(newIndex)
        lb.insert(newIndex-1,x)
        lb.index = newIndex
        print("Downward adjustment successfully...")

fruits = [
    "Banana","Watermelon","Pineapple",
    "Orange","Grapes","Mango"
]

root = Tk()
root.title("apidemos.com")        # 窗口标题
# root.geometry("300x250")     # 窗口宽300高210

lb = Listbox(root)            # 建立Listbox
for fruit in fruits:          # 建立水果项目
    lb.insert(END,fruit)
    lb.bind("<Button-1>",getIndex)
    lb.bind("<B1-Motion>",dragJob)
lb.pack(padx=10,pady=10)

root.mainloop()
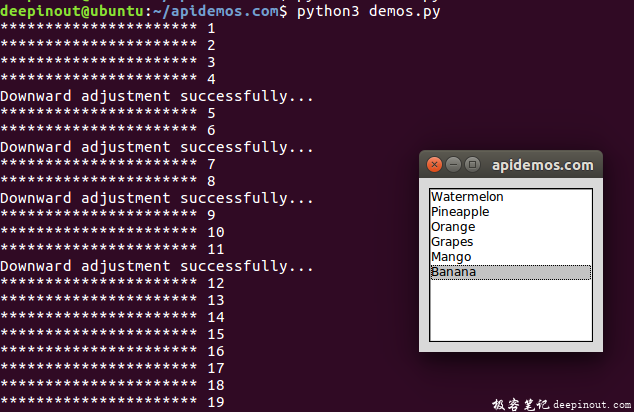
输出:

这个程序中在第3、6行使用了下列方法。
nearest(event.y)上述代码行可以传回最接近y坐标在Listbox中的索引。当有单击操作时会触发getIndex( )方法,第4行可以传回目前选项的索引。在拖曳过程中会触发dragJob()方法,在第7行可以传回新选项的索引,在拖曳过程中这个方法会不断地被触发,至于会被触发多少次视移动速度而定。
若是以上述实例而言,目前选项Watermelon的索引是1,拖曳处理的过程如下。参考示例1代码的执行过程,是往下移动,整个流程说明如下。
(1)新索引位置是2。
(2)获得索引2的内容Pineapple,可参考第13行。
(3)删除索引2的内容Pineapple,可参考第14行。
(4)将Pineapple的内容插入,相当于插入索引1位置,可参考第16行。
(5)这时目前选项Watermelon的索引变成2,这样就达到移动选项的目的了,可参考第16行。
 极客笔记
极客笔记