Matplotlib柱状图注释:如何在柱状图中添加标注
参考:How To Annotate Bars in Barplot with Matplotlib
Matplotlib是Python中最流行的数据可视化库之一,它提供了丰富的绘图功能,其中柱状图(Bar Plot)是一种常用的图表类型。在数据分析和展示中,为柱状图添加注释可以让图表更加信息丰富、易于理解。本文将详细介绍如何使用Matplotlib在柱状图中添加各种类型的注释,包括文本标签、箭头、形状等,以增强图表的可读性和表现力。
1. 基础柱状图绘制
在开始添加注释之前,我们先来回顾一下如何使用Matplotlib绘制基础的柱状图。柱状图通常用于比较不同类别的数据。
import matplotlib.pyplot as plt
import numpy as np

categories = ['A', 'B', 'C', 'D']
values = [25, 40, 30, 55]

plt.figure(figsize=(10, 6))
plt.bar(categories, values)
plt.title('Basic Bar Plot - how2matplotlib.com')
plt.xlabel('Categories')
plt.ylabel('Values')
plt.show()
Output:
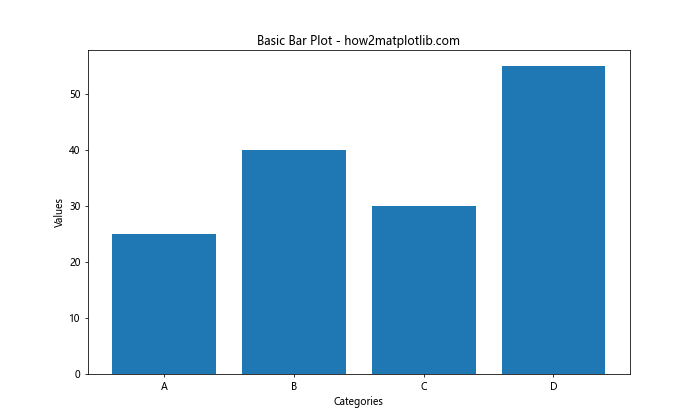
这段代码创建了一个简单的柱状图,包含四个类别和对应的数值。plt.bar()函数是创建柱状图的核心,它接受两个主要参数:类别标签和对应的数值。
2. 在柱子顶部添加数值标签
最常见的注释方式是在每个柱子的顶部添加对应的数值。这可以让读者快速获取精确的数据信息。
import matplotlib.pyplot as plt
import numpy as np

categories = ['A', 'B', 'C', 'D']
values = [25, 40, 30, 55]

plt.figure(figsize=(10, 6))
bars = plt.bar(categories, values)

for bar in bars:
    height = bar.get_height()
    plt.text(bar.get_x() + bar.get_width()/2., height,
             f'{height}',
             ha='center', va='bottom')

plt.title('Bar Plot with Value Labels - how2matplotlib.com')
plt.xlabel('Categories')
plt.ylabel('Values')
plt.show()
Output:
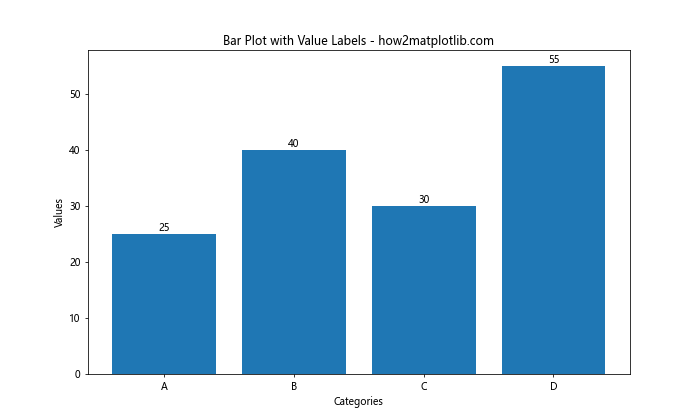
在这个例子中,我们遍历每个柱子(bar对象),获取其高度,然后使用plt.text()函数在柱子顶部添加文本。ha='center'和va='bottom'参数用于调整文本的水平和垂直对齐方式。
3. 自定义标签样式
我们可以进一步自定义标签的样式,比如改变字体大小、颜色,或者添加背景等。
import matplotlib.pyplot as plt
import numpy as np

categories = ['A', 'B', 'C', 'D']
values = [25, 40, 30, 55]

plt.figure(figsize=(10, 6))
bars = plt.bar(categories, values)

for bar in bars:
    height = bar.get_height()
    plt.text(bar.get_x() + bar.get_width()/2., height,
             f'{height}',
             ha='center', va='bottom',
             fontsize=12, fontweight='bold', color='red',
             bbox=dict(facecolor='white', edgecolor='none', alpha=0.7))

plt.title('Bar Plot with Styled Labels - how2matplotlib.com')
plt.xlabel('Categories')
plt.ylabel('Values')
plt.show()
Output:
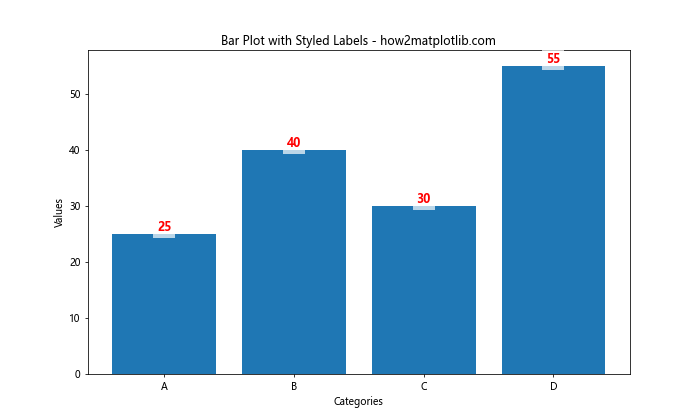
在这个例子中,我们为文本添加了更多的样式属性:
– fontsize:设置字体大小
– fontweight:设置字体粗细
– color:设置文本颜色
– bbox:添加文本背景框,可以提高标签的可读性
4. 添加百分比标签
在某些情况下,显示百分比可能比显示原始数值更有意义。我们可以轻松地将数值转换为百分比并显示。
import matplotlib.pyplot as plt
import numpy as np

categories = ['A', 'B', 'C', 'D']
values = [25, 40, 30, 55]
total = sum(values)

plt.figure(figsize=(10, 6))
bars = plt.bar(categories, values)

for bar in bars:
    height = bar.get_height()
    percentage = height / total * 100
    plt.text(bar.get_x() + bar.get_width()/2., height,
             f'{percentage:.1f}%',
             ha='center', va='bottom')

plt.title('Bar Plot with Percentage Labels - how2matplotlib.com')
plt.xlabel('Categories')
plt.ylabel('Values')
plt.show()
Output:
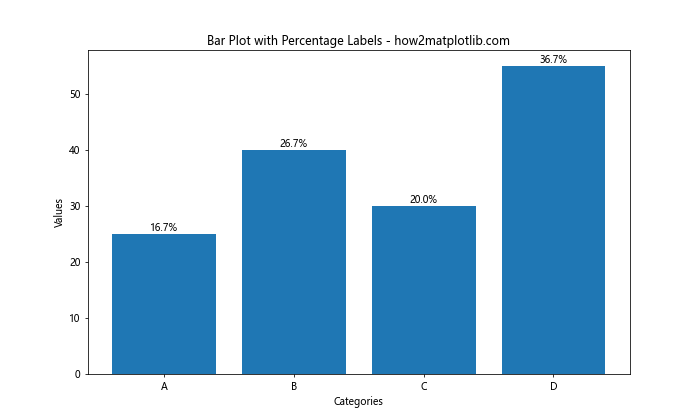
这个例子计算了每个值占总和的百分比,并将其显示在柱子顶部。.1f格式说明符用于将百分比限制为一位小数。
5. 在柱子内部添加标签
有时,将标签放在柱子内部可能更美观或更节省空间,特别是当数值较大时。
import matplotlib.pyplot as plt
import numpy as np

categories = ['A', 'B', 'C', 'D']
values = [250, 400, 300, 550]

plt.figure(figsize=(10, 6))
bars = plt.bar(categories, values)

for bar in bars:
    height = bar.get_height()
    plt.text(bar.get_x() + bar.get_width()/2., height/2,
             f'{height}',
             ha='center', va='center',
             color='white', fontweight='bold')

plt.title('Bar Plot with Inside Labels - how2matplotlib.com')
plt.xlabel('Categories')
plt.ylabel('Values')
plt.show()
Output:
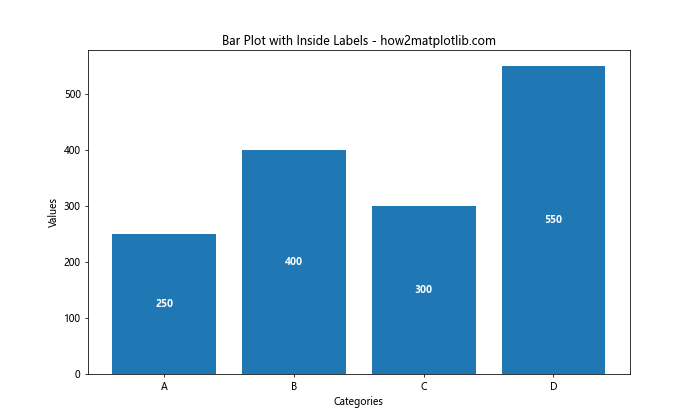
在这个例子中,我们将文本位置设置为柱子高度的一半(height/2),并将垂直对齐方式改为'center'。文本颜色设置为白色,以便在深色柱子上清晰可见。
6. 添加箭头注释
除了简单的文本标签,我们还可以使用箭头注释来强调特定的柱子或数据点。
import matplotlib.pyplot as plt
import numpy as np

categories = ['A', 'B', 'C', 'D']
values = [25, 40, 30, 55]

plt.figure(figsize=(10, 6))
bars = plt.bar(categories, values)

max_value = max(values)
max_index = values.index(max_value)

plt.annotate('Highest Value',
             xy=(max_index, max_value),
             xytext=(max_index, max_value + 10),
             ha='center',
             arrowprops=dict(facecolor='black', shrink=0.05))

plt.title('Bar Plot with Arrow Annotation - how2matplotlib.com')
plt.xlabel('Categories')
plt.ylabel('Values')
plt.ylim(0, max(values) + 20)  # Increase y-axis limit to accommodate annotation
plt.show()
Output:
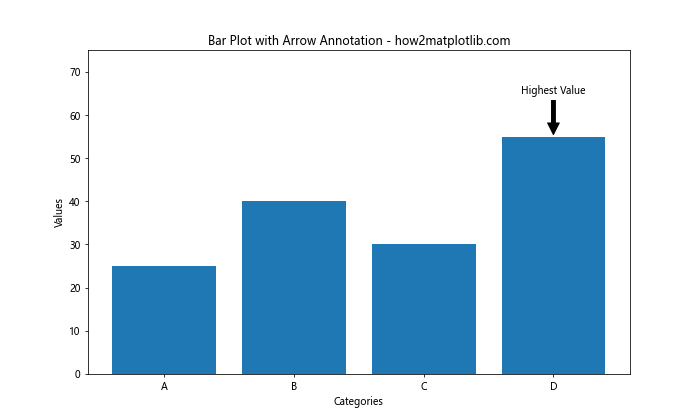
这个例子使用plt.annotate()函数添加了一个箭头注释,指向最高的柱子。xy参数指定箭头的目标位置,xytext参数指定文本的位置,arrowprops参数用于自定义箭头的样式。
7. 水平柱状图的注释
水平柱状图在某些情况下可能更适合,特别是当类别标签较长时。注释水平柱状图的原理与垂直柱状图相似,但需要调整一些参数。
import matplotlib.pyplot as plt
import numpy as np

categories = ['Category A', 'Category B', 'Category C', 'Category D']
values = [25, 40, 30, 55]

plt.figure(figsize=(10, 6))
bars = plt.barh(categories, values)

for bar in bars:
    width = bar.get_width()
    plt.text(width, bar.get_y() + bar.get_height()/2,
             f'{width}',
             ha='left', va='center')

plt.title('Horizontal Bar Plot with Labels - how2matplotlib.com')
plt.xlabel('Values')
plt.ylabel('Categories')
plt.show()
Output:
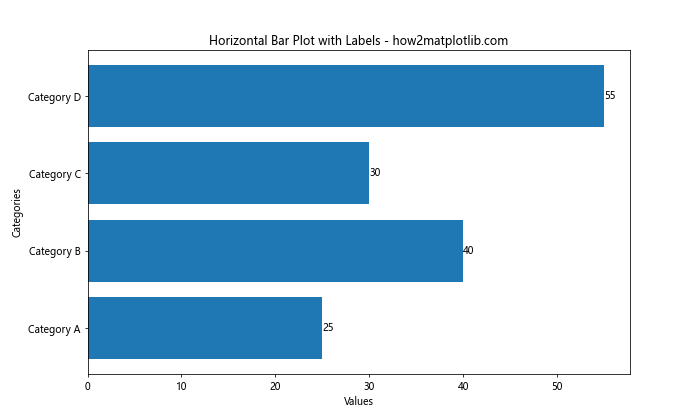
在水平柱状图中,我们使用plt.barh()函数而不是plt.bar()。注释的位置也需要相应调整,使用get_width()而不是get_height()来获取柱子的长度。
8. 堆叠柱状图的注释
堆叠柱状图用于显示多个类别的组成部分。为堆叠柱状图添加注释可以帮助读者理解每个部分的具体数值。
import matplotlib.pyplot as plt
import numpy as np

categories = ['A', 'B', 'C', 'D']
values1 = [20, 35, 30, 35]
values2 = [25, 25, 15, 30]

plt.figure(figsize=(10, 6))
bars1 = plt.bar(categories, values1, label='Group 1')
bars2 = plt.bar(categories, values2, bottom=values1, label='Group 2')

def add_labels(bars):
    for bar in bars:
        height = bar.get_height()
        plt.text(bar.get_x() + bar.get_width()/2., bar.get_y() + height/2,
                 f'{height}',
                 ha='center', va='center')

add_labels(bars1)
add_labels(bars2)

plt.title('Stacked Bar Plot with Labels - how2matplotlib.com')
plt.xlabel('Categories')
plt.ylabel('Values')
plt.legend()
plt.show()
Output:
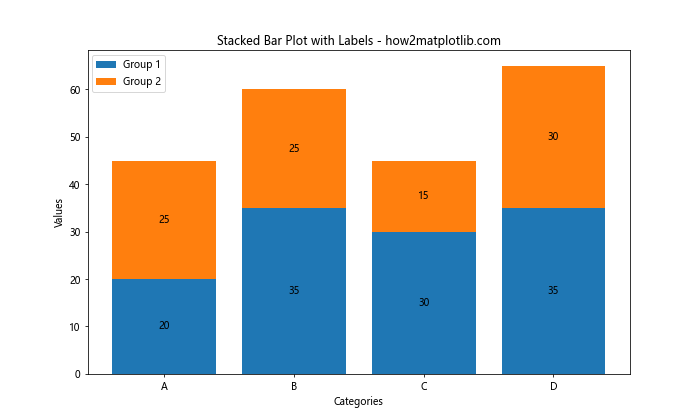
这个例子创建了一个堆叠柱状图,并为每个部分添加了标签。我们定义了一个add_labels函数来复用标签添加的代码。注意,对于第二组柱子,我们使用bottom参数来指定起始位置。
9. 使用不同颜色突出显示特定柱子
有时我们可能想要突出显示某些特定的柱子。我们可以通过改变颜色并添加注释来实现这一点。
import matplotlib.pyplot as plt
import numpy as np

categories = ['A', 'B', 'C', 'D', 'E']
values = [25, 40, 30, 55, 45]
colors = ['blue', 'blue', 'red', 'blue', 'blue']

plt.figure(figsize=(10, 6))
bars = plt.bar(categories, values, color=colors)

for bar in bars:
    height = bar.get_height()
    plt.text(bar.get_x() + bar.get_width()/2., height,
             f'{height}',
             ha='center', va='bottom')

plt.annotate('Highlighted',
             xy=(2, values[2]),
             xytext=(2, values[2] + 5),
             ha='center',
             arrowprops=dict(facecolor='black', shrink=0.05))

plt.title('Bar Plot with Highlighted Bar - how2matplotlib.com')
plt.xlabel('Categories')
plt.ylabel('Values')
plt.show()
Output:
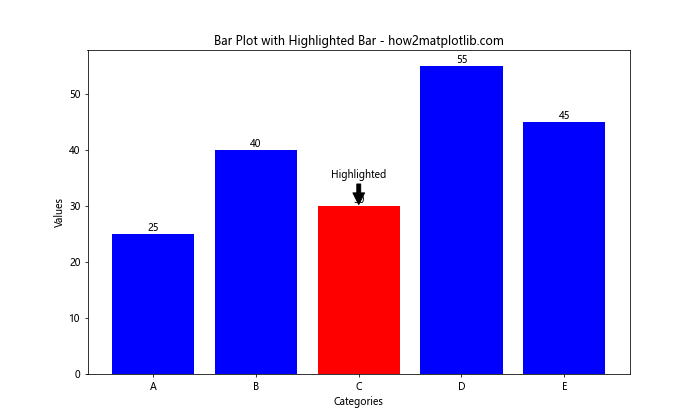
在这个例子中,我们将第三个柱子(索引为2)的颜色设置为红色,并为其添加了一个特殊的箭头注释。这种方法可以有效地引导读者注意到特定的数据点。
10. 添加误差线和注释
在科学数据可视化中,经常需要显示误差范围。我们可以在柱状图中添加误差线,并为其添加注释。
import matplotlib.pyplot as plt
import numpy as np

categories = ['A', 'B', 'C', 'D']
values = [25, 40, 30, 55]
errors = [2, 3, 4, 5]

plt.figure(figsize=(10, 6))
bars = plt.bar(categories, values, yerr=errors, capsize=5)

for bar in bars:
    height = bar.get_height()
    plt.text(bar.get_x() + bar.get_width()/2., height,
             f'{height}±{errors[bars.index(bar)]}',
             ha='center', va='bottom')

plt.title('Bar Plot with Error Bars and Labels - how2matplotlib.com')
plt.xlabel('Categories')
plt.ylabel('Values')
plt.show()
Output:
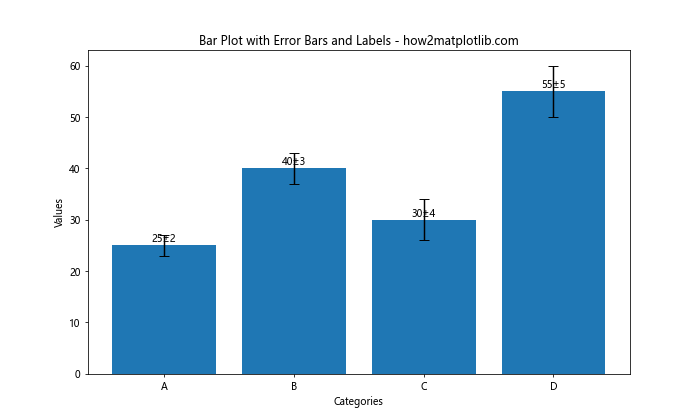
这个例子使用yerr参数添加了误差线,capsize参数设置误差线顶端横线的长度。注释中包含了数值和误差范围。
11. 使用自定义函数进行复杂注释
对于更复杂的注释需求,我们可以创建自定义函数来处理注释的添加。这种方法可以让代码更加模块化和可重用。
import matplotlib.pyplot as plt
import numpy as np

def add_value_labels(ax, spacing=5):
    for rect in ax.patches:
        y_value = rect.get_height()
        x_value = rect.get_x() + rect.get_width() / 2

        label = f"{y_value:.1f}"

        ax.annotate(label,
                    (x_value, y_value),
                    xytext=(0, spacing),
                    textcoords="offset points",
                    ha='center', va='bottom')

categories = ['A', 'B', 'C', 'D']
values = [25.3, 40.9, 30.1, 55.5]

fig, ax = plt.subplots(figsize=(10, 6))
bars = ax.bar(categories, values)

add_value_labels(ax)

plt.title('Bar Plot with Custom Annotation Function - how2matplotlib.com')
plt.xlabel('Categories')
plt.ylabel('Values')
plt.show()
Output:
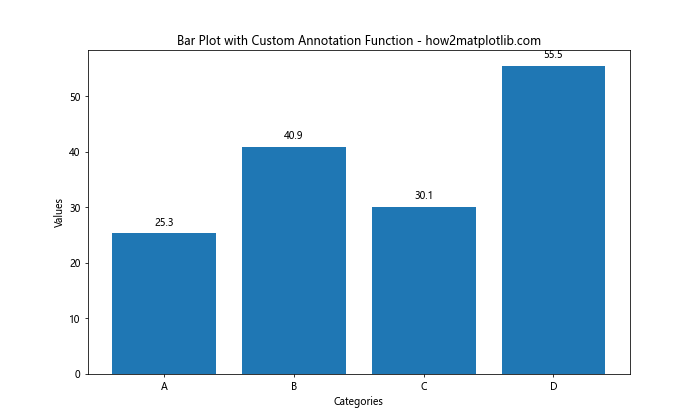
这个例子定义了一个add_value_labels函数,它可以自动为柱状图添加数值标签。这个函数可以轻松地应用于不同的图表,提高了代码的复用性。
12. 在柱子上添加图标或符号
有时,我们可能想在柱子上添加图标或符号,而不仅仅是文本。这可以通过使用Matplotlib的文本渲染功能来实现
import matplotlib.pyplot as plt
import numpy as np

categories = ['A', 'B', 'C', 'D']
values = [25, 40, 30, 55]

plt.figure(figsize=(10, 6))
bars = plt.bar(categories, values)

for bar in bars:
    height = bar.get_height()
    plt.text(bar.get_x() + bar.get_width()/2., height,
             '↑' if height > 35 else '↓',
             ha='center', va='bottom', fontsize=20)

plt.title('Bar Plot with Symbol Annotations - how2matplotlib.com')
plt.xlabel('Categories')
plt.ylabel('Values')
plt.show()
这个例子在每个柱子顶部添加了上箭头或下箭头符号,根据数值是否超过35来决定。这种方法可以快速直观地表示数据的高低。
13. 添加多行注释
当我们需要在注释中包含多个信息时,可以使用多行文本。
import matplotlib.pyplot as plt
import numpy as np

categories = ['A', 'B', 'C', 'D']
values = [25, 40, 30, 55]
percentages = [v / sum(values) * 100 for v in values]

plt.figure(figsize=(10, 6))
bars = plt.bar(categories, values)

for bar, percentage in zip(bars, percentages):
    height = bar.get_height()
    plt.text(bar.get_x() + bar.get_width()/2., height,
             f'Value: {height}\n{percentage:.1f}%',
             ha='center', va='bottom',
             multialignment='center')

plt.title('Bar Plot with Multi-line Annotations - how2matplotlib.com')
plt.xlabel('Categories')
plt.ylabel('Values')
plt.show()
这个例子在每个柱子上方添加了两行注释,显示原始值和百分比。multialignment参数用于设置多行文本的对齐方式。
14. 使用条件格式化注释
我们可以根据数据的特定条件来改变注释的样式或内容。
import matplotlib.pyplot as plt
import numpy as np

categories = ['A', 'B', 'C', 'D', 'E']
values = [25, 40, 30, 55, 45]

plt.figure(figsize=(10, 6))
bars = plt.bar(categories, values)

for bar in bars:
    height = bar.get_height()
    color = 'green' if height > 40 else 'red'
    label = f'{height}\n{"High" if height > 40 else "Low"}'
    plt.text(bar.get_x() + bar.get_width()/2., height,
             label,
             ha='center', va='bottom',
             color=color, fontweight='bold')

plt.title('Bar Plot with Conditional Annotations - how2matplotlib.com')
plt.xlabel('Categories')
plt.ylabel('Values')
plt.show()
这个例子根据数值的大小改变了注释的颜色和内容。对于大于40的值,使用绿色并标记为”High”;否则使用红色并标记为”Low”。
15. 在柱子之间添加比较箭头
有时我们可能想要直观地展示柱子之间的差异。我们可以使用箭头来实现这一点。
import matplotlib.pyplot as plt
import numpy as np

categories = ['A', 'B', 'C', 'D']
values = [25, 40, 30, 55]

plt.figure(figsize=(12, 6))
bars = plt.bar(categories, values)

for i in range(len(bars) - 1):
    start = bars[i]
    end = bars[i+1]
    plt.annotate('',
                 xy=(end.get_x() + end.get_width()/2, max(start.get_height(), end.get_height())),
                 xytext=(start.get_x() + start.get_width()/2, max(start.get_height(), end.get_height())),
                 arrowprops=dict(arrowstyle='<->', color='red'))

    diff = end.get_height() - start.get_height()
    plt.text((start.get_x() + end.get_x() + end.get_width())/2,
             max(start.get_height(), end.get_height()) + 1,
             f'{abs(diff):.1f}',
             ha='center', va='bottom')

plt.title('Bar Plot with Comparison Arrows - how2matplotlib.com')
plt.xlabel('Categories')
plt.ylabel('Values')
plt.ylim(0, max(values) * 1.2)
plt.show()
这个例子在相邻的柱子之间添加了双向箭头,并在箭头上方标注了差值。这种方法可以直观地展示数据点之间的变化。
16. 使用文本框进行详细注释
对于需要更多解释的数据点,我们可以使用文本框来添加详细的注释。
import matplotlib.pyplot as plt
import numpy as np

categories = ['A', 'B', 'C', 'D']
values = [25, 40, 30, 55]

plt.figure(figsize=(12, 6))
bars = plt.bar(categories, values)

max_value = max(values)
max_index = values.index(max_value)

plt.annotate(f'Highest value: {max_value}\nCategory: {categories[max_index]}\nThis is 37.5% higher than the average',
             xy=(max_index, max_value),
             xytext=(max_index + 0.5, max_value),
             ha='left', va='center',
             bbox=dict(boxstyle='round,pad=0.5', fc='yellow', alpha=0.5),
             arrowprops=dict(arrowstyle='->', connectionstyle='arc3,rad=0'))

plt.title('Bar Plot with Detailed Annotation - how2matplotlib.com')
plt.xlabel('Categories')
plt.ylabel('Values')
plt.ylim(0, max(values) * 1.2)
plt.show()
这个例子为最高的柱子添加了一个详细的文本框注释,包含了多行信息。bbox参数用于设置文本框的样式,arrowprops参数用于自定义指向箭头。
17. 在柱子内部添加渐变色注释
为了增加视觉吸引力,我们可以在柱子内部添加渐变色的注释。
import matplotlib.pyplot as plt
import numpy as np
from matplotlib.patches import Rectangle

categories = ['A', 'B', 'C', 'D']
values = [25, 40, 30, 55]

fig, ax = plt.subplots(figsize=(10, 6))
bars = ax.bar(categories, values)

for bar in bars:
    height = bar.get_height()
    width = bar.get_width()
    x = bar.get_x()

    # Create gradient
    gradient = np.linspace(0, 1, 100).reshape(1, -1)
    ax.imshow(gradient, extent=[x, x+width, 0, height], aspect='auto', zorder=0, cmap='Blues')

    # Add text
    ax.text(x + width/2, height/2, f'{height}', ha='center', va='center', color='white', fontweight='bold')

plt.title('Bar Plot with Gradient Annotations - how2matplotlib.com')
plt.xlabel('Categories')
plt.ylabel('Values')
plt.show()
这个例子使用imshow函数在每个柱子内部创建了一个蓝色渐变效果,并在渐变背景上添加了白色的数值标签。这种方法可以创造出独特的视觉效果。
18. 添加带有连接线的注释
有时,我们可能想要在图表的空白区域添加注释,并用线条连接到相应的柱子。
import matplotlib.pyplot as plt
import numpy as np

categories = ['A', 'B', 'C', 'D']
values = [25, 40, 30, 55]

fig, ax = plt.subplots(figsize=(12, 6))
bars = ax.bar(categories, values)

for i, bar in enumerate(bars):
    height = bar.get_height()
    ax.text(bar.get_x() + bar.get_width()/2, height,
            f'{height}',
            ha='center', va='bottom')

    if i % 2 == 0:  # Add detailed annotation for every other bar
        ax.annotate(f'Details for {categories[i]}:\nValue: {height}\nRank: {sorted(values, reverse=True).index(height) + 1}',
                    xy=(bar.get_x() + bar.get_width()/2, height),
                    xytext=(bar.get_x() + bar.get_width()/2, max(values) * 1.1),
                    ha='center', va='bottom',
                    bbox=dict(boxstyle='round,pad=0.5', fc='yellow', alpha=0.5),
                    arrowprops=dict(arrowstyle='-', connectionstyle='arc3,rad=0'))

plt.title('Bar Plot with Connected Annotations - how2matplotlib.com')
plt.xlabel('Categories')
plt.ylabel('Values')
plt.ylim(0, max(values) * 1.3)
plt.show()
这个例子为每隔一个柱子添加了一个详细的注释框,并用线条连接到相应的柱子。这种方法可以在不影响主图表清晰度的情况下提供额外的信息。
19. 使用极坐标系创建圆形柱状图并添加注释
为了创造独特的视觉效果,我们可以使用极坐标系创建圆形柱状图,并为其添加注释。
import matplotlib.pyplot as plt
import numpy as np

categories = ['A', 'B', 'C', 'D', 'E', 'F', 'G', 'H']
values = [25, 40, 30, 55, 45, 35, 50, 20]

fig, ax = plt.subplots(figsize=(10, 10), subplot_kw=dict(projection='polar'))
theta = np.linspace(0, 2*np.pi, len(categories), endpoint=False)
width = 2*np.pi / len(categories)

bars = ax.bar(theta, values, width=width, bottom=10)

for bar, angle, value in zip(bars, theta, values):
    height = bar.get_height()
    ax.text(angle, 10 + height, f'{value}',
            ha='center', va='center',
            rotation=angle*180/np.pi - 90,
            rotation_mode='anchor')

ax.set_xticks(theta)
ax.set_xticklabels(categories)
ax.set_ylim(0, max(values) + 20)
plt.title('Circular Bar Plot with Annotations - how2matplotlib.com')
plt.show()
这个例子创建了一个圆形柱状图,并在每个柱子的顶部添加了数值标签。注意,我们需要调整文本的旋转角度以确保其可读性。
20. 使用表格形式的注释
对于某些类型的数据,使用表格形式的注释可能更加清晰和信息丰富。
import matplotlib.pyplot as plt
import numpy as np

categories = ['A', 'B', 'C', 'D']
values = [25, 40, 30, 55]
percentages = [v / sum(values) * 100 for v in values]

fig, (ax1, ax2) = plt.subplots(1, 2, figsize=(15, 6), gridspec_kw={'width_ratios': [2, 1]})

bars = ax1.bar(categories, values)

for bar in bars:
    height = bar.get_height()
    ax1.text(bar.get_x() + bar.get_width()/2, height,
             f'{height}',
             ha='center', va='bottom')

ax1.set_title('Bar Plot - how2matplotlib.com')
ax1.set_xlabel('Categories')
ax1.set_ylabel('Values')

table_data = [categories, values, [f'{p:.1f}%' for p in percentages]]
table = ax2.table(cellText=table_data,
                  rowLabels=['Category', 'Value', 'Percentage'],
                  colWidths=[0.2] * len(categories),
                  loc='center')
table.auto_set_font_size(False)
table.set_fontsize(10)
table.scale(1.2, 1.2)
ax2.axis('off')

plt.suptitle('Bar Plot with Table Annotation - how2matplotlib.com', fontsize=16)
plt.tight_layout()
plt.show()
这个例子创建了一个柱状图和一个相邻的表格。表格包含了类别、数值和百分比信息,提供了一种更结构化的方式来呈现数据。
总结:
本文详细介绍了如何在Matplotlib中为柱状图添加各种类型的注释。我们探讨了从基本的数值标签到复杂的条件格式化注释,从简单的文本到带有箭头和背景的详细说明。这些技术可以大大增强数据可视化的信息量和可读性。
关键点包括:
1. 使用plt.text()和plt.annotate()函数添加基本注释
2. 自定义注释的样式,包括字体、颜色和背景
3. 根据数据条件动态调整注释内容和样式
4. 使用箭头和线条连接注释和数据点
5. 在特殊图表(如堆叠柱状图和极坐标图)中添加注释
6. 使用自定义函数实现复杂的注释逻辑
7. 结合其他可视化元素(如表格)来增强信息展示
通过掌握这些技术,数据分析师和可视化专家可以创建更加丰富、信息量大且易于理解的图表。在实际应用中,应根据数据的特性和目标受众的需求来选择最合适的注释方式。同时,要注意保持图表的整体美观和清晰,避免过度注释导致视觉混乱。
在实际应用中,选择合适的注释方式时还需要考虑以下几点:
- 数据的复杂性:对于简单的数据集,基本的数值标签可能就足够了。但对于复杂的数据集,可能需要使用多行注释或额外的图形元素来充分解释数据。
-
目标受众:考虑谁将会查看这些图表。专业人士可能更关注精确的数值,而普通受众可能更喜欢直观的视觉元素。
-
展示环境:考虑图表将在何处展示。例如,在演示文稿中使用的图表可能需要更大、更醒目的注释,而在学术论文中使用的图表可能需要更精确、更详细的注释。
-
颜色和对比度:确保注释的颜色与背景形成良好的对比,以保证可读性。同时,考虑色盲友好的配色方案。
-
一致性:如果在同一份报告或演示中使用多个图表,保持注释风格的一致性可以提高整体的专业性和可读性。
-
交互性:如果图表将在交互式环境中使用(如网页或数据仪表板),可以考虑使用鼠标悬停或点击触发的动态注释。
-
数据更新:如果数据会定期更新,考虑设计一个可以自动更新注释的系统,以减少手动工作。
-
图表大小:注意注释不应该占据过多空间,以免喧宾夺主。在有限的空间内,可能需要使用缩写或符号来传达信息。
-
法律和道德考虑:在某些情况下,可能需要在注释中包含数据来源或免责声明。
-
美学平衡:注释应该增强图表的信息价值,而不是破坏其视觉吸引力。寻求信息量和美观度之间的平衡。
最后,熟练掌握Matplotlib的各种功能对于创建高质量的数据可视化至关重要。本文介绍的技术只是Matplotlib强大功能的一小部分。建议读者继续探索Matplotlib的其他特性,如自定义颜色映射、3D绘图、动画等,以进一步提升数据可视化技能。
同时,也要记住,好的数据可视化不仅仅依赖于技术实现,更重要的是对数据的深入理解和清晰的表达意图。在选择和实现注释时,始终要问自己:这个注释是否有助于更好地理解数据?是否突出了关键信息?是否可能引起误解?通过不断实践和反思,你将能够创建出既美观又富有洞察力的数据可视化作品。
在数据科学和商业智能领域,优秀的数据可视化技能越来越受到重视。掌握如何恰当地为图表添加注释,将使你的工作成果更加出色,更容易被理解和接受。无论是在学术研究、商业报告还是数据新闻中,这些技能都将大有用武之地。
继续学习和实践,不断挑战自己创建更复杂、更有意义的可视化。记住,每一个伟大的数据故事背后,都有一个精心设计的可视化来支撑它。通过本文学到的技巧,你已经向成为数据可视化专家迈出了重要的一步。继续探索,继续创新,你的数据可视化之旅才刚刚开始!
 极客笔记
极客笔记